Integrate Arduino Projects with Python Using PyFirmata and Computer Vision
Tired of blinking LEDs and staring at the Serial Monitor?
What if you could control your Arduino just by waving your hand? Not with a clunky sensor, but with your actual fingers — using your computer’s webcam and the magic of AI.
In this tutorial, you’ll learn how to connect Python and Arduino using PyFirmata, allowing Python to directly control Arduino pins without uploading new sketches every time. As a practical example, we’ll create a futuristic project that controls a lamp brightness based on the distance between your thumb and index finger using MediaPipe Hand Tracking and OpenCV.
We’ll connect Python + OpenCV + MediaPipe to an Arduino using PyFirmata — no firmware flashing, no messy C++. Let’s go. ⚡
You Will Learn:
✔ How PyFirmata works
✔ How to connect Python to Arduino
✔ How to control Arduino pins directly from Python
✔ How to use OpenCV for real-time webcam processing
✔ How to detect hand landmarks using MediaPipe
✔ How to control LED brightness using finger gestures
Project Demo
Imagine moving your thumb and index finger apart to increase an LED’s brightness and bringing them closer together to dim it.
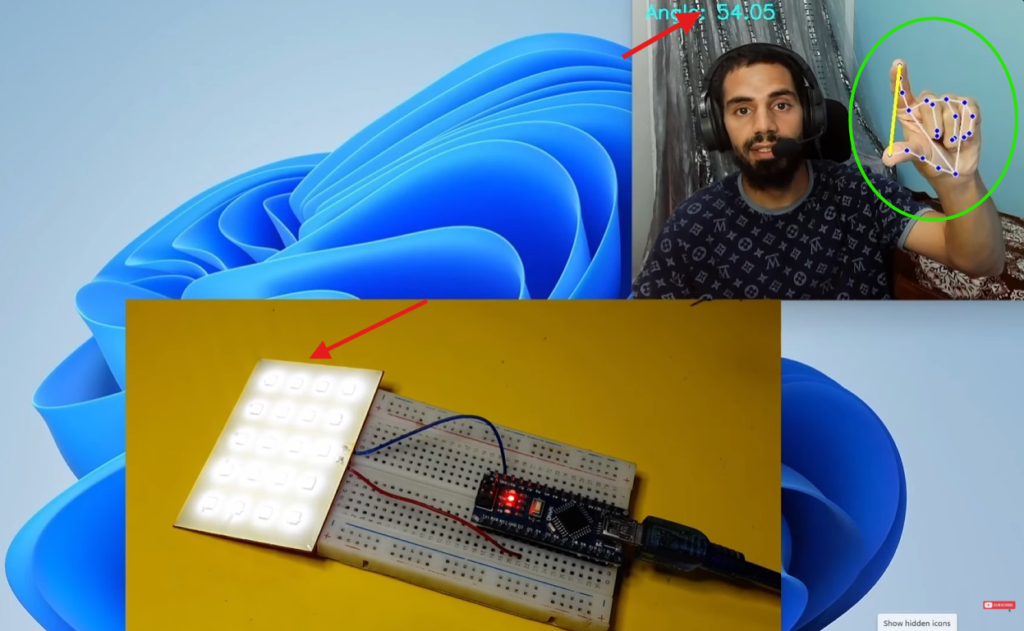
This creates a seamless bridge between computer vision and physical hardware.
📦 What You’ll Need
Hardware:
| Component | Quantity |
|---|---|
| Arduino Uno (or compatible board: Nano/Mega) | 1 |
| 5mm LED (any color) | 1 |
| 220Ω resistor | 1 |
| Breadboard | 1 |
| Jumper wires (male-to-female recommended) | a few |
| Computer with webcam | 1 |
I highly recommend getting a complete starter kit that includes everything you need to create a wide range of projects.
Software:
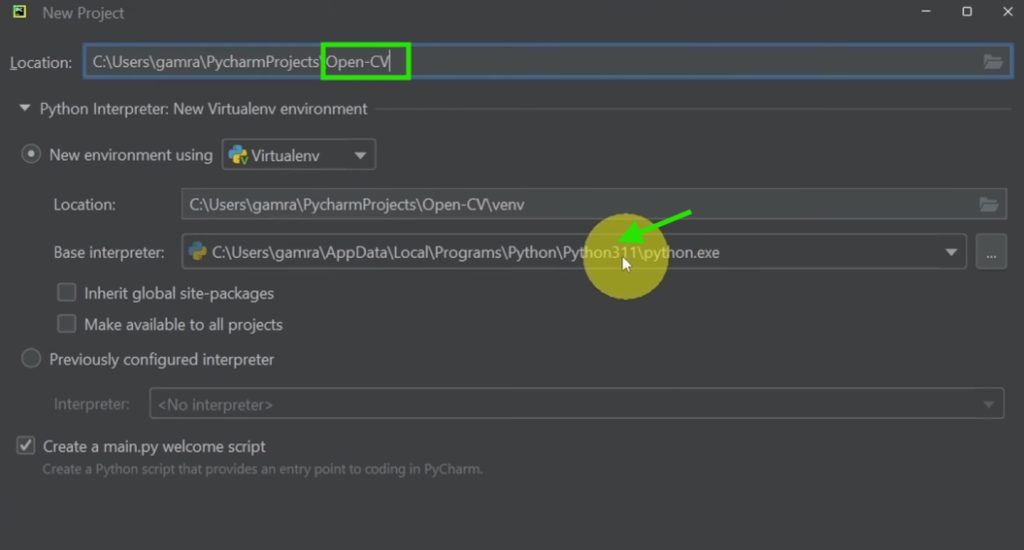
- Python 3.11 (critical – MediaPipe doesn’t yet support 3.12+)
- PyCharm Community Edition (free)
- Arduino IDE (just for one upload)
💡 Why PyCharm? It gives you code completion, debugging, and a unified workspace for both Python and Arduino control.
🔧 Step 1: Upload the StandardFirmata Sketch
Normally, Arduino runs a sketch that contains all the logic. With PyFirmata, Arduino becomes an I/O device that receives commands from Python.
To use Pyfirmata, you only have to open the Arduino IDE and navigate to:
File → Examples → Firmata → StandardFirmataNext, select your Arduino Board and upload the sketch/firmware.
This enables communication between Arduino and Python, which means Python can directly:
- Read sensors
- Control LEDs
- Move servos
- Operate motors
- Communicate with external APIs
- Use AI and computer vision
🧪 Step 2: Test PyFirmata Communication
Now we can create a new Python project using PyCharm.
Next, copy and paste this code under the main.py file:
from pyfirmata2 import Arduino
import time
board = Arduino('COM5')
led = board.get_pin('d:13:o')
while True:
led.write(1)
time.sleep(1)
led.write(0)
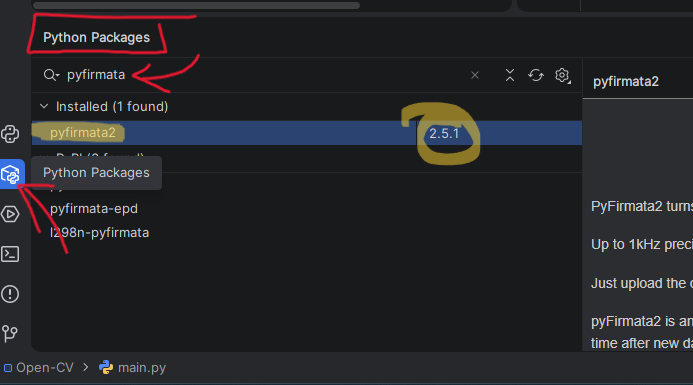
time.sleep(1)First, make sure to install the pyfirmata2 package:
And replace your Arduino port: “COM5“:
- Windows: COM3, COM4, COM5
- Linux: /dev/ttyACM0
- macOS: /dev/cu.usbmodemXXXX
Finally, run the code using the green “Play” button. If the LED blinks, it means the communication is working successfully.
Step 3: Understand MediaPipe Hand Tracking
MediaPipe is an open-source framework developed by Google that provides powerful machine learning solutions for computer vision, face detection, pose estimation, object tracking, and hand tracking.
In this project, we use the MediaPipe Hands solution to detect and track hand movements in real time using a webcam.

MediaPipe can detect 21 landmarks on a hand:

Important landmarks:
- Thumb tip → ID 4
- Index finger tip → ID 8
We’ll measure the distance between these two points.
🐍 Step 4: The Complete Python Code
Open PyCharm and create a new Python project named Gesture-Control.
Your project structure will initially look like this:
Gesture-Control/
│
└── main.py
Copy the code below. Change the PORT variable to match your Arduino.
# STEP 1: Import the necessary modules.
import cv2
import numpy as np
import mediapipe as mp
from mediapipe.tasks import python
from mediapipe.tasks.python import vision
from pyfirmata2 import Arduino, util
import time

# ========== CONFIGURATION ==========
PORT = 'COM5'        # CHANGE THIS to your Arduino port
LED_PIN = 9          # PWM pin on Arduino
# ===================================

# --- 1. Connect to Arduino via PyFirmata ---
print("Connecting to Arduino...")
board = Arduino(PORT)

# Start iterator to avoid buffer overflow
iterator = util.Iterator(board)
iterator.start()
time.sleep(2)

led = board.get_pin(f'd:{LED_PIN}:p')  # 'p' = PWM output
print("✅ Arduino ready")


# --- 2. Setup MediaPipe Hand Tracking ---
base_options = python.BaseOptions(model_asset_path='hand_landmarker.task')
options = vision.HandLandmarkerOptions(base_options=base_options,
                                       num_hands=2)
detector = vision.HandLandmarker.create_from_options(options)


# --- 3. Start Webcam ---
# !! Use CAP_DSHOW to bypass default Windows 11 backend issues
cap = cv2.VideoCapture(0, cv2.CAP_DSHOW)
print("📸 Webcam started. Show your hand to the camera.")
print("👉 Press 'q' to quit.")

while cap.isOpened():
    success, frame = cap.read()
    if not success:
        continue

    # Mirror image for natural feel
    frame = cv2.flip(frame, 1)
    h, w, _ = frame.shape

    # Convert BGR -> RGB for MediaPipe
    rgb = cv2.cvtColor(frame, cv2.COLOR_BGR2RGB)

    # Load the input image from a numpy array.
    mp_image = mp.Image(image_format=mp.ImageFormat.SRGB, data=rgb)

    # Detect hand landmarks from the input image.
    result = detector.detect(mp_image)
    # Default brightness (if no hand detected)
    brightness = 0.0
    print(result)

    print("Hands detected:", len(result.hand_landmarks))

    if result.hand_landmarks:
        for hand_landmarks in result.hand_landmarks:
            # Draw all 21 landmarks
            #mp_draw.draw_landmarks(frame, hand_landmarks, mp_hands.HAND_CONNECTIONS)

            # Get thumb tip (ID 4) and index tip (ID 8)
            thumb = hand_landmarks[4]
            index = hand_landmarks[8]

            # Convert normalized coordinates to pixel positions
            x1, y1 = int(thumb.x * w), int(thumb.y * h)
            x2, y2 = int(index.x * w), int(index.y * h)

            # Draw circles and line
            cv2.circle(frame, (x1, y1), 10, (255, 0, 0), cv2.FILLED)
            cv2.circle(frame, (x2, y2), 10, (255, 0, 0), cv2.FILLED)
            cv2.line(frame, (x1, y1), (x2, y2), (0, 255, 255), 3)

            # Euclidean distance between fingertips
            distance = np.linalg.norm([x2 - x1, y2 - y1])

            # Map distance (pixels) to LED brightness (0 to 1)
            # Close fingers → distance ~20 → brightness 0 (off)
            # Spread apart → distance ~200 → brightness 1 (full)
            brightness = np.interp(distance, [20, 200], [0, 1])
            brightness = max(0.0, min(1.0, brightness))

            # Send to Arduino
            led.write(brightness)

            # ----- On-screen UI: Brightness bar -----
            bar_height = int(np.interp(brightness, [0, 1], [400, 150]))
            cv2.rectangle(frame, (50, 150), (85, 400), (0, 255, 0), 2)
            cv2.rectangle(frame, (50, bar_height), (85, 400), (0, 255, 0), cv2.FILLED)
            percent = int(brightness * 100)
            cv2.putText(frame, f"{percent}%", (40, 140),
                        cv2.FONT_HERSHEY_SIMPLEX, 1, (0, 255, 0), 2)
            cv2.putText(frame, f"Dist: {int(distance)}px", (10, 50),
                        cv2.FONT_HERSHEY_SIMPLEX, 0.7, (255, 255, 255), 2)

    else:
        # No hand detected → turn LED off
        led.write(0.0)

    # Show the video feed
    cv2.imshow("Gesture Controlled LED", frame)

    if cv2.waitKey(1) & 0xFF == ord('q'):
        break

# --- Cleanup ---
cap.release()
cv2.destroyAllWindows()
board.exit()
print("👋 Goodbye!")
✅ Before running the Python script, you need to :
⭐ Download the Hand Landmarker model used by MediaPipe Tasks.
The code loads the model using:
base_options = python.BaseOptions(model_asset_path='hand_landmarker.task')This means Python will look for a file named:
hand_landmarker.taskSo make sure to place the hand_landmarker.task file in the same directory as your main.py script.
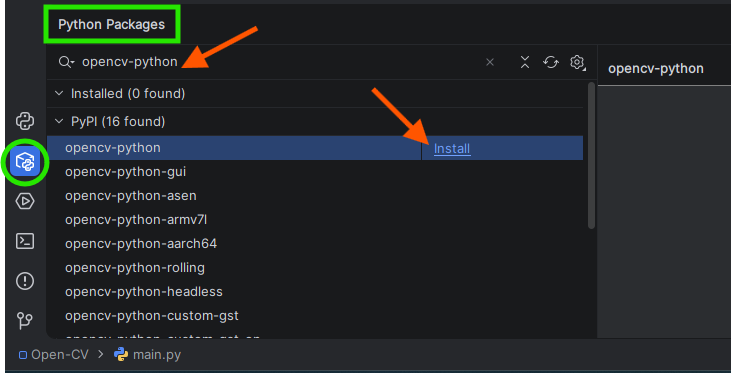
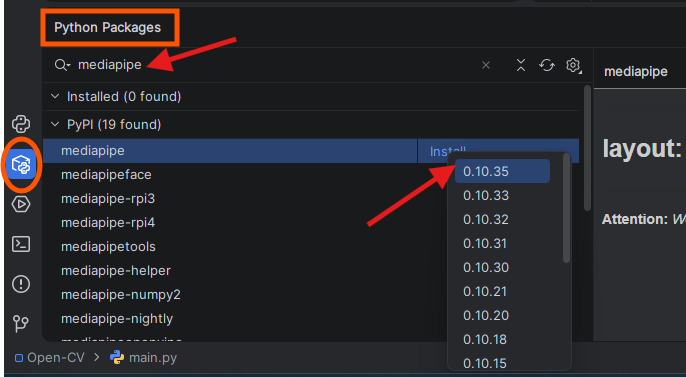
⭐ Install the required Python packages:
| Library | Purpose |
|---|---|
OpenCV (opencv-python) | Capturing and displaying webcam video |
| MediaPipe | Hand tracking and gesture recognition |
| NumPy | Mathematical calculations and distance measurement |
| PyFirmata2 | Communication between Python and Arduino |

🚀 Step 5: Run Your Project
- Save the Python script.
- Make sure your Arduino is connected via USB.
- Open a terminal/command prompt in the script folder.
- Run:
python gesture_led.py
- Show your hand to the webcam.
- Bring thumb and index together → LED dims.
- Spread them apart → LED brightens.
🎉 You just built an AI-powered gesture dimmer.
💡 What to Try Next
Once you’ve mastered the thumb–index dimmer, here’s where to go:
🔹 Animatronic Eye Control
Have you ever wanted to create a robotic eye that follows your hand movements and blinks in response to your gestures?
In this Blog Post, we’ll combine Arduino, Python, MediaPipe Hand Tracking, and Servo Motors to build an animatronic eye controlled entirely by hand gestures.
🔹 Multi‑Gesture Switching
Count fingers using MediaPipe landmarks:
- 1 finger → turn on fan
- 2 fingers → turn on the LED strip
- 3 fingers → play music from Python
🔹 Go Wireless
Replace the USB cable with:
- HC‑05 Bluetooth module (easy, medium range)
- ESP8266/ESP32 (WiFi, cloud logs)
Your Python script would then send brightness via serial to the wireless module instead of directly to the Arduino.
🎯 Final Thoughts
You’ve just broken down the wall between high‑level Python AI and low‑level Arduino hardware — without writing a single line of Arduino C++.
This is the same technique used in:
- Interactive museum exhibits
- DIY prosthetic controls
- Touchless interfaces for hygiene‑sensitive environments
You are no longer limited to buttons and sensors.
Your hands, a webcam, and a few lines of Python can now command the physical world.
📚 Resources & Further Reading
Conclusion
PyFirmata makes Arduino and Python integration incredibly simple. By combining Arduino’s hardware capabilities with Python’s powerful libraries like OpenCV and MediaPipe, you can create advanced interactive projects that would be difficult to implement using Arduino alone.
In this project, you learned how to control LED brightness using hand gestures detected through computer vision, but this is only the beginning. The same techniques can be expanded to control servos, robots, smart home devices, and even AI-powered systems.
The possibilities are truly endless when Arduino and Python work together.