Build Your Own Smart Prayer Mat Counter (Rukoo & Sujood) Using Arduino and Distance Sensor
Keeping track of your Rakats, Rukoo, and Sujood during Salah can be a great solution, especially during long prayers. A microcontroller like Arduino with some sensors can be used to create an innovative Smart Prayer Mat capable of detecting prayer movements such as Rukoo and Sujood.
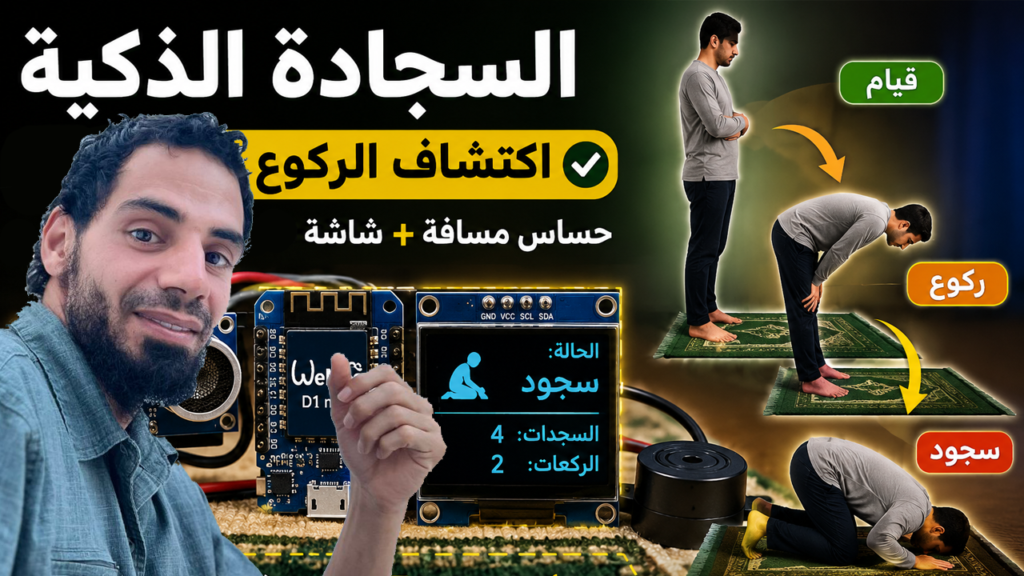
In this Guide, we will build a Smart Prayer Mat Counter using a Wemos D1 Mini (or Arduino), an HC-SR04 ultrasonic sensor, an OLED display, and a push button. The system sits at the top of your prayer mat. It automatically detects your physical posture (Standing, Rukoo, or Sujood), counts it in real time, and displays it on the screen. A reset button allows the counters to be cleared at any time.
This project is a great example of combining sensors, displays, filtering algorithms, and state machines to create a practical smart device.
🛠 What You Will Need
To build this project, you will need a few standard electronic components.
- Microcontroller: Wemos D1 Mini, or Arduino
- Sensor: HC-SR04 Ultrasonic Sensor
- Display: 0.96″ I2C OLED Display (128×64 pixels)
- Input: Push Button (to reset the counters)
- Misc: Breadboard, Jumper Wires, and a Micro-USB cable
I highly recommend getting a complete starter kit that includes everything you need to create a wide range of projects.
🔌 Wiring & Connections
Before uploading the code, connect your components as follows:
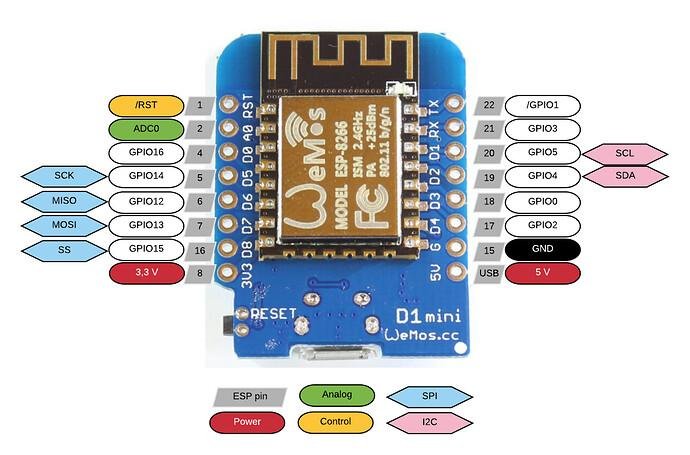
1. OLED Display (I2C)
- VCC → 3.3V
- GND → GND
- SDA → D2 (GPIO 4)
- SCL → D1 (GPIO 5)
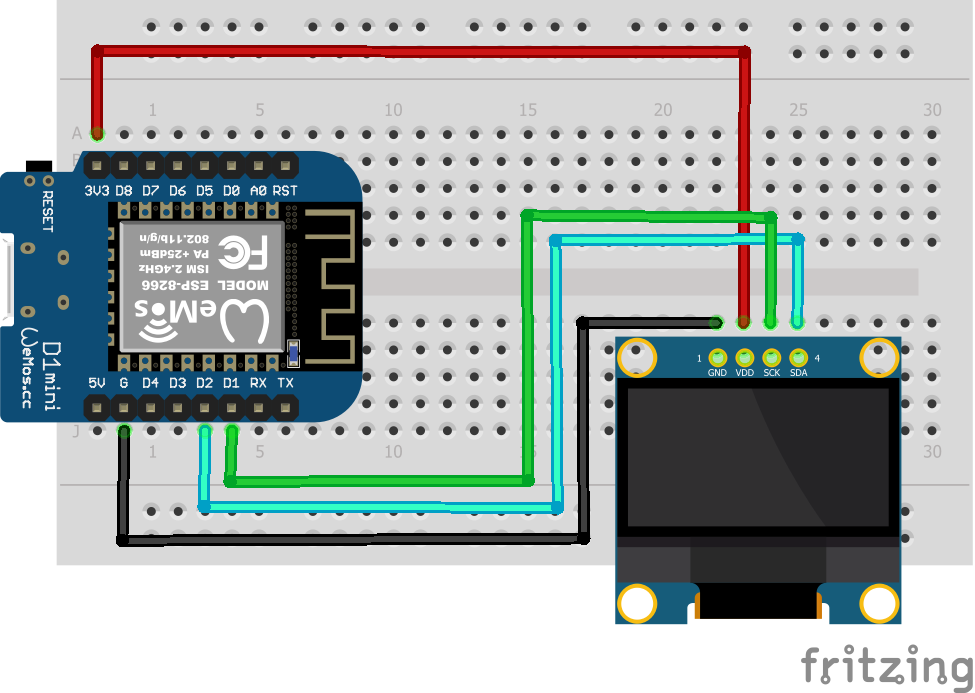
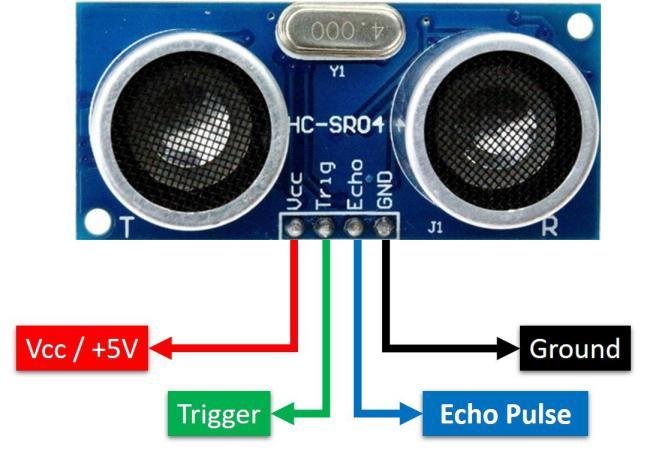
2. HC-SR04 Ultrasonic Sensor
- VCC → 5V
- TRIG → D5 (GPIO 14)
- ECHO → D6 (GPIO 12)
- GND → GND
3. Reset Push Button
- Connect one side of the button to D7 (GPIO 13)
- Connect the other side of the button to GND
💻 The Complete Code
Your Wemos D1 Mini will process the distance data, filter out noise using a moving average, and track your prayer states.
Copy and paste this final code into your Arduino IDE:
#include <SPI.h>
#include <Wire.h>
#include <Adafruit_GFX.h>
#include <Adafruit_SSD1306.h>

#define SCREEN_WIDTH 128 // OLED display width, in pixels
#define SCREEN_HEIGHT 64 // OLED display height, in pixels

#define OLED_RESET     -1 // Reset pin # (or -1 if sharing Arduino reset pin)
#define SCREEN_ADDRESS 0x3C ///< See datasheet for Address; 0x3D for 128x64, 0x3C for 128x32
Adafruit_SSD1306 display(SCREEN_WIDTH, SCREEN_HEIGHT, &Wire, OLED_RESET);

// HC-SR04
#define TRIG_PIN D5
#define ECHO_PIN D6

// ResetBtton
#define RESET_BUTTON D7

// Filter
const byte FILTER_SIZE = 5;
float readings[FILTER_SIZE];
byte filterIndex = 0;

// Thresholds
const float RUKOO_ENTER = 70;
const float RUKOO_EXIT  = 85;

const float SUJOOD_ENTER = 30;
const float SUJOOD_EXIT  = 40;

// Counters
int rukooCount = 0;
int sujoodCount = 0;

// State timer
unsigned long stateTimer = 0;
const unsigned long CONFIRM_TIME = 500;

enum PrayerState
{
  STANDING,
  RUKOO,
  SUJOOD
};

PrayerState currentState = STANDING;

float getDistance()
{
  digitalWrite(TRIG_PIN, LOW);
  delayMicroseconds(2);

  digitalWrite(TRIG_PIN, HIGH);
  delayMicroseconds(10);
  digitalWrite(TRIG_PIN, LOW);

  long duration = pulseIn(ECHO_PIN, HIGH, 25000);

  if(duration <= 0)
    return 999;

  return duration * 0.0343 / 2.0;
}

float movingAverage(float value)
{
  readings[filterIndex] = value;
  filterIndex++;

  if(filterIndex >= FILTER_SIZE)
    filterIndex = 0;

  float sum = 0;

  for(int i=0;i<FILTER_SIZE;i++)
  {
    sum += readings[i];
  }

  return sum / FILTER_SIZE;
}

void updateDisplay(float distance)
{
  display.clearDisplay();

  display.setTextSize(1);
  display.setCursor(0,0);
  display.setTextColor(SSD1306_WHITE);

  display.print("Distance:");
  display.print(distance,1);
  display.println("cm");

  display.setCursor(0,15);

  switch(currentState)
  {
    case STANDING:
      display.println("State: STANDING");
      break;

    case RUKOO:
      display.println("State: RUKOO");
      break;

    case SUJOOD:
      display.println("State: SUJOOD");
      break;
  }

  display.setCursor(0,35);
  display.print("Rukoo : ");
  display.println(rukooCount);

  display.setCursor(0,50);
  display.print("Sujood: ");
  display.println(sujoodCount);

  display.display();
}

void resetCounters()
{
  rukooCount = 0;
  sujoodCount = 0;

  currentState = STANDING;
  stateTimer = 0;

  display.clearDisplay();
  display.setTextSize(2);
  display.setTextColor(SSD1306_WHITE);
  display.setCursor(20,25);
  display.println("RESET");
  display.display();

  delay(3000);
}

void setup()
{
  Serial.begin(115200);

  pinMode(TRIG_PIN, OUTPUT);
  pinMode(ECHO_PIN, INPUT);

  pinMode(RESET_BUTTON, INPUT_PULLUP);

  // SSD1306_SWITCHCAPVCC = generate display voltage from 3.3V internally
  if(!display.begin(SSD1306_SWITCHCAPVCC, SCREEN_ADDRESS)) {
    Serial.println(F("SSD1306 allocation failed"));
    for(;;); // Don't proceed, loop forever
  }

  // Clear the buffer
  display.clearDisplay();

  for(int i=0;i<FILTER_SIZE;i++)
    readings[i] = 100;
}

void loop()
{
  float rawDistance = getDistance();
  float distance = movingAverage(rawDistance);

  switch(currentState)
  {
    case STANDING:

      if(distance < RUKOO_ENTER &&
         distance > SUJOOD_EXIT)
      {
        if(stateTimer == 0)
          stateTimer = millis();

        if(millis() - stateTimer > CONFIRM_TIME)
        {
          currentState = RUKOO;
          rukooCount++;
          stateTimer = 0;
        }
      }

      else if(distance < SUJOOD_ENTER)
      {
        if(stateTimer == 0)
          stateTimer = millis();

        if(millis() - stateTimer > CONFIRM_TIME)
        {
          currentState = SUJOOD;
          sujoodCount++;
          stateTimer = 0;
        }
      }
      else
      {
        stateTimer = 0;
      }

      break;

    case RUKOO:

      if(distance > RUKOO_EXIT)
      {
        currentState = STANDING;
      }

      if(distance < SUJOOD_ENTER)
      {
        if(stateTimer == 0)
          stateTimer = millis();

        if(millis() - stateTimer > CONFIRM_TIME)
        {
          currentState = SUJOOD;
          sujoodCount++;
          stateTimer = 0;
        }
      }
      else
      {
        stateTimer = 0;
      }

      break;

    case SUJOOD:

      if(distance > SUJOOD_EXIT)
      {
        currentState = STANDING;
      }

      break;
  }

  updateDisplay(distance);

  // Reset button pressed?
  if(digitalRead(RESET_BUTTON) == LOW)
  {
    delay(50); // debounce

    if(digitalRead(RESET_BUTTON) == LOW)
    {
      resetCounters();

      while(digitalRead(RESET_BUTTON) == LOW)
      {
        delay(10); // wait until release
      }
    }
  }
  delay(50);
}
Before uploading this code, you need to make some modifications:
1. Install the Required Libraries:
From the Arduino IDE, go to Tools → Manage Libraries, search and install:
- Adafruit SSD1306: Used to control the OLED display.
- Adafruit GFX Library, which provides graphics and text functions for the OLED screen.
2. Setting Up Your Wemos D1 Mini:
Unlike the Arduino microcontroller, the Wemos D1 Mini doesn’t work out of the box with the Arduino IDE. You’ll need to add support for ESP8266 boards first.
- Install, then open up the Arduino IDE
- Go to File > Preferences
- In Additional Boards Manager URLs, add:
http://arduino.esp8266.com/stable/package_esp8266com_index.json - Go to Tools > Board > Boards Manager
- Search for “esp8266” and install the package from the Espressif Community
For more details, check out my Wemos D1 Mini Guide
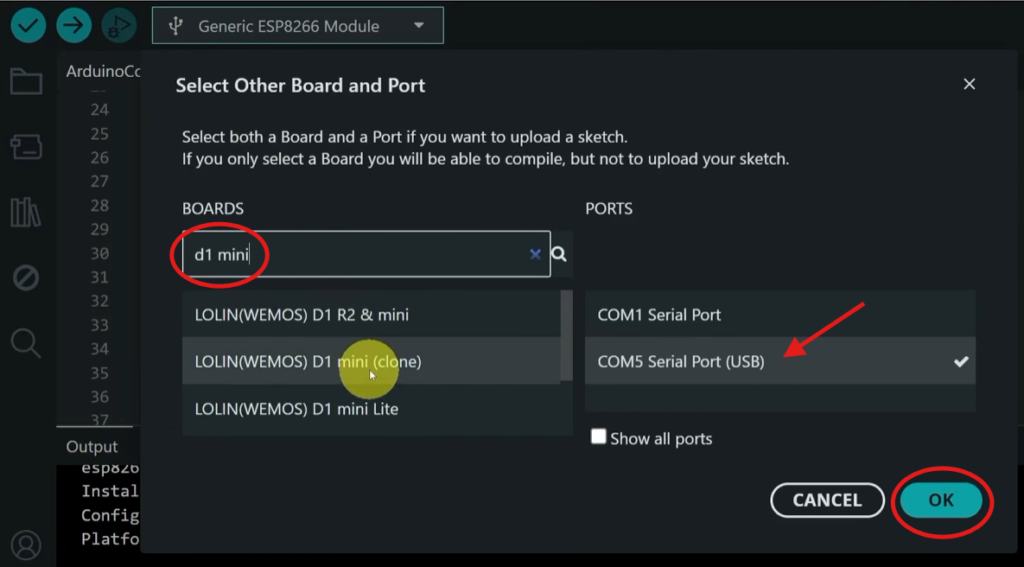
3. Connect, Select Port, and Upload:
After installing the software and drivers, we can plug in our board via Micro-USB, then select the correct COM port from Tools > Port. Select Tools > Board > ESP8266 > LOLIN(WEMOS) D1 R2 & mini
Finally, upload the code to your board, and Let’s Start testing
⚙️ How It Works
1. Distance Measurement
The HC-SR04 ultrasonic sensor emits a sound wave and measures the time it takes to return after bouncing off an object (Al Mosali). The distance is calculated using:
distance = duration * 0.0343 / 2.0;
2. Position Detection Logic
The system uses distance thresholds to determine the current position:
STANDING:  distance > 85cm
RUKOO:     40cm < distance < 70cm
SUJOOD:    30cm < distance < 40cm
3. State Machine
        ┌─────────────────────────────────────┐
        │                                     │
        │  ┌────────┐      ┌────────┐         │
        │  │        │      │        │         │
        │  │STANDING├─────▶│ RUKOO  │         │
        │  │        │      │        │         │
        │  └────┬───┘      └───┬────┘         │
        │                      │              │
        │                      │              │
        │                      ▼              │
        │  ┌────────┐      ┌────────┐         │
        │  │        │      │        │         │
        │  │SUJOOD  │◀─────│SUJOOD  │         │
        │  │        │      │        │         │
        │  └────────┘      └────────┘         │
        │                                     │
        └─────────────────────────────────────┘
4. Debouncing with Time Confirmation
To prevent false triggers, the system requires the distance to remain in a particular range for 500ms before changing state.
5. Moving Average Filter
A moving average filter of 5 samples smooths out noise and sudden fluctuations in distance readings.
📝 Code Breakdown
1. Library Inclusions and Display Setup
#include <SPI.h>
#include <Wire.h>
#include <Adafruit_GFX.h>
#include <Adafruit_SSD1306.h>

#define SCREEN_WIDTH 128 // OLED display width, in pixels
#define SCREEN_HEIGHT 64 // OLED display height, in pixels

#define OLED_RESET     -1 // Reset pin # (or -1 if sharing Arduino reset pin)
#define SCREEN_ADDRESS 0x3C ///See datasheet for Address; 0x3D for 128x64, 0x3C for 128x32
Adafruit_SSD1306 display(SCREEN_WIDTH, SCREEN_HEIGHT, &Wire, OLED_RESET);
These libraries provide graphics capabilities for the OLED display.
2. Pin Definitions
// HC-SR04
#define TRIG_PIN D5
#define ECHO_PIN D6

// ResetBtton
#define RESET_BUTTON D7
Defines the pins for the ultrasonic sensor and button.
3. Configuration Parameters
// Thresholds
const float RUKOO_ENTER = 70;
const float RUKOO_EXIT  = 85;

const float SUJOOD_ENTER = 30;
const float SUJOOD_EXIT  = 40;

// Counters
int rukooCount = 0;
int sujoodCount = 0;

// State timer
unsigned long stateTimer = 0;
const unsigned long CONFIRM_TIME = 500;
These values are critical for accurate operation. You may need to adjust them based on your specific setup.
4. State Machine Implementation
The code uses an enum to represent the three possible states:
enum PrayerState {
  STANDING,
  RUKOO,
  SUJOOD
};
The loop() function implements the state machine logic:
switch(currentState) {
  case STANDING:
    // Check for transitions to RUKOO or SUJOOD
    break;
  case RUKOO:
    // Check for transitions to STANDING or SUJOOD
    break;
  case SUJOOD:
    // Check for transitions to STANDING
    break;
}
5. Distance Measurement Function
float getDistance()
{
  digitalWrite(TRIG_PIN, LOW);
  delayMicroseconds(2);

  digitalWrite(TRIG_PIN, HIGH);
  delayMicroseconds(10);
  digitalWrite(TRIG_PIN, LOW);

  long duration = pulseIn(ECHO_PIN, HIGH, 25000);

  if(duration <= 0)
    return 999;

  return duration * 0.0343 / 2.0;
}
6. Moving Average Filter
float movingAverage(float value)
{
  readings[filterIndex] = value;
  filterIndex++;

  if(filterIndex >= FILTER_SIZE)
    filterIndex = 0;

  float sum = 0;

  for(int i=0;i<FILTER_SIZE;i++)
  {
    sum += readings[i];
  }

  return sum / FILTER_SIZE;
}
7. Display Update Function
void updateDisplay(float distance) {
  display.clearDisplay();
  // Display distance, state, and counts
  // ...
}
Conclusion
The Smart Prayer Counter is an excellent example of using simple electronics to create a meaningful tool for the Muslim community. By combining an ultrasonic sensor with an Arduino microcontroller, we’ve created a system that:
- Automatically detects prayer positions
- Counts Rukoo and Sujood accurately
- Displays information on an OLED screen
- Provides a reset mechanism for multiple uses
The system successfully detects Rukoo and Sujood movements, displays real-time information on an OLED screen, and maintains movement counters using a reliable state machine and filtering algorithm.