Wemos D1 Mini (ESP8266): A Complete Beginner’s Guide
The Wemos D1 Mini has become one of the most popular Wi-Fi-enabled microcontroller boards for IoT projects. Based on the ESP8266 chip, this tiny yet powerful board allows makers, students, and engineers to create wireless projects with ease.
In this guide, you’ll learn everything you need to know to get started with the Wemos D1 Mini, including its specifications, pinout, setup process, and your first project.
What is the Wemos D1 Mini?
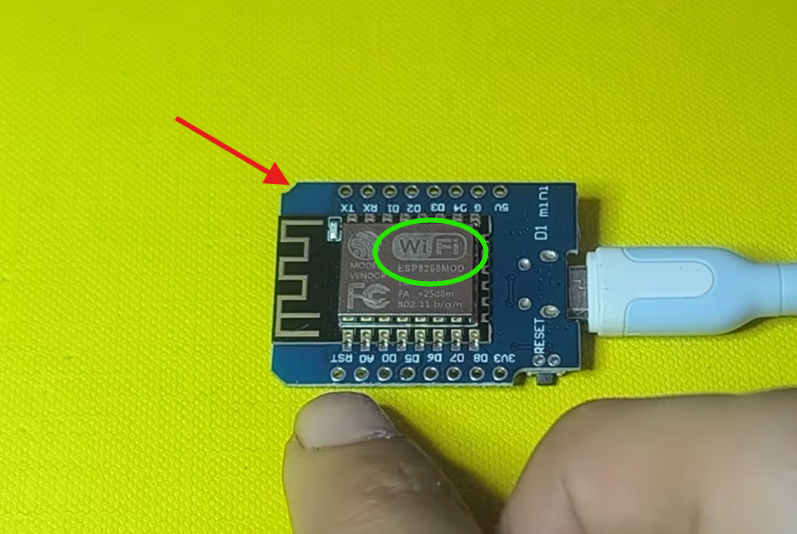
The Wemos D1 Mini is a compact Wi-Fi development board based on the ESP8266 microcontroller. It’s specifically designed for IoT applications, making it perfect for smart home devices, wireless sensor networks, and connected projects.
Think of it as an Arduino with built-in Wi-Fi, but smaller, cheaper, and more powerful. At its heart is the ESP8266EX chip with 4MB of flash memory, running at 80MHz (or 160MHz optionally).
Why Choose the Wemos D1 Mini?
There are several reasons this board has gained such a dedicated following:
Size and Cost: At just 34.2 mm x 25.6 mm and costing around $2.50, it’s incredibly compact and affordable.
Built-in Wi-Fi: The onboard 802.11 b/g/n Wi-Fi eliminates the need for separate modules or shields.
Arduino Compatibility: You can program it using the familiar Arduino IDE, making the transition smooth for anyone who’s worked with Arduino before.
Versatility: With 11 GPIO pins, I2C, SPI, and a 10-bit ADC, it can interface with a wide variety of sensors and peripherals.
Active Community: There’s excellent documentation and countless project examples available online.
Setting Up Your Wemos D1 Mini
1. Install Arduino IDE and ESP8266 Support
The Wemos D1 Mini doesn’t work out of the box with the Arduino IDE. You’ll need to add support for ESP8266 boards first.
- Install, then open up the Arduino IDE
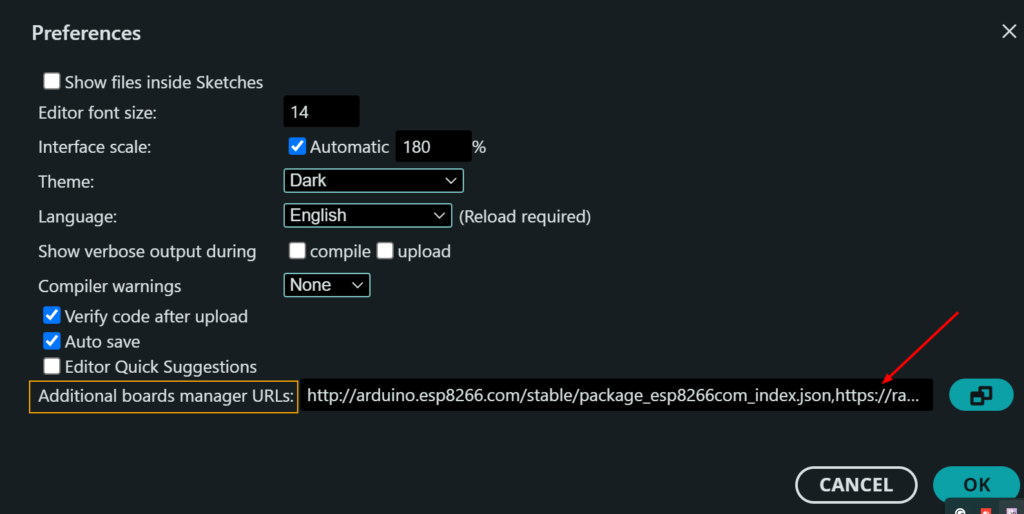
- Go to File > Preferences
- In Additional Boards Manager URLs, add:
http://arduino.esp8266.com/stable/package_esp8266com_index.json - Go to Tools > Board > Boards Manager
- Search for “esp8266” and install the package from the Espressif Community
2. Install USB Drivers
The Wemos D1 Mini uses the CH340 USB-to-serial chip, so you’ll need to install the appropriate drivers for your operating system if Windows doesn’t detect it automatically.
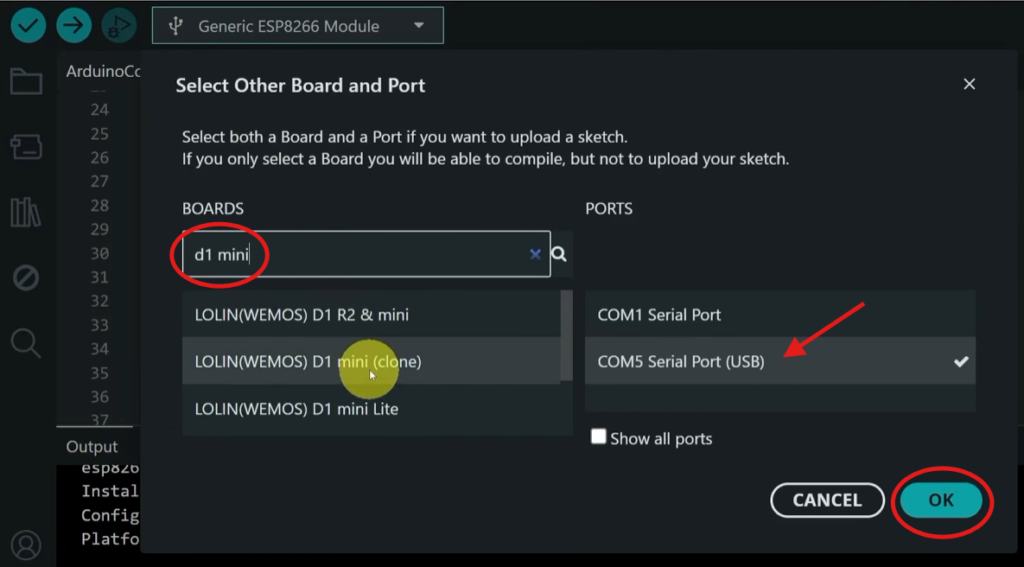
3. Connect and Select Port
After installing the software and drivers, we can plug in our board via Micro-USB, then select the correct COM port from Tools > Port. Select Tools > Board > ESP8266 > LOLIN(WEMOS) D1 R2 & mini
Understanding the Pinout
The Wemos D1 Mini has 16 pins. Here’s the essential pinout :
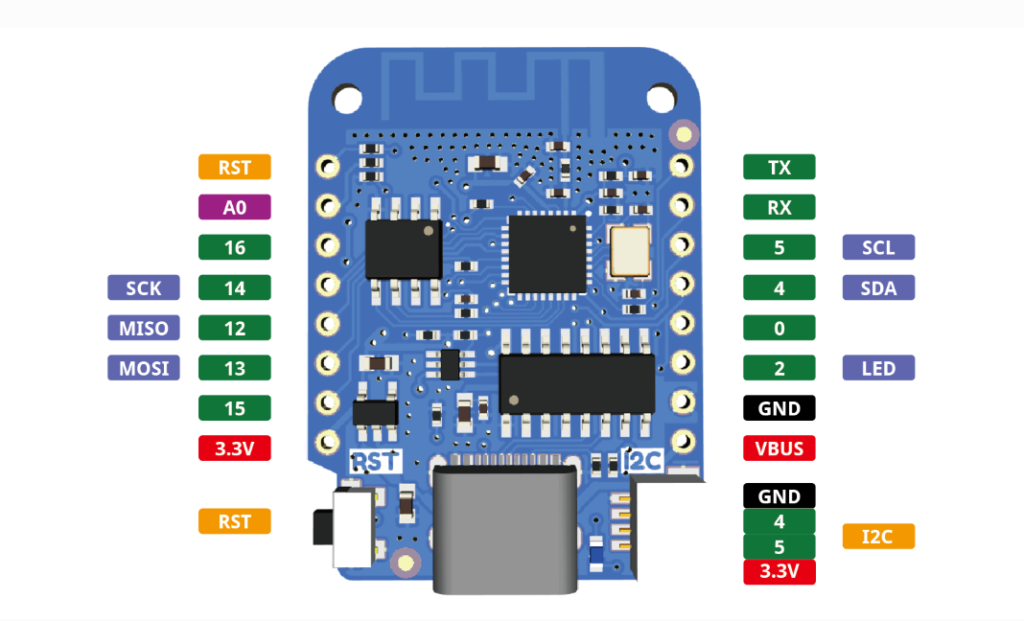
Power Pins:
- 3V3: 3.3V output (can power peripherals)
- 5V: 5V input (when powering via USB, this provides 5V to peripherals)
- G: Ground
Digital I/O Pins (D0-D8):
- D0 (GPIO16): Digital I/O
- D1 (GPIO5): I2C SCL
- D2 (GPIO4): I2C SDA
- D3 (GPIO0): Digital I/O (used during boot)
- D4 (GPIO2): Digital I/O, built-in LED (used during boot)
- D5 (GPIO14): SPI SCK
- D6 (GPIO12): SPI MISO
- D7 (GPIO13): SPI MOSI
- D8 (GPIO15): SPI CS (used during boot)
Communication Pins:
- RX (GPIO3): UART receive
- TX (GPIO1): UART transmit
- A0: Analog input (0-3.3V, 10-bit resolution)
Your First Project: Wi-Fi LED Blink
Let’s make the onboard LED blink and connect to Wi-Fi. This is the “Hello World” of ESP8266 programming.
#include <ESP8266WiFi.h>

const char* ssid = "Your_SSID";       // Your Wi-Fi network name
const char* password = "Your_Password"; // Your Wi-Fi password

void setup() {
  pinMode(D4, OUTPUT); // Built-in LED is on GPIO2 (D4)
  Serial.begin(115200);

  Serial.print("Connecting to Wi-Fi");
  WiFi.begin(ssid, password);
  while (WiFi.status() != WL_CONNECTED) {
    delay(500);
    Serial.print(".");
  }
  Serial.println("\nWi-Fi connected!");
  Serial.print("IP Address: ");
  Serial.println(WiFi.localIP());
}

void loop() {
  digitalWrite(D4, HIGH); // LED on
  delay(1000);
  digitalWrite(D4, LOW);  // LED off
  delay(1000);
}
Upload this code to your board, and you’ll see the onboard LED blink while your Wemos connects to your Wi-Fi network. The built-in LED is active LOW, so writing HIGH turns it off.
Real-World Project Examples
The Wemos D1 Mini has been used in countless projects. Here are three practical examples:
1. Smart Garage Door Controller
The Wemos D1 Mini makes an excellent garage door controller. It can connect to Alexa (using the fauxmoESP library to simulate a Philips Hue bulb) and activate a relay to open/close the door.
Hardware needed:
- Wemos D1 Mini
- Relay module
- Optional: Hall effect sensor with magnet for door status detection
2. Tank Robot
With a simple H-bridge motor driver and a WebSocket server, a Wemos D1 Mini can control a tracked robot via a mobile-friendly web interface.
Hardware needed:
- Wemos D1 Mini
- H-bridge motor driver
- Two motors with tank treads
- Battery power source
3. Car Presence Detection
Using an ultrasonic sensor, the Wemos can detect if a car is parked in your garage or driveway and report the status to Home Assistant via ESPHome.
Hardware needed:
- Wemos D1 Mini
- HC-SR04 ultrasonic sensor
- Power supply (5V)
Important Tips
Voltage Levels: The Wemos D1 Mini uses 3.3V logic levels, not 5V. Connecting 5V directly to GPIO pins can damage the board.
Analog Input: The A0 pin accepts 0-3.3V only. Don’t exceed 3.2V to avoid damage.
GPIO Current: Each GPIO pin can source or sink up to 12mA. Exceeding this limit may damage the microcontroller.
Power Requirements: When powering via the 5V pin, ensure your power source can supply at least 500mA.
Boot Pins: GPIO0, GPIO2, and GPIO15 have special boot functions. Avoid using them for critical components.
Troubleshooting Common Issues
Board not detected by computer: Install the CH340 USB drivers and try a different USB cable or port.
Upload errors: Ensure you’ve selected the correct board (LOLIN WEMOS D1 R2 & mini) and COM port. If you still have issues, try the “Upload Using Programmer” method with Esptool selected.
Wi-Fi connection fails: Double-check your SSID and password. Verify your network isn’t using unsupported security protocols.
Conclusion
The Wemos D1 Mini remains one of the best development boards for beginners and IoT enthusiasts. Its combination of low cost, built-in Wi-Fi, compact size, and Arduino compatibility makes it perfect for a wide range of smart projects.
If you’re starting your IoT journey, the Wemos D1 Mini is an excellent platform to learn wireless communication, web servers, cloud integration, and home automation.
In future tutorials, we’ll explore practical Wemos D1 Mini projects such as web servers, MQTT communication, weather stations, smart home devices, and much more.
With its Arduino IDE compatibility, extensive community support, and wealth of available shields and components, the Wemos D1 Mini is a solid choice for makers of all skill levels.
Happy tinkering!