Infrared (IR) Remote with Arduino and an IR Receiver (Ultimate Guide)
Introduction
Infrared (IR) remote controls are everywhere—TV remotes, air conditioners, stereo systems. But did you know you can easily use them with your Arduino projects?
With just a simple IR receiver module and a free library, you can turn an old TV remote into a wireless controller for robots, lights, or any other project you can imagine.
Here’s everything you need to get started.
What You’ll Need
Before diving in, gather these components:
- Arduino Uno (or compatible board: Nano, Mega …)
- IR receiver module (commonly VS1838B or similar)
- IR remote control (any standard TV remote or universal remote)
- Jumper wires
- Breadboard (optional, but helpful)
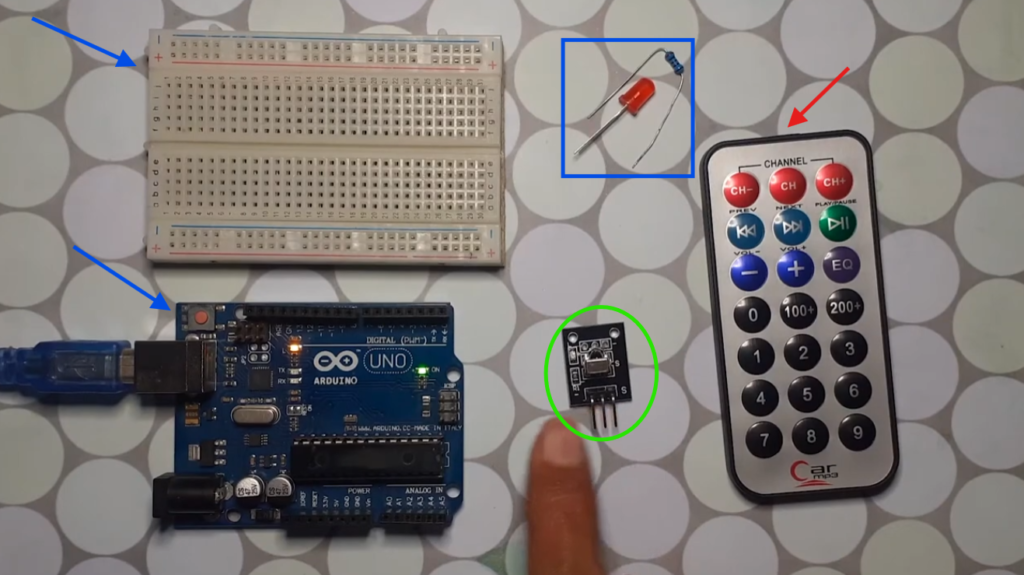
Most IR receivers have three pins: VCC (power), GND (ground), and OUT (signal). The ones you’ll find in an Arduino complete starter kit typically work with 5V power.
What is an Infrared (IR) Remote?
An Infrared Remote is a wireless controller that transmits data using invisible infrared light.
Unlike Bluetooth or Wi-Fi, infrared communication requires:
- Line-of-sight
- Short distance (typically 5–10 meters)
- No internet connection
When you press a button, the remote flashes an infrared LED at approximately 38 kHz, sending a unique digital code that represents that button.

The IR receiver detects these flashes and converts them into digital data that Arduino can read and then control devices using the code.
For example:
Power Button Press
↓
If Code Received: 0xBA45FF00
↓
Arduino turns LED ON
Each button sends its own hexadecimal code.
Understanding the IR Receiver Pins


Most IR receiver modules have three pins.
| Pin | Connect To |
|---|---|
| OUT | Arduino Digital Pin 3 |
| GND | Arduino GND |
| VCC | Arduino 5V |
Always verify your module’s pin labels, as some modules have different pin arrangements.
Circuit Diagram
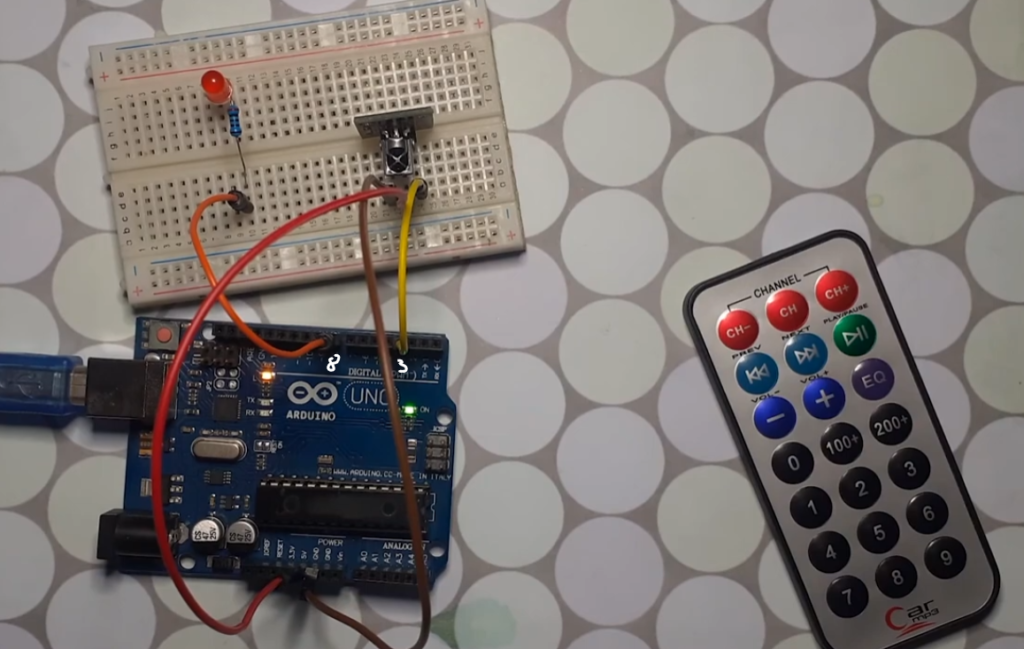
IR Receiver
| Arduino | IR Receiver |
|---|---|
| 5V | VCC |
| GND | GND |
| D3 | OUT |
LED
| Arduino | Component |
|---|---|
| D8 | 220Ω Resistor |
| Resistor | LED Anode |
| LED Cathode | GND |
Installing the IRremote Library
The easiest way to work with IR signals is using the IRremote library.
- Open the Arduino IDE
- Go to Sketch → Include Library → Manage Libraries
- Search for “IRremote” and click Install
Install the latest version by Armin Joachimsmeyer.
Important: The library has gone through major updates. If you’re following older tutorials, note that the modern version uses
#include <IRremote.hpp>instead of#include <IRremote.h>. The library’s GitHub documentation recommends using the.hppversion for better compatibility with compile options
The Test Sketch: Decoding Your Remote
Before controlling anything, we need to know what code each button sends.
Here’s the simplest possible sketch to test your IR receiver and find those codes :
#include <IRremote.hpp>  // Note: .hpp, not .h

int RECV_PIN = 3;  // Change this to whatever pin you used

IRrecv irrecv(RECV_PIN);
decode_results results;

void setup() {
  Serial.begin(9600);
  irrecv.enableIRIn();  // Start the receiver
}

void loop() {
  if (irrecv.decode(&results)) {
    Serial.println(results.value, HEX);  // Print the code in hex format
    delay(500);
    irrecv.resume();  // Ready for the next signal
  }
}
Upload this, open the Serial Monitor (Tools → Serial Monitor), and start pressing buttons on your remote. You’ll see hexadecimal codes appear. For example, the “forward” button sent 0xFD807F, “stop” sent 0xFDA05F, and “back” sent 0xFD906F.
Pro tip: Write down the codes for the buttons you want to use. They’ll be the key to making your project work.
A Practical Example: Control an LED
Once you know your remote’s codes, you can use them to control things. Here’s a simplified example to turn the LED ON and OFF:
#include <IRremote.hpp>

int RECV_PIN = 3;
IRrecv irrecv(RECV_PIN);
decode_results results;

int ledPin = 8;

void setup() {
  Serial.begin(57600);
  irrecv.enableIRIn();
  pinMode(ledPin, OUTPUT);
}

void loop() {
  if (irrecv.decode(&results)) {
    Serial.println(results.value, HEX);

    // Replace these values with YOUR remote's codes
    switch(results.value) {
      case 0xFD807F:  // On Button
        Serial.println("Turn ON");
        digitalWrite(ledPin, HIGH);
        break;

      case 0xFDA05F:  // Off button
        Serial.println("Turn OFF");
        digitalWrite(ledPin, LOW);
        break;

      default:
        Serial.println("Unknown button");
        break;
    }
    delay(300);
    irrecv.resume();  // Ready for next signal
  }
}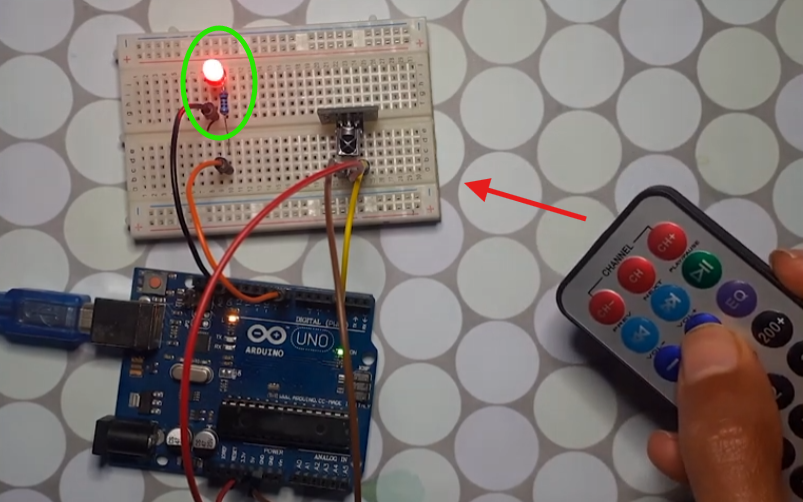
The concept works the same whether you’re controlling motors , LED lights , or home appliances . You just map each button code to a specific action.
Advanced Techniques
Using Multiple Buttons
You can assign different functions to different buttons.
Example:
switch(code)
{
case 0xBA45FF00:
    digitalWrite(LED_PIN,HIGH);
    break;

case 0xB946FF00:
    digitalWrite(LED_PIN,LOW);
    break;

case 0xB847FF00:
    Serial.println("Button 3");
    break;
}
This makes it easy to build menu systems and remote-controlled devices.
Handling Repeats
When you hold down a button on most remotes, it sends a “repeat” code rather than the full command again. The library marks these with a flag :
if (IrReceiver.decode()) {
    // Ignore repeat codes to avoid duplicate actions
    if (IrReceiver.decodedIRData.flags == 0) {
      // This is the first press, not a repeat
      handleButtonPress(IrReceiver.decodedIRData.command);
    }
    IrReceiver.resume();
}
Storing Codes for Multiple Buttons
For complex projects, you can store multiple IR code variables and compare them:
#define UP_CMD 0x5
#define DOWN_CMD 0xD
#define LEFT_CMD 0xA
#define RIGHT_CMD 0x8

void loop() {
  if (IrReceiver.decode()) {
    IrReceiver.resume();
    if (IrReceiver.decodedIRData.flags == 0) {
      if (IrReceiver.decodedIRData.command == UP_CMD) {
        // Handle UP button
      } else if (IrReceiver.decodedIRData.command == DOWN_CMD) {
        // Handle DOWN button
      }
      // ... and so on
    }
  }
}
This approach using .command works because many IR remotes use the NEC protocol where each button has a unique command code .
Supported Protocols
The IRremote library supports many common infrared protocols, including:
- NEC
- Sony
- Samsung
- Panasonic
- JVC
- LG
- RC5
- RC6
- Sharp
- Denon
This means a wide variety of TV and appliance remotes can work with your Arduino project.
Common Issues and Solutions
Receiving Stops After Motor Control
If you’re controlling motors and the IR stops working, the problem is likely timer conflicts. analogWrite() and the IR library both use hardware timers. On many boards, analogWrite on certain pins shares the same timer that the IR receiver uses .
Solutions:
- Use different pins for motor control
- Try a different timer by changing the IR receiver pin (the library’s documentation lists which timers each pin uses)
- Use
digitalWrite()instead ofanalogWrite()if you don’t need speed control
Unknown Protocols
If your remote’s codes show up as “UNKNOWN”, don’t worry—this means the library doesn’t recognize the protocol but can still read the raw timing data. The library can still send and receive these signals .
No Output on Serial Monitor
Double-check:
- The IR receiver’s VCC is connected to 5V (not 3.3V)
- The receiver is within range of the remote (about 5-10 meters)
- The baud rate matches:
Serial.begin(9600)in code must match the Serial Monitor setting - You’re pointing the remote directly at the receiver
Taking It Further
Once you’ve mastered the basics, here are some project ideas:
- Robot control: Use directional buttons to move a robot
- Home automation: Control lights or appliances via relays
- Media center: Build your own universal remote
- IR cloning: Build a device that learns and replays IR signals
The IRremote library also supports sending IR signals, meaning you can build projects that mimic other remotes—perfect for controlling your TV or other IR devices automatically.
Final Thoughts
Using an IR remote with an Arduino is a simple and affordable way to add wireless control to your electronics projects. With just an Arduino, an IR receiver, and a standard TV remote, you can build interactive systems that respond to button presses without physical switches.
By combining IR input with LEDs, displays, motors, relays, or sensors, you can create everything from home automation projects to robots and smart devices. Once you’ve learned how to read and decode IR signals, you can adapt virtually any compatible remote for your own custom applications.
The key takeaway: get your test sketch working first, discover your button codes, and build from there. Happy tinkering!