Ultimate Guide to the SONOFF DUALR3: Control 2 Lights with Wi-Fi and Amazon Alexa
The SONOFF DUALR3 is a versatile dual-channel smart switch that can turn two separate electrical loads into Wi-Fi-controlled devices. Instead of using a traditional wall switch alone, you can control your lights from the eWeLink app, create schedules and scenes, and connect the device to Amazon Alexa for voice control.
We’re gonna learn how to install and configure the SONOFF DUALR3, control two separate electrical loads from your phone, and connect it to Amazon Alexa for convenient voice control.
⚠️ Important Safety Warning: The SONOFF DUALR3 is designed to work with mains electrical wiring. Mains voltage can cause serious injury, fire, or death. Do not work on energized circuits. Installation and mains wiring should be performed by a suitably qualified person and in accordance with local electrical regulations. Always verify the exact wiring and ratings in the manual supplied with your DUALR3 before installation.
What Is the SONOFF DUALR3?
The SONOFF DUALR3 is a dual-channel Wi-Fi smart switch designed to control two electrical circuits.
Unlike a simple single-channel smart relay, the DUALR3 provides two independently controllable channels.
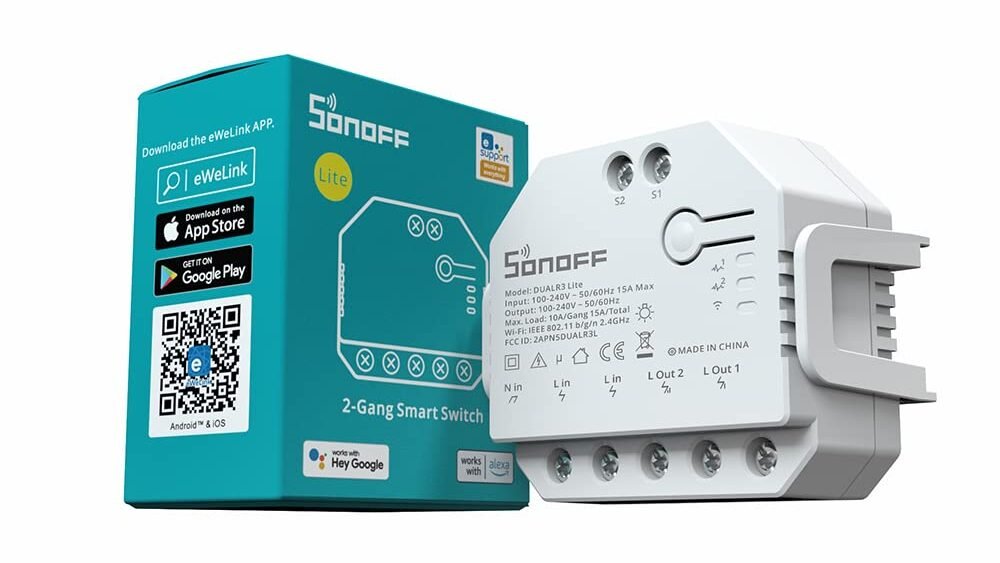
For this project, we’ll configure it in Switch Mode:
- Channel 1 controls Light 1.
- Channel 2 controls Light 2.
- You can control both channels from eWeLink.
- Both channels can be integrated with Alexa.
- Physical external switches can also be used where supported.
- The DUALR3 provides power-monitoring functionality in its supported modes.
SONOFF documents three working modes for the DUALR3: Switch Mode, Motor Mode, and Meter Mode. Switch Mode is the appropriate mode for this two-light project.
The goal is to create a simple smart-home system in which two ordinary lights can be controlled from several interfaces.
Control options
Traditional control
Physical wall switch → SONOFF DUALR3 → Light
Smartphone control
eWeLink app → Wi-Fi → SONOFF DUALR3 → Light
Voice control
Alexa → eWeLink integration → SONOFF DUALR3 → Light
The final system looks conceptually like this:
                         ┌───────────────┐
                         │     Alexa     │
                         └───────┬───────┘
                                 │
                           Voice Control
                                 │
                         ┌───────▼───────┐
                         │ eWeLink Cloud │
                         └───────┬───────┘
                                 │
                                Wi-Fi
                                 │
                         ┌───────▼───────┐
                         │ SONOFF DUALR3 │
                         │    V1.6       │
                         └───────┬───────┘
                            ┌────┴────┐
                            │         │
                         CH1        CH2
                            │         │
                       ┌────▼───┐ ┌───▼────┐
                       │ Light 1│ │ Light 2│
                       └────────┘ └────────┘
Components and Tools
For this project, you’ll need:
- SONOFF DUALR3 V1.6
- Two compatible electrical loads, such as lamps
- Suitable electrical wiring
- Compatible wall switches, if physical switches are required
- Wi-Fi router
- Android or iPhone smartphone
- eWeLink application
- Amazon Alexa application
- Alexa-compatible device, such as an Echo speaker, if you want hands-free voice control
The DUALR3’s official documentation and downloads are available from SONOFF’s user-manual section.
Understanding the DUALR3
The DUALR3 has two independently controlled output channels.
For our application:
                SONOFF DUALR3
             ┌─────────────────┐
             │                 │
AC Supply ──►│ Power Input     │
             │                 │
             │   Channel 1 ────┼────► Light 1
             │                 │
             │   Channel 2 ────┼────► Light 2
             │                 │
             │ External Switch │
             │ Connections     │
             │                 │
             └─────────────────┘
Always check the exact terminal labels and wiring arrangement against the label on your DUALR3 V1.6 and its supplied manual before connecting anything.
SONOFF also provides an official wiring resource specifically covering the DUALR3 with two loads in Switch Mode.
Step 1 — Safety Before Wiring
Before touching the electrical wiring:
- Disconnect the circuit from the mains supply.
- Verify that the circuit is actually de-energized using appropriate test equipment.
- Make sure the installation is suitable for the DUALR3 and the connected loads.
- Follow the wiring diagram supplied with your exact hardware revision.
- Ensure all terminals are securely connected and properly enclosed.
- Never leave mains terminals exposed.
- Do not exceed the device’s rated electrical limits.
If you’re not qualified to work with mains electrical systems, have a qualified electrician perform the installation.
Do not use the DUALR3 as a low-voltage electronics experiment.
Step 2 — Wiring the DUALR3 in Switch Mode
For this project, the DUALR3 will operate two independent loads.
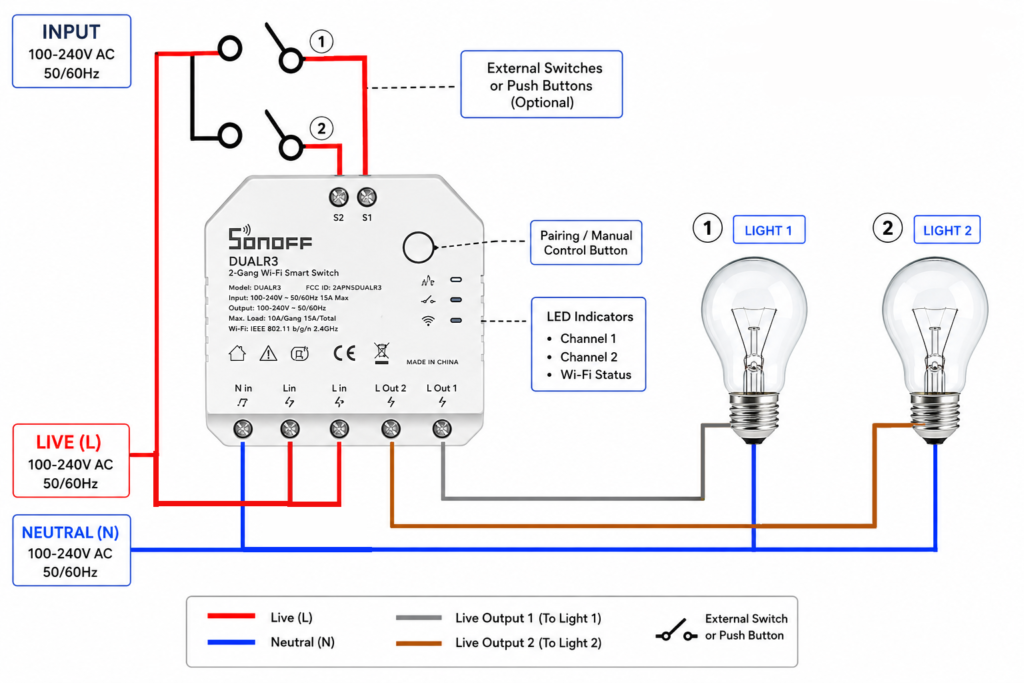
The diagram above substitutes for the manufacturer’s wiring diagram.
SONOFF provides a DUALR3 wiring resource showing how to connect two loads in Switch Mode.
External wall switches
The DUALR3 can also work with external switches. SONOFF documents different trigger modes for external switches, including rocker and momentary switch configurations in Switch Mode.
This allows the installation to retain physical control while also providing app and voice control.
Other Working Modes
One of the interesting features of the DUALR3 is that it isn’t limited to ordinary ON/OFF switching.
According to SONOFF’s documentation, the DUALR3 provides three working modes.
1. Switch Mode
This is the mode we’ll use in this guide.
It turns the DUALR3 into a two-channel smart switch.
For example:
- CH1 → living-room light
- CH2 → bedroom light
Each channel can be controlled independently.
2. Motor Mode
Motor Mode is designed for applications such as roller shutters, blinds, and compatible bidirectional motors.
The DUALR3 can control the motor’s direction and supports position control and calibration in compatible applications.
This isn’t the mode we’ll use for our two-light project.
3. Meter Mode
Meter Mode is intended for electrical monitoring rather than normal independent switching.
SONOFF describes the DUALR3 as supporting electrical measurements including voltage, current, and power-related data depending on the operating mode and configuration.
Step 3 — Configure the DUALR3 (eWeLink App)
After you have safely completed the wiring, the DUALR3 has to be configured using the eWeLink app on your smartphone.
Once you install it, sign in or create a new eWeLink account.
Now, the important point is to select: Working Mode → Switch Mode
Switch Mode allows the two channels to operate as independent switches.
For example:
DUALR3
│
├── Channel 1 → Living Room Light
│
└── Channel 2 → Bedroom Light or a TV
If the DUALR3 isn’t already in pairing mode, use its pairing/control button according to the manual.
The DUALR3’s pairing procedure uses the device’s Wi-Fi indicator to show pairing status. SONOFF documents a pairing indication consisting of two short flashes followed by one long flash.
Step 4 — Add the DUALR3 to eWeLink
Open the eWeLink application.
- Select Add Device.
- Choose the appropriate Wi-Fi device/pairing method.
- Put the DUALR3 into pairing mode if necessary.
- Select your Wi-Fi network.
- Enter the Wi-Fi password.
- Wait for the device to connect.
- Give the device a useful name.
Depending on the current version of eWeLink, the exact buttons and interface may look different.
SONOFF’s current documentation also describes app-based pairing and Wi-Fi setup for its smart switches.
Step 5 — Rename the Two Channels
This is a small step that makes a huge difference when using Alexa.
Instead of leaving the channels with generic names such as:
- DUALR3 Channel 1
- DUALR3 Channel 2
use natural names such as:
- Living Room Light
- Bedroom Light
or:
- Desk Light
- Ceiling Light
Good names make voice commands much easier.
For example:
Alexa, turn on the living room light.
is much easier to use than:
Alexa, turn on DUALR3 channel one.
SONOFF’s Alexa guidance recommends using clear, understandable device names when Alexa has difficulty recognizing them.
Step 6 — Test the DUALR3 From eWeLink
Before connecting Alexa, make sure everything works correctly through eWeLink.
Test:
Channel 1
Turn Channel 1 ON.
The first connected light should turn ON.
Turn Channel 1 OFF.
The light should turn OFF.
Channel 2
Turn Channel 2 ON.
The second light should turn ON.
Turn Channel 2 OFF.
The light should turn OFF.
Test both channels
Turn both channels ON and OFF independently.
If both channels behave correctly in eWeLink, the next step is Alexa integration.
Step 7 — Connect eWeLink to Amazon Alexa
Now we can connect the DUALR3 to Alexa.
SONOFF officially supports Alexa integration through the eWeLink Smart Home skill.
Open the Alexa application.
Go to:
More → Skills & Games
Search for:
eWeLink Smart Home
Select the skill and choose:
Enable to Use
Alexa will then ask you to link your eWeLink account.
Sign in with the same eWeLink account that contains your DUALR3.
After linking the accounts, Alexa needs to discover your devices.
Select:
Discover Devices
Then Alexa will search for compatible devices associated with your eWeLink account.
Once discovery is complete, your DUALR3 channels should become available in Alexa.
Step 8 — Organize the Devices in Alexa
Now rename or organize the devices if necessary.
For example:
Home
│
├── Living Room
│   └── Living Room Light
│
└── Bedroom
    └── Bedroom Light
This becomes particularly useful when you start creating Alexa routines.
Once Alexa has discovered the DUALR3 channels, you can use voice commands.
For example:
Turn on a light
Alexa, turn on the living room light.
Turn off a light
Alexa, turn off the living room light.
Control the second channel
Alexa, turn on the bedroom light.
Alexa, turn off the bedroom light.
SONOFF’s Alexa documentation lists ON/OFF voice control for DUALR3 and provides the corresponding voice-command structure.
Creating an Alexa Routine
The real advantage of connecting the DUALR3 to Alexa isn’t just voice control.
You can also create routines.
For example, create a Good Night routine.
Good Night Routine
When you say:
Alexa, good night.
Alexa could:
- Turn off the living-room light.
- Turn off the bedroom light.
- Control other compatible smart-home devices.
Another example is a Good Morning routine:
Alexa, good morning.
The routine could turn on selected lights and control other compatible devices.
Using the DUALR3 With a Physical Switch
One of the useful characteristics of the DUALR3 is that smart control doesn’t necessarily mean losing physical control.
With a compatible external switch configuration, you can use:
Physical switch + eWeLink + Alexa
This gives you multiple ways to control the same light.
For example:
                 ┌── Physical Switch
                 │
                 ├── eWeLink App
                 │
                 └── Alexa Voice
                        │
                        ▼
                 SONOFF DUALR3
                        │
                        ▼
                     Light
SONOFF documents external-switch support and synchronization between physical control, app control, and voice control.
Final Thoughts
The SONOFF DUALR3 is a powerful way to introduce two-channel smart control into an electrical installation.
For this project, we used Switch Mode to control two independent lights. After connecting the DUALR3 to Wi-Fi through eWeLink, we linked the eWeLink account with Amazon Alexa and enabled voice control.
The final result combines:
- Two-channel switching
- Wi-Fi control
- Smartphone control
- Physical switch control
- Alexa voice control
- Scheduling
- Smart scenes
- Power-monitoring capabilities
The most important thing is to treat the DUALR3 as a mains-voltage device, not as a low-voltage electronics module. Follow the official wiring documentation for your exact DUALR3 V1.6 and have the installation performed by a qualified person when required.
Official Resources
SONOFF DUALR3 User Manual & Downloads
SONOFF User Manual Center
SONOFF DUALR3 Wiring Guide
DUALR3 Wiring Instructional Guide
SONOFF Alexa Integration Guide
Works with Alexa Instruction Guide