Create a Smart WiFi Light Switch Using ESP8266 and Servo Motors
Want to make your old-school light switch smart without replacing it?
So, Today we build a smart WiFi-controlled light switch using an Espressif Systems ESP8266 board and two servo motors.
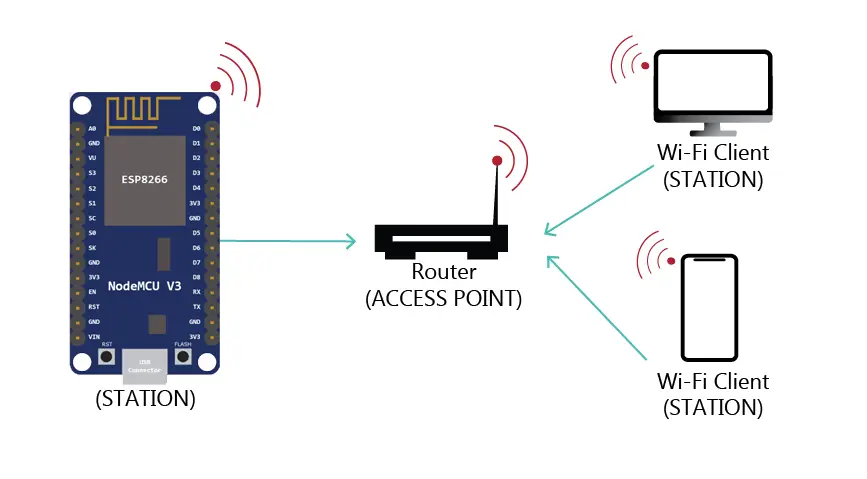
The ESP8266 creates a simple web server that allows you to control a physical wall light switch directly from your smartphone or computer.
🛠 Components Required:
- ESP8266 (NodeMCU or Wemos D1 mini)
- 2x micro servo motors (SG90 or similar)
- Standard light switch (already wired to your light
- Jumper wires
- 5V power supply (USB charger works great)
🔌 Circuit Diagram:
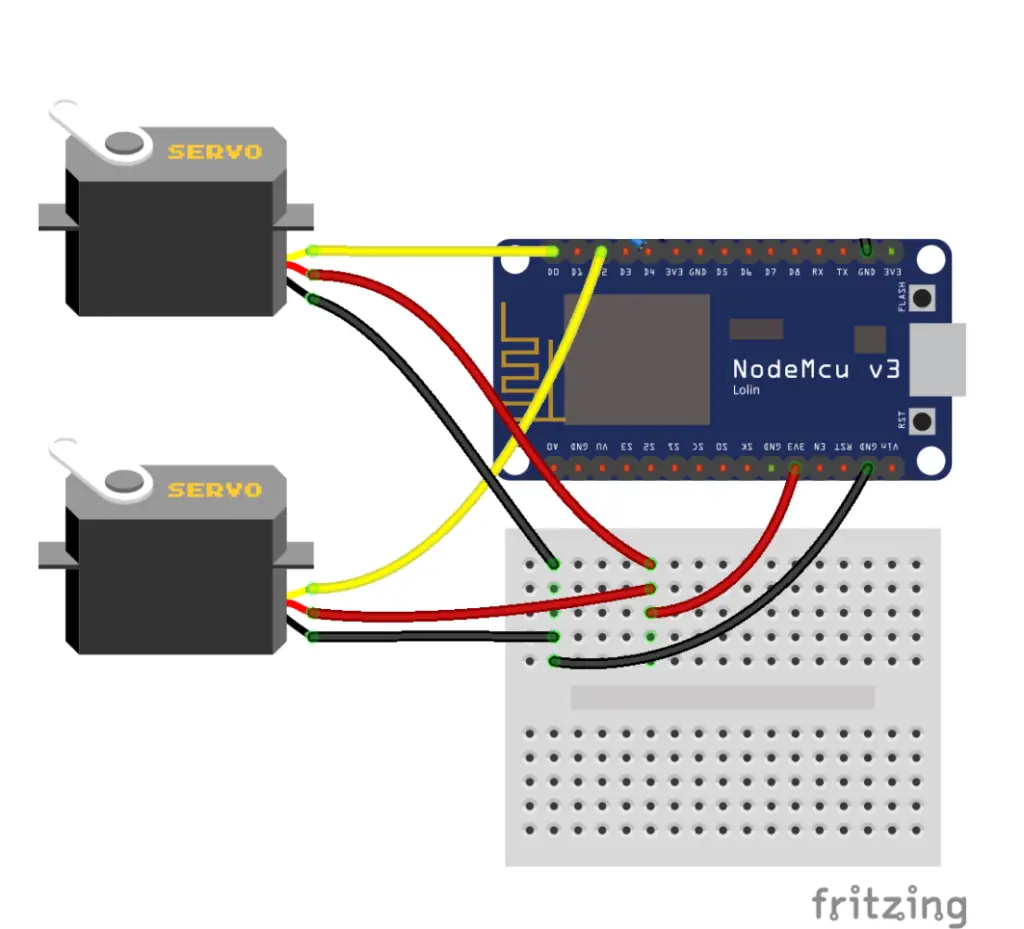
| ESP8266 Pin | Servo |
|---|---|
| D0 | ON Servo Signal |
| D2 | OFF Servo Signal |
| GND | Both Servo GND |
| 5V/VIN | Both Servo VCC |
Important:
Use an external 5V power source for the servos because the ESP8266 alone may not provide enough current.

📝 The Complete Code:
Here’s the complete code. Update the Wi-Fi credentials at the top:
#include <Servo.h>
// Load Wi-Fi library
#include <ESP8266WiFi.h>

#include <ESP8266mDNS.h>

// Replace with your network credentials
const char* ssid = "YOUR-Network-SSID";
const char* password = "YOUR-Password";

// Set web server port number to 80
WiFiServer server(80);

// Variable to store the HTTP request
String header;

// Current time
unsigned long currentTime = millis();
// Previous time
unsigned long previousTime = 0;
// Define timeout time in milliseconds (example: 2000ms = 2s)
const long timeoutTime = 2000;

Servo onServo;
Servo offServo;

void setup() {
  // put your setup code here, to run once
  Serial.begin(115200);

  onServo.attach(D0);
  offServo.attach(D2);

  onServo.write(90);
  offServo.write(0);

  // Connect to Wi-Fi network with SSID and password
  Serial.print("Connecting to ");
  Serial.println(ssid);
  WiFi.begin(ssid, password);
  while (WiFi.status() != WL_CONNECTED) {
    delay(500);
    Serial.print(".");
  }
  if (MDNS.begin("esp8266")) { Serial.println("MDNS responder started"); }

  // Print local IP address and start web server
  Serial.println("");
  Serial.println("WiFi connected.");
  Serial.println("IP address: ");
  Serial.println(WiFi.localIP());
  server.begin();
}

void loop() {
  MDNS.update();

  WiFiClient client = server.available();  // Listen for incoming clients

  if (client) {                     // If a new client connects,
    Serial.println("New Client.");  // print a message out in the serial port
    String currentLine = "";        // make a String to hold incoming data from the client
    currentTime = millis();
    previousTime = currentTime;

    while (client.connected() && currentTime - previousTime <= timeoutTime) {  // loop while the client's connected
      currentTime = millis();
      if (client.available()) {  // if there's bytes to read from the client,
        char c = client.read();  // read a byte, then
        Serial.write(c);         // print it out the serial monitor
        header += c;
        if (c == 'n') {  // if the byte is a newline character
          // if the current line is blank, you got two newline characters in a row.
          // that's the end of the client HTTP request, so send a response:
          if (currentLine.length() == 0) {
            // HTTP headers always start with a response code (e.g. HTTP/1.1 200 OK)
            // and a content-type so the client knows what's coming, then a blank line:
            client.println("HTTP/1.1 200 OK");
            client.println("Content-type:text/html");
            client.println("Connection: close");
            client.println();

            // turn on and off lights
            if (header.indexOf("GET /on") >= 0) {
              //Turn On Light
              onServo.write(0);
              delay(1000);
              onServo.write(90);
            } else if (header.indexOf("GET /off") >= 0) {
              //Turn Off Light
              offServo.write(90);
              delay(1000);
              offServo.write(0);
            }

            // Display the HTML web page
            client.println("<!DOCTYPE html><html>");
            client.println("<head><meta name="viewport" content="width=device-width, initial-scale=1">");
            client.println("<link rel="icon" href="data:,">");
            // CSS to style the on/off buttons
            // Feel free to change the background-color and font-size attributes to fit your preferences
            client.println("<style>html { font-family: Helvetica; display: inline-block; margin: 0px auto; text-align: center;}");
            client.println(".button { background-color: #195B6A; border: none; color: white; padding: 16px 40px;");
            client.println("text-decoration: none; font-size: 30px; margin: 2px; cursor: pointer;}");
            client.println("</style></head>");

            // Web Page Heading
            client.println("<body><h1>ESP8266 Web Server</h1>");

            // Display ON/OFF buttons
            client.println("<p> Light Switch </p>");
            client.println("<p><a href="/on"><button class="button">ON</button></a></p>");
            client.println("<p><a href="/off"><button class="button">OFF</button></a></p>");
            client.println("</body></html>");

            // The HTTP response ends with another blank line
            client.println();
            // Break out of the while loop
            break;
          } else {  // if you got a newline, then clear currentLine
            currentLine = "";
          }
        } else if (c != 'r') {  // if you got anything else but a carriage return character,
          currentLine += c;      // add it to the end of the currentLine
        }
      }
    }
    // Clear the header variable
    header = "";
    // Close the connection
    client.stop();
    Serial.println("Client disconnected.");
    Serial.println("");
  }
}
Note: If you haven’t set up your Arduino IDE with ESP support yet, please follow my previous ESP32 setup guide before proceeding.
Also, you need to install these libraries in the Arduino IDE:
- Servo Library
- ESP8266WiFi (built-in)
- ESP8266mDNS
To install libraries:
- Open up the Arduino IDE
- Go to Sketch → Include Library → Manage Libraries
- Search and install the required libraries
🎯 Using the Smart Switch
- Upload the code to your ESP8266
- Open the Serial Monitor (115200 baud) to find your IP address
- On any device on the same network, open a browser and go to
http://[your-esp-ip] - Click ON or OFF — watch the servos physically flip your switch
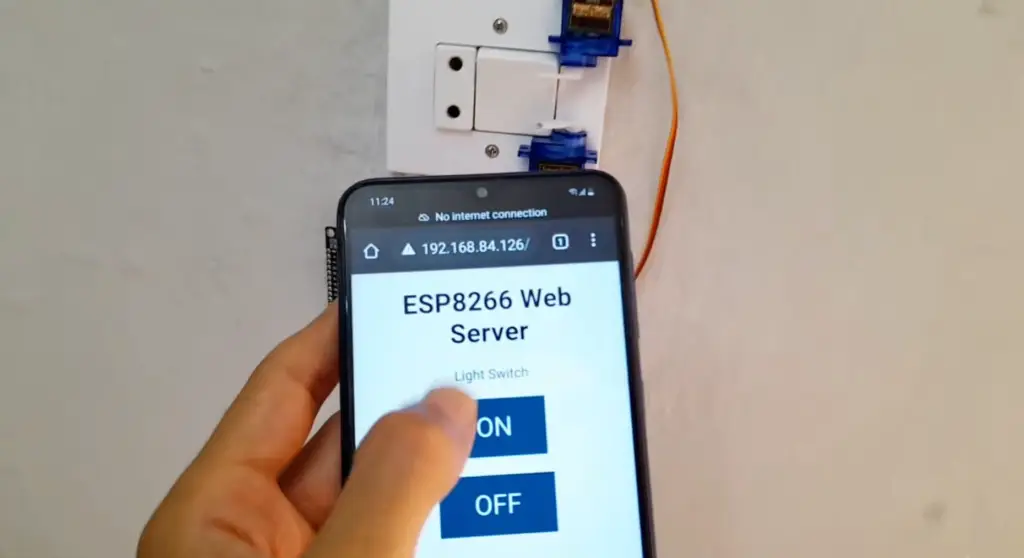
Mount the servos so their horns press against the toggle switch — one pushing up, one pushing down.
The servos need to press the switch firmly enough to flip it, but not so hard that they break the toggle.
✅ How the Project Works:
The ESP8266 connects to your WiFi network and hosts a web page with two buttons:
- ON
- OFF
When the ON button is pressed:
- The first servo rotates and physically presses the switch ON.
When the OFF button is pressed:
- The second servo rotates and physically presses the switch OFF.
The entire system can be controlled from any device connected to the same network.
🧠 Code Deep Dive
Let me explain each critical section of the code.
Library Includes
#include <Servo.h>           // Provides servo control (attach, write)
#include <ESP8266WiFi.h>     // WiFi connectivity for ESP8266
#include <ESP8266mDNS.h>     // Allows "esp8266.local" instead of IP
Global Variables
// Replace with your network credentials
const char* ssid = "Our-Network";
const char* password = "123456789";

// Set web server port number to 80
WiFiServer server(80);

// Variable to store the HTTP request
String header;

// Current time
unsigned long currentTime = millis();
// Previous time
unsigned long previousTime = 0;
// Define timeout time in milliseconds (example: 2000ms = 2s)
const long timeoutTime = 2000;

Servo onServo;
Servo offServo;
Creating the Web Server
WiFiServer server(80);The ESP8266 opens a web server on port 80.
When you enter the ESP8266 IP address into a browser, the web page appears.
Setup Function Explained
void setup() {
  Serial.begin(115200);                // Debug output

  onServo.attach(D0);                  // Tell ESP: pin D0 controls ON servo
  offServo.attach(D2);                 // Tell ESP: pin D2 controls OFF servo

  onServo.write(90);                   // Start in neutral position
  offServo.write(0);                   // Start in neutral position
Connecting to WiFi
This section connects the ESP8266 to your wireless network.
WiFi.begin(ssid, password);The ESP8266 keeps trying until the connection is successful.
HTTP Request Parsing
When you click the ON button, the browser sends:
GET /on HTTP/1.1
Host: 192.168.1.100
User-Agent: Mozilla/5.0 ...
Accept: text/html,application/xhtml+xml
Our code reads this character by character and stores it in the header Then we search for /on or /off:
if (header.indexOf("GET /on") >= 0) {
    // Turn light ON
    onServo.write(0);      // Extend servo
    delay(1000);           // Wait 1 second for switch to flip
    onServo.write(90);     // Retract servo
}
Sequence for “Turning Light ON”
- When the User clicks the “ON” button on the webpage
- The Browser sends:
GET /on HTTP/1.1to the ESP8266 IP address - ESP8266 reads header, sees
/onin the request - Code executes:
onServo.write(0);→ Servo rotates to 0° (full one direction) - Servo horn presses switch downward → Switch flips UP → Light turns ON
delay(1000);→ Hold for 1 second (enough time to flip)onServo.write(90);→ Servo returns to the neutral position- ESP8266 sends back the HTML confirmation page
- The user sees the page reload with buttons ready for the next action
HTML Response
The ESP8266 sends back this minimal, responsive HTML:
<!DOCTYPE html>
<html>
<head>
    <meta name="viewport" content="width=device-width, initial-scale=1">
    <style>
        .button {
            background-color: #195B6A;
            border: none;
            color: white;
            padding: 16px 40px;
            font-size: 30px;
            cursor: pointer;
        }
    </style>
</head>
<body>
    <h1>ESP8266 Web Server</h1>
    <p> Light Switch </p>
    <p><a href="/on"><button class="button">ON</button></a></p>
    <p><a href="/off"><button class="button">OFF</button></a></p>
</body>
</html>
Troubleshooting
Servo Not Moving:
- Check the external power supply
- Verify signal wiring
- Test the servo separately
ESP8266 Not Connecting:
- Verify SSID and password
- Check WiFi frequency (ESP8266 supports 2.4GHz only)
Web Page Not Opening:
- Ensure your phone and ESP8266 are on the same network
- Verify the IP address from the Serial Monitor
Final Thoughts
This ESP8266 smart switch project is a great introduction to:
- WiFi communication
- Web servers
- Servo motor control
- Smart home automation
By combining simple hardware with web technology, you can transform ordinary switches into smart IoT devices.