Create an ESP32 Web Server to Control Devices Over WiFi 🚀
Today, we’ll create a web server on the ESP32 that displays a control interface with two buttons. When you click these buttons from a browser, the ESP32 will toggle the corresponding outputs, controlling LEDs or replace them with relays to control high‑voltage devices like lights, fans, or sockets ⚡
🧠 Before We Begin: If you’re completely new to the ESP32, I recommend checking out my previous blog post, an Ultimate ESP32 Beginner’s Guide. We’ve covered the basics of setting up your development environment, installing board support, and uploading your first program.
What You’ll Need?
Hardware Components
- ESP32 Development Board (any variant: ESP32 DevKit, NodeMCU-32S, etc.)
- 2 LEDs (for testing) & 2 × 220Ω resistors
- Breadboard (optional but recommended)
- Jumper Wires (male-to-female or male-to-male)
- Micro-USB Cable for programming and power
- (Optional) 2‑Channel Relay Module
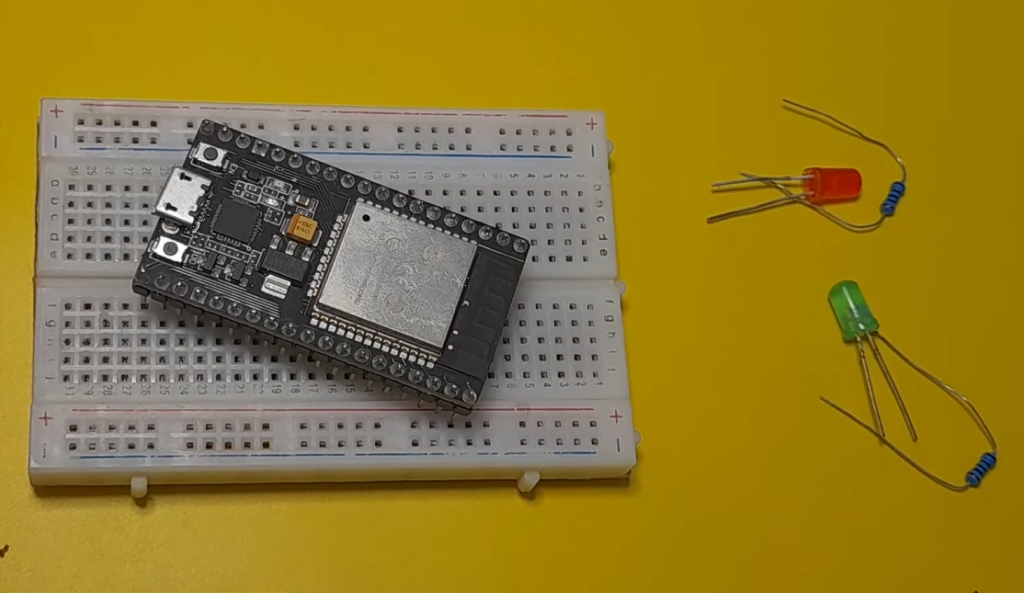
🧰 I highly recommend getting a complete ESP32 starter kit.
It will save you time, money, and frustration—and help you learn IoT much faster.
Software Requirements
- Arduino IDE or VS Code & PlatformIO
- ESP32 Board Support Package
Note: If you haven’t set up your Arduino IDE with ESP32 support yet, please follow my previous ESP32 setup guide before proceeding.
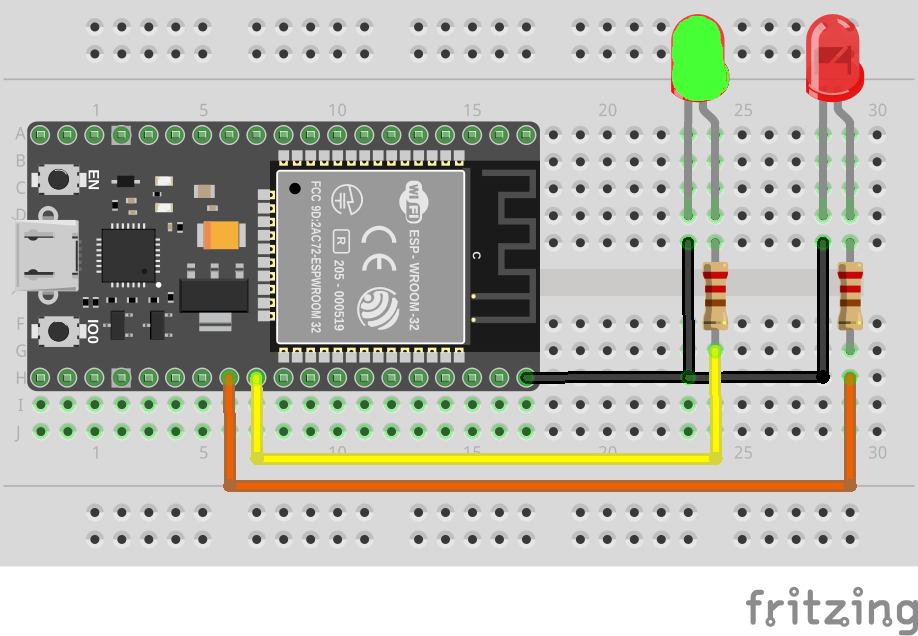
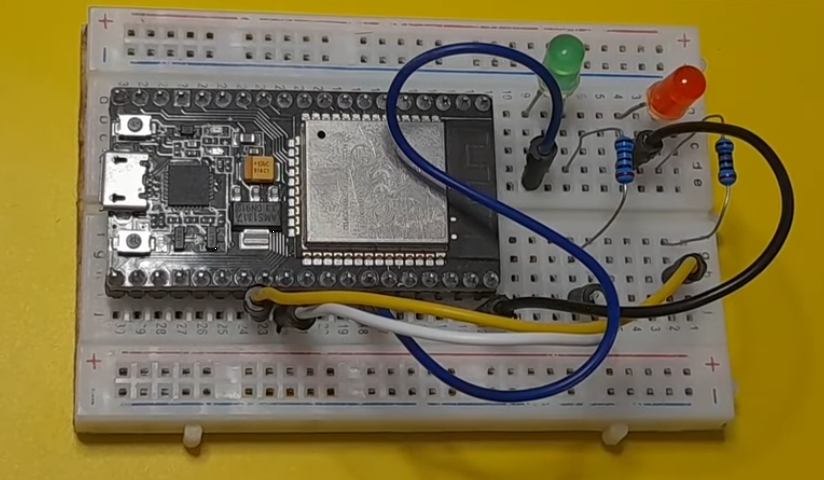
🔌 Circuit Connections
| Device | ESP32 GPIO |
|---|---|
| LED 1 | GPIO 16 |
| LED 2 | GPIO 17 |
- LED anode → GPIO pin (through 220Ω resistor)
- LED cathode → GND
⚠️ GPIO PINs can be changed in the code.
💻 ESP32 Web Server Code (Access Point)
Copy and paste the following code into the Arduino IDE:
// Load Wi-Fi library
#include <WiFi.h>

// Network credentials Here
const char* ssid     = "ESP32-Network";
const char* password = "Esp32-Password";

// Set web server port number to 80
WiFiServer server(80);

// Variable to store the HTTP request
String header;

//variables to store the current LED states
String statePin16 = "off";
String statePin17 = "off";
//Output variable to GPIO pins
const int ledPin16 = 16;
const int ledPin17 = 17;

// Current time
unsigned long currentTime = millis();
// Previous time
unsigned long previousTime = 0;
// Define timeout time in milliseconds
const long timeoutTime = 2000;

void setup() {
  Serial.begin(115200);

  pinMode(ledPin16, OUTPUT);      // set the LED pin mode
  digitalWrite(ledPin16, 0);      // turn LED off by default
  pinMode(ledPin17, OUTPUT);      // set the LED pin mode
  digitalWrite(ledPin17, 0);      // turn LED off by default

  WiFi.softAP(ssid,password);

  // Print IP address and start web server
  Serial.println("");
  Serial.println("IP address: ");
  Serial.println(WiFi.softAPIP());
  server.begin();
}

void loop() {
  WiFiClient client = server.available();   // Listen for incoming clients

  if (client) {                             // If a new client connects,
    currentTime = millis();
    previousTime = currentTime;
    Serial.println("New Client.");          // print a message out in the serial port
    String currentLine = "";                // make a String to hold incoming data from the client

    while (client.connected() && currentTime - previousTime <= timeoutTime) {
      // loop while the client's connected
      currentTime = millis();
      if (client.available()) {             // if there's bytes to read from the client,
        char c = client.read();             // read a byte, then
        Serial.write(c);                    // print it out the serial monitor
        header += c;
        if (c == '\n') {                    // if the byte is a newline character
          // if the current line is blank, you got two newline characters in a row.
          // that's the end of the client HTTP request, so send a response:
          if (currentLine.length() == 0) {
            // HTTP headers always start with a response code (e.g. HTTP/1.1 200 OK)
            // and a content-type so the client knows what's coming, then a blank line:
            client.println("HTTP/1.1 200 OK");
            client.println("Content-type:text/html");
            client.println("Connection: close");
            client.println();

            // turns the GPIOs on and off
            if (header.indexOf("GET /16/on") >= 0) {
              statePin16 = "on";
              digitalWrite(ledPin16, HIGH);               // turns the LED on
            } else if (header.indexOf("GET /16/off") >= 0) {
              statePin16 = "off";
              digitalWrite(ledPin16, LOW);                //turns the LED off
            }

            if (header.indexOf("GET /17/on") >= 0) {
              statePin17 = "on";
              digitalWrite(ledPin17, HIGH);               // turns the LED on
            } else if (header.indexOf("GET /17/off") >= 0) {
              statePin17 = "off";
              digitalWrite(ledPin17, LOW);                //turns the LED off
            }

            // Display the HTML web page
            client.println("<!DOCTYPE html><html>");
            client.println("<head><meta name=\"viewport\" content=\"width=device-width, initial-scale=1\">");
            client.println("<link rel=\"icon\" href=\"data:,\">");
            // CSS to style the on/off buttons
            client.println("<style>html { font-family: monospace; display: inline-block; margin: 0px auto; text-align: center;}");
            client.println(".button { background-color: yellowgreen; border: none; color: white; padding: 16px 40px;");
            client.println("text-decoration: none; font-size: 32px; margin: 2px; cursor: pointer;}");
            client.println(".button2 {background-color: gray;}</style></head>");

            client.println("<body><h1>ESP32 Web Server</h1>");
            client.println("<p>Control LED State</p>");

            if (statePin16 == "off") {
              client.println("<p><a href=\"/16/on\"><button class=\"button\">ON</button></a></p>");
            } else {
              client.println("<p><a href=\"/16/off\"><button class=\"button button2\">OFF</button></a></p>");
            }
            if (statePin17 == "off") {
              client.println("<p><a href=\"/17/on\"><button class=\"button\">ON</button></a></p>");
            } else {
              client.println("<p><a href=\"/17/off\"><button class=\"button button2\">OFF</button></a></p>");
            }
            client.println("</body></html>");

            // The HTTP response ends with another blank line
            client.println();
            // Break out of the while loop
            break;
          } else { // if you got a newline, then clear currentLine
            currentLine = "";
          }
        } else if (c != '\r') {  // if you got anything else but a carriage return character,
          currentLine += c;      // add it to the end of the currentLine
        }
      }
    }
    // Clear the header variable
    header = "";
    // Close the connection
    client.stop();
    Serial.println("Client disconnected.");
    Serial.println("");
  }
}
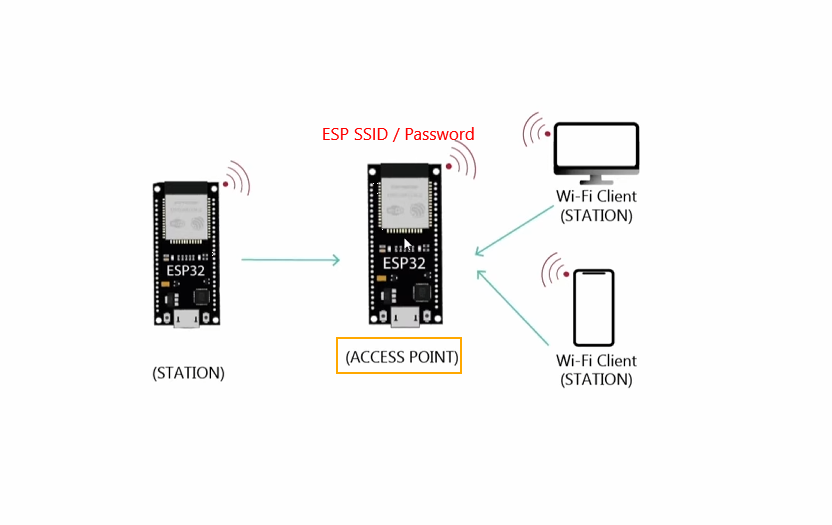
In this project, the ESP32 acts as a WiFi Access Point:
- WiFi Name (SSID):
ESP32-Network - Password:
Esp32-Password - Default IP Address:
192.168.4.1
▶️ Upload & Test
- Select your ESP32 board and COM port
- Upload the code using the (Right Arrow icon)
- Open the Serial Monitor (Tools → Serial Monitor) (baud rate 115200)
- Copy the ESP32 IP address 192.168.4.1
- Connect your phone/PC to the
ESP32-Network(Password:Esp32-Password) - Paste the IP address 192.168.4.1 into your browser
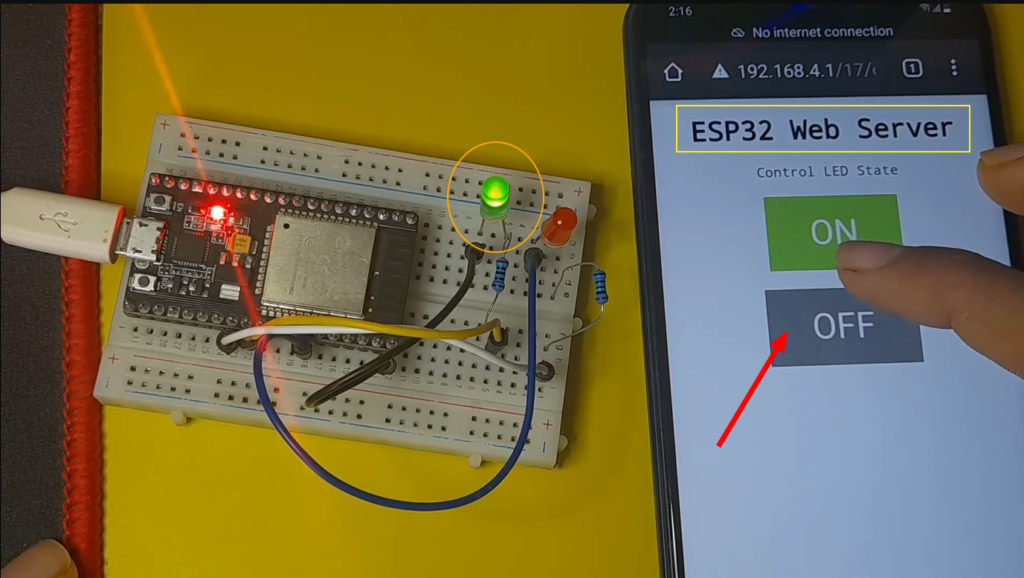
🎉 You should now see two buttons controlling the LEDs!
✍️ Code Explanation (In details):
✅ This code turns your ESP32 into a web server. We can connect directly to it using a smartphone or laptop — no router and no internet required.
1️⃣ Libraries and Network Configuration
#include <WiFi.h>

const char* ssid = "ESP32-Network";
const char* password = "Esp32-Password";
- We use the “WiFi.h” library, which enables our ESP32 WiFi features.
- Then we create an access point named “ESP32-Network” with a password “Esp32-Password“
- You can change these credentials to secure access to the web server.
2️⃣ Web Server Setup
WiFiServer server(80);
String header;
- This creates a server listening on port 80 (standard HTTP port)
- The
headervariable stores the complete HTTP request from clients
3️⃣ LED State Variables
String statePin16 = "off";
String statePin17 = "off";
const int ledPin16 = 16;
const int ledPin17 = 17;
- This code tracks LED states as strings (“on”/”off”)
- Defines which GPIO pins control the LEDs (16,17)
4️⃣ Timeout Mechanism
unsigned long currentTime = millis();
unsigned long previousTime = 0;
const long timeoutTime = 2000;
millis(): Gets time since ESP32 started (in milliseconds)timeoutTime = 2000: Client connection times out after 2 seconds- Prevents hanging connections
5️⃣ Setup Function
void setup() {
  Serial.begin(115200);
  pinMode(ledPin16, OUTPUT);
  digitalWrite(ledPin16, 0);
  pinMode(ledPin17, OUTPUT);
  digitalWrite(ledPin17, 0);

  WiFi.softAP(ssid,password);

  Serial.println("");
  Serial.println("IP address: ");
  Serial.println(WiFi.softAPIP());
  server.begin();
}
- Initialize Serial communication (115200 baud)
- Configure pins 16 & 17 as OUTPUT, set to LOW (LEDs off)
- Start WiFi Access Point:
WiFi.softAP(ssid,password) - Print AP IP address (usually 192.168.4.1)
- Start web server:
server.begin()
6️⃣ Main Loop – Client Handling
void loop() {
  WiFiClient client = server.available();   // Check for new clients
  if (client) {                             // If client connects
    currentTime = millis();
    previousTime = currentTime;
    Serial.println("New Client.");
    String currentLine = "";
server.available(): Checks for incoming client connectionsif (client): True when a client connects- Resets timeout timer
currentLine: Stores the current line of the HTTP request
7️⃣ HTTP Request Processing Loop
while (client.connected() && currentTime - previousTime <= timeoutTime) {
  currentTime = millis();
  if (client.available()) {
    char c = client.read();
    Serial.write(c);
    header += c;
- Main loop runs while client is connected and hasn’t timed out
client.read(): Reads one character from the clientSerial.write(c): Echoes character to Serial Monitor (debugging)header += c: Appends character to complete request
8️⃣ End of Request Detection
if (c == '\n') {
  if (currentLine.length() == 0) {
    // End of HTTP request detected
- HTTP requests end with two consecutive newlines (
\n) currentLine.length() == 0means empty line after header- Time to process the request and send response
9️⃣ Sending HTTP Response Headers
client.println("HTTP/1.1 200 OK");
client.println("Content-type:text/html");
client.println("Connection: close");
client.println();
HTTP Response Structure:
- Status line:
HTTP/1.1 200 OK(success) - Content type:
text/html(sending HTML) - Connection:
close(close after response) - Blank line (separates headers from content)
🔟 Parsing LED Control Commands
if (header.indexOf("GET /16/on") >= 0) {
  statePin16 = "on";
  digitalWrite(ledPin16, HIGH);
} else if (header.indexOf("GET /16/off") >= 0) {
  statePin16 = "off";
  digitalWrite(ledPin16, LOW);
}
- We use
indexOf()to search for patterns in the HTTP request - Then we check if the header contains specific GET requests:
/16/on→ Turn LED on pin 16 ON/16/off→ Turn LED on pin 16 OFF
1️⃣1️⃣ Generating HTML Page
client.println("<!DOCTYPE html><html>");
client.println("<head><meta name=\"viewport\" content=\"width=device-width, initial-scale=1\">");
client.println("<link rel=\"icon\" href=\"data:,\">");
This sends an HTML document line by line
1️⃣2️⃣ Dynamic Button Creation
if (statePin16 == "off") {
  client.println("<p><a href=\"/16/on\"><button class=\"button\">ON</button></a></p>");
} else {
  client.println("<p><a href=\"/16/off\"><button class=\"button button2\">OFF</button></a></p>");
}
Logic:
- If LED is OFF → Show green “ON” button that links to
/16/on - If LED is ON → Show gray “OFF” button that links to
/16/off - This creates a toggle mechanism for each device
1️⃣3️⃣ End of Response and Cleanup
client.println("</body></html>");
client.println();
break;
- Closes HTML tags
- Adds final blank line (end of HTTP response)
break: Exits the while loop
1️⃣4️⃣ Client Disconnection
header = "";
client.stop();
Serial.println("Client disconnected.");
- Finally, we Clear header for the next client
- Then it closes the client connection
- And prints a disconnect message
⚡Using a Relay (High Voltage Control)
To control real devices, you simply have to :
- Replace the LED with a relay module
- GPIO 16 → Relay IN
- Relay VCC → 5V / 3.3V (check module)
- Relay GND → ESP32 GND
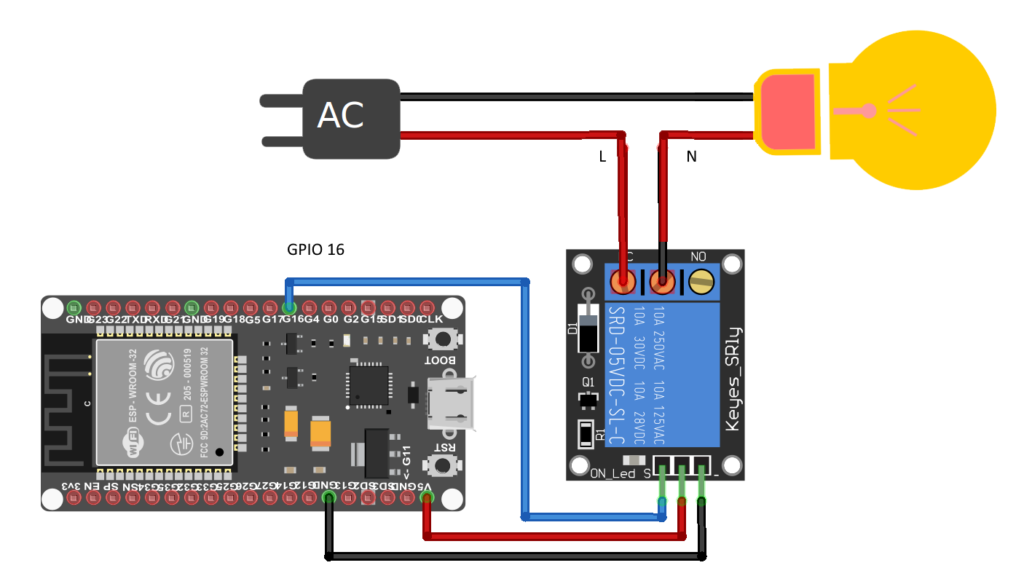
⚠️ Warning: High voltage is dangerous
The code stays the same 👍
What’s Next: Taking Your Project Further
Now that you have a working ESP32 web server, here are several directions you can take your project:
Multiple Client Support:
Modify your code to handle multiple simultaneous connections using non-blocking techniques or the WebServer library.
Transform your ESP32 microcontroller into a real-time temperature and humidity monitoring station that serves data through a web interface.
Integrate with Alexa or Google Assistant to create a voice-controlled smart lamp using an ESP32 microcontroller and an Amazon Echo Dot.