Build my One-Eyed Minion Companion Robot with ESP32 and a Round TFT Display 🤖
What if you could build a small robot companion that reacts to your touch, detects its surroundings, gets dizzy when shaken, and even displays the time, temperature, and humidity?
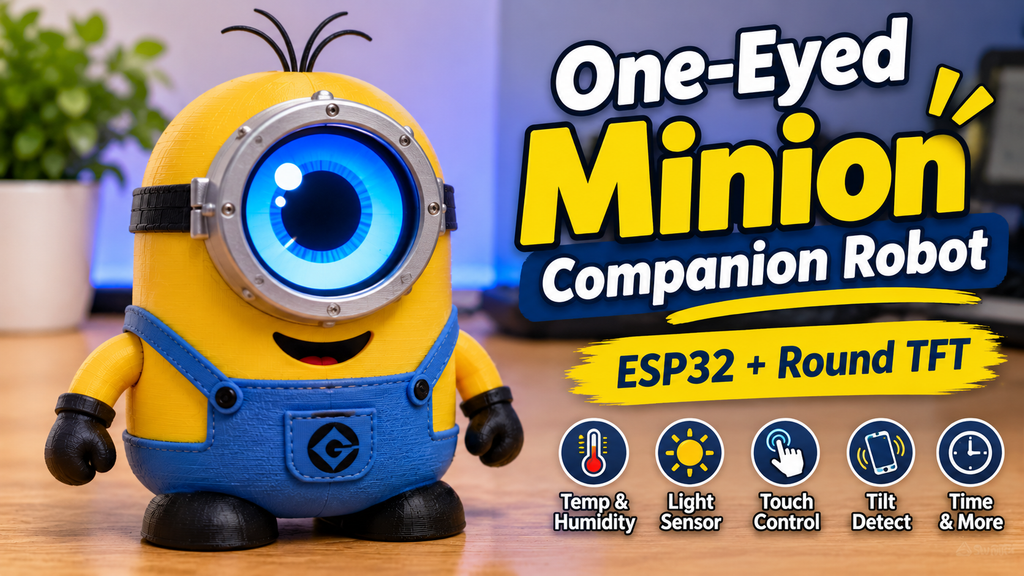
In this project, we’ll build a One-Eyed Minion Companion Robot using an ESP32 and a GC9A01 round TFT display. The display acts as the robot’s animated eye, while several sensors let it interact with its environment.
The robot features 6 different eye expressions, including normal, happy, surprised, sleepy, dizzy, and information modes. It also connects to Wi-Fi to synchronize the time using an NTP server.
This project combines electronics, programming, sensors, and 3D printing to create a fun interactive desktop companion.
1. Project Features ✨
Here is what the robot can do:
- Animated eye: Displays different expressions on the round TFT screen.
- Touch interaction: Touching the sensor makes the robot happy.
- Light detection: The LDR detects bright surroundings and triggers a surprised expression.
- Tilt detection: The tilt switch detects changes in the robot’s orientation.
- Dizzy mode: Rapid movement of the tilt switch triggers a dizzy expression.
- Information screen: Displays temperature, humidity, and synchronized time.
- Wi-Fi time synchronization: Uses an NTP server to retrieve the current time.
- Rechargeable power: Uses a lithium battery and TP4056 charging module.
2. Required Components 🔧
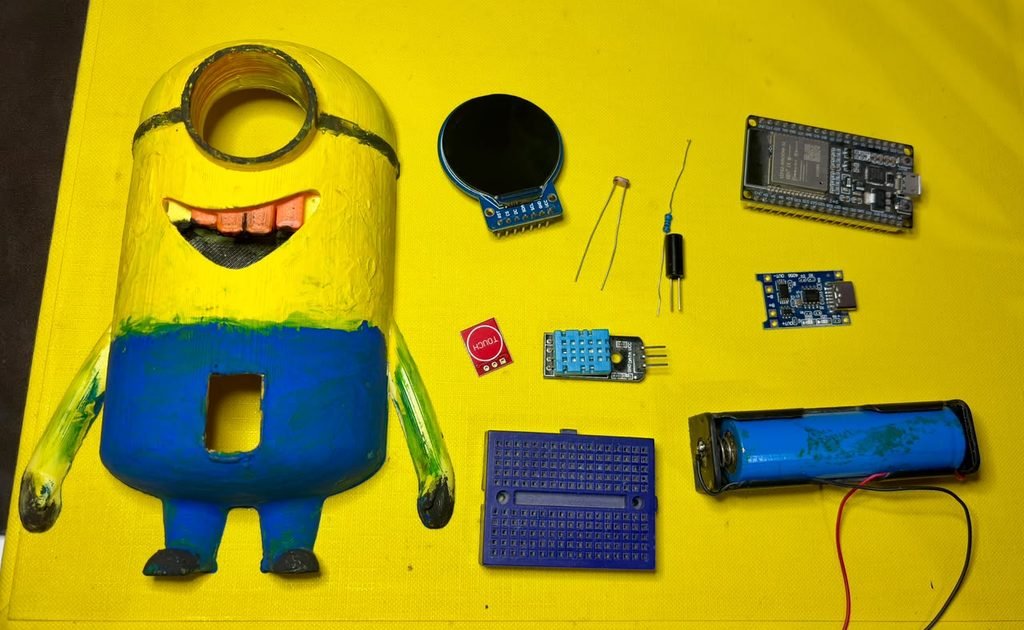
| Component | Purpose |
|---|---|
| 🧠 ESP32 Development Board | Main controller |
| 📺 GC9A01 1.28″ round TFT | The eye (240×240, SPI) |
| 🌡️ DHT11 or DHT22 sensor | Temperature and humidity |
| 💡 LDR + 10kΩ resistor | Light detection |
| 👆 TTP223 touch sensor | Touch input |
| 🎚️ Tilt switch | Orientation / shake detection |
| 🔋 TP4056 charging module | Lithium battery charging |
| 🔋 3.7V Li-Po battery (1000–2000 mAh) | Portable power |
| 🔊 Piezo buzzer (optional) | Future sound effects |
| Jumper wires Breadboard or prototype PCB USB cable | Other Components |
| 📦 3D-printed enclosure | The Minion body |
3. Understanding the Circuit 🔌
The ESP32 communicates with the GC9A01 display through SPI. The sensors connect to individual GPIO pins, allowing the program to read their values and change the eye’s expression.
GC9A01 display 📺:
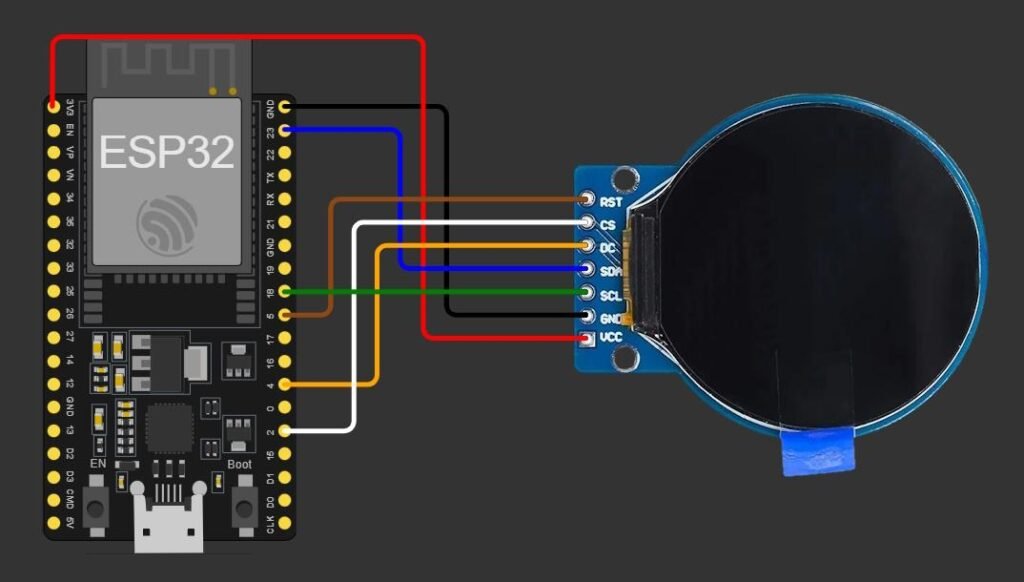
| GC9A01 pin | ESP32 |
|---|---|
| VCC | 3.3V (if required by your module) |
| GND | GND |
| SCL / SCLK | GPIO 18 |
| SDA / MOSI | GPIO 23 |
| DC | GPIO 4 |
| CS | GPIO 2 |
| RST | GPIO 5 |
| BL / BLK | GPIO 15 |
DHT Sensor 🌡️:
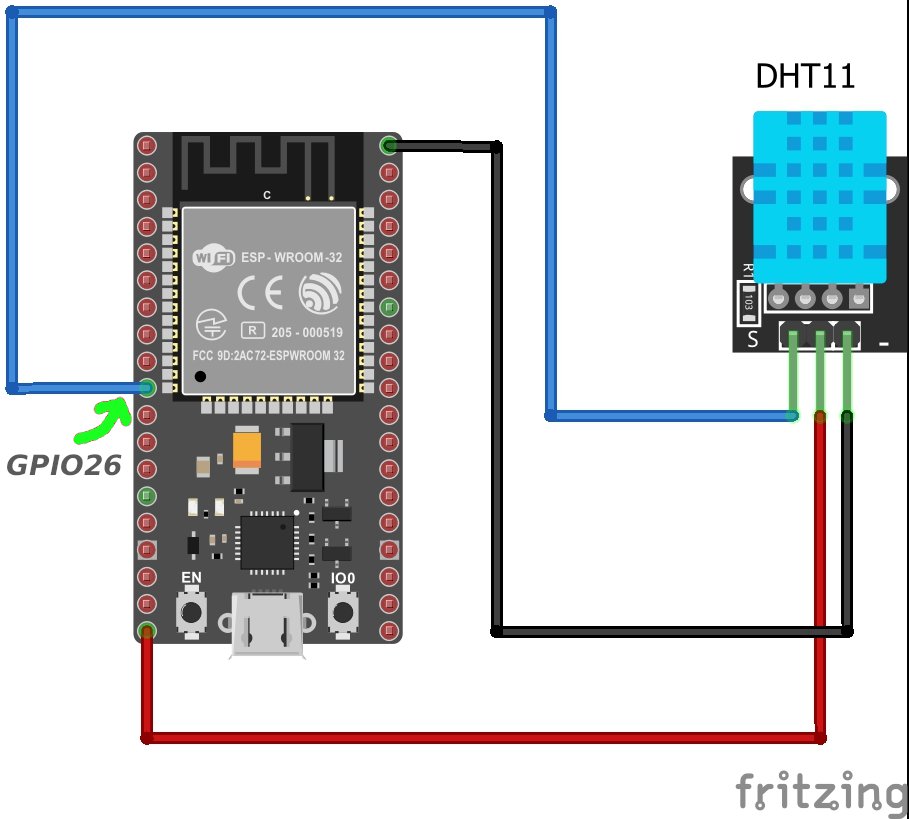
- VCC → ESP32 3.3V or 5V
- GND → ESP32 GND
- DATA → ESP32 GPIO 26 (can be any digital pin)
⚠️ Important Note:
If you are using a DHT sensor without an internal pull-up resistor, connect a 10kΩ resistor between VCC and DATA. This ensures reliable communication between the sensor and the ESP32.
Other Sensors 👁️:
TTP223 — VCC → 3.3V; GND → GND; OUT → GPIO 32
Tilt switch — one side to GPIO 33, other side to GND.
LDR voltage divider — LDR leg 1 → 3.3V; LDR leg 2 → GPIO 34 → 10kΩ → GND.
[YOUR PHOTO — breadboard wiring]
4. Battery and Charging Circuit 🔋
The robot uses a rechargeable lithium battery and a TP4056 charging module.
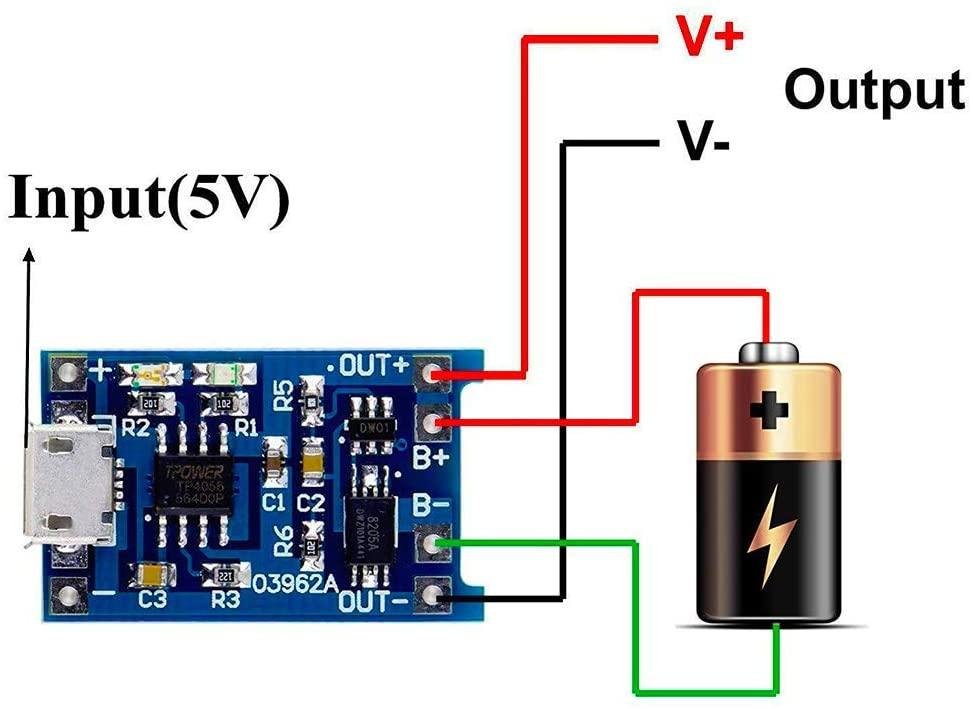
| TP4056 connection | Component |
|---|---|
| B+ | Battery positive |
| B- | Battery negative |
| OUT+ | Power circuit positive |
| OUT- | Power circuit ground |
The Code in this project does not measure battery voltage or control charging. The TP4056 handles the charging process independently.
5. Configure the GC9A01 Display 📺
To control the round display, we will use the TFT_eSPI library.
Step 1: Installation
Open your Arduino IDE. Go to Sketch -> Include Library -> Manage Libraries. Search for “TFT_eSPI” and install it by Bodmer.
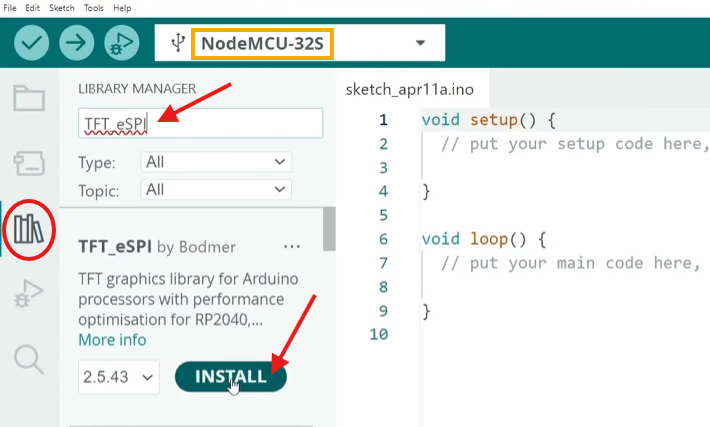
The TFT_eSPI library by Bodmer is the gold standard for these displays, but it doesn’t use “magic” auto-configuration. You must tell it exactly what screen, board, and pins you are using.
Make sure to Install the following libraries as well:
- DHT sensor library by Adafruit
- Adafruit Unified Sensor
The ESP32 Wi-Fi and time libraries are included with the ESP32 Arduino core.
Step 2: Configuration (“User_Setup_Select.h” File)
This is where most people get stuck. You cannot just run the code yet; you need to edit the library settings.
- Navigate to your Arduino libraries folder (usually
Documents/Arduino/libraries). - Open the
TFT_eSPIfolder. - Open the
User_Setup_Select.hfile in a text editor. - Comment out the generic setup lines and include the GC9A01 specific setup.
Find the section #include <User_Setups/...> and modify it to look like this:
// User_Setup_Select.h

// Comment out the generic default
//#include <User_Setup.h>           // Default setup is root library folder

// Enable the GC9A01 Round display setup file
#include <User_Setups/Setup200_GC9A01.h> // Setup file for ESP32 and GC9A01 driver
Step 3: Custom Pin Mapping (Recommended)
While Setup200_GC9A01.h Works for some boards, it’s safer to manually define your pins, which prevents conflicts and ensures that our specific wiring works.
So, open up the User_Setups Folder and edit the “Setup200_GC9A01.h” file, paste the configuration below. This matches the wiring diagram we used.
// See SetupX_Template.h for all options available
#define USER_SETUP_ID 200

#define GC9A01_DRIVER

// For ESP32 Dev board (only tested with GC9A01 display)
// The hardware SPI can be mapped to any pins

#define TFT_MOSI 23 // In some display driver board, it might be written as "SDA" and so on.
#define TFT_SCLK 18
#define TFT_CS   2  // Chip select control pin
#define TFT_DC   4  // Data Command control pin
#define TFT_RST  5  // Reset pin (could connect to Arduino RESET pin)
#define TFT_BL   21  // LED back-light

#define LOAD_GLCD   // Font 1. Original Adafruit 8 pixel font needs ~1820 bytes in FLASH
#define LOAD_FONT2  // Font 2. Small 16 pixel high font, needs ~3534 bytes in FLASH, 96 characters
#define LOAD_FONT4  // Font 4. Medium 26 pixel high font, needs ~5848 bytes in FLASH, 96 characters
#define LOAD_FONT6  // Font 6. Large 48 pixel font, needs ~2666 bytes in FLASH, only characters 1234567890:-.apm
#define LOAD_FONT7  // Font 7. 7 segment 48 pixel font, needs ~2438 bytes in FLASH, only characters 1234567890:.
#define LOAD_FONT8  // Font 8. Large 75 pixel font needs ~3256 bytes in FLASH, only characters 1234567890:-.
#define LOAD_GFXFF  // FreeFonts. Include access to the 48 Adafruit_GFX free fonts FF1 to FF48 and custom fonts

#define SMOOTH_FONT

//#define SPI_FREQUENCY  80000000
#define SPI_FREQUENCY  27000000

// Optional reduced SPI frequency for reading TFT
#define SPI_READ_FREQUENCY  5000000
Save the files. You have now successfully installed the right driver.
6. Complete ESP32 Arduino Code 💻
⚠️ Before uploading: replace YOUR_WIFI_NAME and YOUR_WIFI_PASSWORD with your own credentials. Do not publish real credentials in the article or GitHub repo.
/*********************************************************************
 *  ONE-EYED MINION COMPANION ROBOT
 *  ---------------------------------------------------------------
 *  Pins:
 *    GC9A01 : CS=5, DC=2, RST=4, MOSI=23, SCLK=18, BL=15
 *    DHT    : GPIO 26
 *    LDR    : GPIO 34 (ADC)
 *    TOUCH  : GPIO 32  (TTP223 OUT)
 *    TILT   : GPIO 33  (tilt switch)
 *
 *  TFT_eSPI User_Setup.h must define GC9A01_DRIVER and pins above.
 *********************************************************************/

#include <TFT_eSPI.h>
#include <DHT.h>
#include <WiFi.h>

// -------- WiFi & NTP --------
const char* WIFI_SSID = "YOUR_WIFI_NAME";
const char* WIFI_PASS = "YOUR_WIFI_PASSWORD";
const char* NTP_SERVER = "pool.ntp.org";
const long  GMT_OFFSET = 3600;      // your timezone offset in seconds (e.g. 3600 = UTC+1)

// -------- Pins --------

#define DHTPIN    26
#define LDR_PIN   34
#define TOUCH_PIN 32
#define TILT_PIN  33

TFT_eSPI tft = TFT_eSPI();
DHT dht(DHTPIN, DHT22);

enum EyeState { NORMAL, HAPPY, SURPRISED, SLEEPY, DIZZY, INFO };
EyeState state = NORMAL;
EyeState lastState = NORMAL;

unsigned long dizzyUntil = 0;      // when DIZZY ends
unsigned long infoUntil = 0;       // when INFO ends
unsigned long lastAction = 0;      // last time anything happened
unsigned long nextBlink = 0;
unsigned long lastSensorRead = 0;

byte shakeCount = 0;
byte tiltPrev = LOW;
int pupilX = 0, pupilY = 0;
float temperature = 0, humidity = 0;

// =====================================================================
//  SETUP
// =====================================================================
void setup() {
  Serial.begin(115200);
  pinMode(TOUCH_PIN, INPUT);
  pinMode(TILT_PIN,  INPUT_PULLUP);

  dht.begin();

  tft.init();
  tft.fillScreen(TFT_BLACK);

  WiFi.begin(WIFI_SSID, WIFI_PASS);
  unsigned long start = millis();
  while (WiFi.status() != WL_CONNECTED && millis() - start < 10000) delay(300);
  if (WiFi.status() == WL_CONNECTED) configTime(GMT_OFFSET, 0, NTP_SERVER);

  lastAction = millis();
  drawEye();
}

// =====================================================================
//  LOOP
// =====================================================================
void loop() {
  unsigned long now = millis();

  // Read temp/humidity every 2 seconds
  if (now - lastSensorRead > 2000) {
    lastSensorRead = now;
    float t = dht.readTemperature();
    float h = dht.readHumidity();
    if (!isnan(t)) temperature = t;
    if (!isnan(h)) humidity = h;
  }

  // Read sensors
  bool touchNow = digitalRead(TOUCH_PIN);
  bool tiltNow  = digitalRead(TILT_PIN);

  // Reset shake counter if no toggle for 1s
  static unsigned long lastToggle = 0;

  // Shake detection: 5 toggles
  if (tiltNow != tiltPrev) {
    lastToggle = now;
    tiltPrev = tiltNow;
    shakeCount++;
    if (shakeCount > 4) {
      dizzyUntil = now + 3000;
      shakeCount = 0;
    }
  }
  if (now - lastToggle > 1000) shakeCount = 0;

  // Track activity
  if (touchNow || tiltNow || now < dizzyUntil) lastAction = now;

  // Show INFO after 10 seconds of nothing
  if (now - lastAction > 10000 && now > infoUntil + 6000) {
    infoUntil = now + 6000;
  }

  // Pick state (first match wins)
  if (now < dizzyUntil)       state = DIZZY;
  else if (tiltNow)           state = SLEEPY;
  else if (touchNow)          state = HAPPY;
  else if (now < infoUntil)   state = INFO;
  else if (analogRead(LDR_PIN) > 3200)   state = SURPRISED;
  else                        state = NORMAL;

  // Redraw when state changes
  if (state != lastState) {
    lastState = state;
    tft.fillScreen(TFT_BLACK);
    drawEye();
  }

  // NORMAL animations
  if (state == NORMAL) {
    if (now > nextBlink) {
      blink();
      nextBlink = now + random(7000, 10000);
    }
    if (now % 3000 < 30) {
      pupilX = random(-10, 11);
      pupilY = random(-8, 9);
      tft.fillScreen(TFT_BLACK);
      drawEye();
    }
  }else{
    nextBlink= now + random(7000, 10000);
  }

  // HAPPY animation
  if (state == HAPPY && now % 2000 < 30) {
    tft.fillScreen(TFT_BLACK);
    drawEye();
  }

  // DIZZY animation
  if (state == DIZZY && now % 1000 < 30) {
    tft.fillScreen(TFT_BLACK);
    drawEye();
  }

  // INFO refresh
  if (state == INFO && now % 2000 < 30) drawInfo();

  delay(20);
}

// =====================================================================
//  drawInfo — temp, humidity, time
// =====================================================================
void drawInfo() {
  tft.fillScreen(TFT_GREENYELLOW);
  tft.setTextDatum(TC_DATUM);

  // Title — dark navy, reads strongly on yellow
  tft.setTextColor(tft.color565(20, 40, 90));
  tft.setTextSize(2);
  tft.drawString("STATUS", 120, 20);

  // TEMP label — deep red-orange
  tft.setTextColor(tft.color565(180, 50, 30));
  tft.setTextSize(2);
  tft.drawString("TEMP", 120, 55);
  // TEMP value — bright red
  tft.setTextColor(tft.color565(220, 30, 30));
  tft.setTextSize(3);
  char tBuf[12];
  snprintf(tBuf, sizeof(tBuf), "%.1f C", temperature);
  tft.drawString(tBuf, 120, 78);

  // HUMID label — deep blue
  tft.setTextColor(tft.color565(20, 60, 140));
  tft.setTextSize(2);
  tft.drawString("HUMID", 120, 115);
  // HUMID value — bright blue
  tft.setTextColor(tft.color565(20, 90, 200));
  tft.setTextSize(3);
  char hBuf[10];
  snprintf(hBuf, sizeof(hBuf), "%.0f %%", humidity);
  tft.drawString(hBuf, 120, 138);

  // TIME label — dark purple
  tft.setTextColor(tft.color565(70, 20, 110));
  tft.setTextSize(2);
  tft.drawString("TIME", 120, 175);

  // TIME value — deep purple, biggest text
  tft.setTextColor(tft.color565(90, 30, 140));
  struct tm timeinfo;
  if (getLocalTime(&timeinfo, 10)) {
    char timeBuf[6];
    strftime(timeBuf, sizeof(timeBuf), "%H:%M", &timeinfo);
    tft.setTextSize(4);
    tft.drawString(timeBuf, 120, 195);
  } else {
    tft.setTextSize(3);
    tft.drawString("--:--", 120, 195);
  }
}

// =====================================================================
//  fillIris — blue gradient
// =====================================================================
void fillIris(int x, int y, int r) {
  for (int i = r; i > 0; i--) {
    byte red   = map(i, 0, r, 110, 15);
    byte green = map(i, 0, r, 190, 55);
    byte blue  = map(i, 0, r, 250, 150);
    tft.fillCircle(x, y, i, tft.color565(red, green, blue));
  }
}

// =====================================================================
//  blink — closed lid for 140 ms
// =====================================================================
void blink() {
  tft.fillScreen(TFT_BLACK);
  for (int x = -80; x <= 80; x++) {
    int y = (int)(0.010 * x * x);
    for (int t = -4; t <= 4; t++)
      tft.drawPixel(120 + x, 120 + y + t + 10, tft.color565(90, 160, 245));
  }
  delay(140);
  tft.fillScreen(TFT_BLACK);
  drawEye();
}

// =====================================================================
//  drawEye — renders current expression
// =====================================================================
void drawEye() {
  int cx = 120, cy = 120;

  if (state == NORMAL) {
    tft.fillCircle(cx, cy, 92, TFT_WHITE);
    fillIris(cx + pupilX, cy + pupilY, 62);
    tft.fillCircle(cx + pupilX, cy + pupilY, 28, TFT_BLACK);
    tft.fillCircle(cx + pupilX - 14, cy + pupilY - 14, 10, TFT_WHITE);
    tft.fillCircle(cx + pupilX + 8, cy + pupilY + 10, 4, TFT_WHITE);
    tft.drawCircle(cx, cy, 92, TFT_BLACK);
  }
  else if (state == HAPPY) {
    tft.fillCircle(cx, cy, 92, TFT_WHITE);
    fillIris(cx, cy + 22, 62);
    tft.fillCircle(cx, cy + 22, 28, TFT_BLACK);
    tft.fillRect(cx - 96, cy - 96, 192, 88, TFT_BLACK);
    tft.fillCircle(cx, cy - 5, 93, TFT_WHITE);
    tft.fillCircle(cx, cy - 5, 91, TFT_BLACK);
    fillIris(cx, cy + 22, 60);
    tft.fillCircle(cx, cy + 22, 28, TFT_BLACK);
    tft.fillCircle(cx - 78, cy + 55, 14, tft.color565(255, 120, 150));
    tft.fillCircle(cx + 78, cy + 55, 14, tft.color565(255, 120, 150));
    tft.drawCircle(cx, cy, 92, TFT_BLACK);
  }
  else if (state == SURPRISED) {
    tft.fillCircle(cx, cy, 96, TFT_WHITE);
    fillIris(cx, cy, 82);
    tft.fillCircle(cx, cy, 32, TFT_BLACK);
    tft.fillCircle(cx - 22, cy - 22, 14, TFT_WHITE);
    tft.fillCircle(cx + 14, cy + 14, 6, TFT_WHITE);
    tft.drawCircle(cx, cy, 96, TFT_BLACK);
  }
  else if (state == SLEEPY) {
    tft.fillScreen(TFT_BLACK);
    for (int x = -80; x <= 80; x++) {
      int y = (int)(0.010 * x * x);
      for (int t = -4; t <= 4; t++)
        tft.drawPixel(cx + x, cy + y + t + 10, tft.color565(90, 160, 245));
    }
    tft.setTextColor(tft.color565(120, 190, 255));
    tft.setTextSize(3); tft.setCursor(178, 30); tft.print("Z");
    tft.setTextSize(2); tft.setCursor(205, 18); tft.print("Z");
  }
  else if (state == DIZZY) {
    tft.fillCircle(cx, cy, 95, TFT_WHITE);
    byte offset = (millis() / 240) % 32;
    for (int r = 88; r > 8; r -= 16) {
      bool dark = ((r + offset) / 16) % 2;
      tft.fillCircle(cx, cy, r, dark ? tft.color565(30, 90, 200) : tft.color565(90, 160, 245));
    }
    tft.fillCircle(cx, cy, 12, TFT_BLACK);
    tft.drawCircle(cx, cy, 95, TFT_BLACK);
  }
  else if (state == INFO) {
    drawInfo();
  }
}
Once the code is uploaded, the robot will start by initializing the display, sensors, and Wi-Fi connection.
7. How the Robot Behaves 🎭
The program includes 6 different expressions:
| Interaction | Expression |
|---|---|
| Nothing happening | NORMAL — blinks, looks around |
| Touch the sensor | HAPPY — squint |
| Shine light on it | SURPRISED — wide eye |
| Lay it flat | SLEEPY — closed lid + Z Z |
| Shake it | DIZZY — spinning rings (2 s) |
| 10 s of inactivity | INFO — temp, humidity, time (5 s) |
Priority order: DIZZY > SLEEPY > HAPPY > SURPRISED > INFO > NORMAL
😊 Normal Mode:
The robot looks around by moving its pupil randomly. It also blinks at random intervals.
😄 Happy Mode:
When you touch the TTP223 sensor the robot display a happy expression.
😲 Surprised Mode:
If the LDR reading exceeds the configured threshold, the robot switches to its surprised expression.
😴 Sleepy Mode:
The robot changes its expression when the tilt switch reaches its configured active orientation.
😵 Dizzy Mode:
Quickly shake or change the robot’s orientation several times. Five detected switch transitions within one second trigger this mode.
📊 Info Mode
After approximately 10 seconds without touch or tilt activity, the robot displays temperature, humidity, and time for 6 seconds.
Priority order: 😵 DIZZY > 😴 SLEEPY > 😄 HAPPY > 😲 SURPRISED > 📊 INFO > 😊 NORMAL
The order of state selection matters. For example, dizzy mode has priority over sleepy mode, touch, information, and the light sensor.
8. Building the Robot Enclosure 📦
Once the electronics are working, you can create a custom enclosure using your 3D printer.
I designed a yellow Minion-style body with a single large eye.
[YOUR PHOTO — 3D printed enclosure]
A suitable design should include:
- A circular opening for the GC9A01 display.
- Space behind the display for its wiring.
- Access to the USB charging port.
- A secure battery compartment.
- A small opening for the buzzer.
Make sure the LDR and DHT22 are not hidden inside a sealed enclosure. The DHT22 needs exposure to the surrounding air, and the LDR needs to receive ambient light.
9. Possible Future Improvements 🚀
This project can be extended with additional features:
- Buzzer sound effects: Add different sounds for happy, surprised, sleepy, and dizzy modes.
- Battery monitoring: Use an ADC voltage divider to display battery percentage.
- More eye animations: Add angry, confused, crying, and excited expressions.
- Voice interaction: Add a microphone module to detect sound or simple voice commands.
- Bluetooth control: Allow a smartphone to trigger expressions.
- Custom animations: Create sprite-based eye animations for smoother movement.
- Sleep management: Reduce display brightness and Wi-Fi activity to save battery.
10. Conclusion 🎉
The One-Eyed Minion Companion Robot is a fun ESP32 project that combines animated graphics, environmental sensors, touch interaction, and Wi-Fi connectivity.
The GC9A01 round display gives the robot its personality, while the DHT22, LDR, touch sensor, and tilt switch allow it to respond to its surroundings.
You can start with the basic circuit on a breadboard, test each feature, and then design a custom 3D-printed enclosure to turn it into a unique desktop companion.
It is also a great foundation for experimenting with more advanced robotics, animations, and interactive electronic devices.
One final implementation note: Your actual firmware does not yet produce buzzer sounds or monitor battery level, so those are listed as hardware and future improvements rather than working features. Also, the eye drawing functions are a starting point; you can refine the eyelid shapes and add sprite animations to make the expressions more natural.