Build a Gesture-Controlled Animatronic Eye Using Arduino and MediaPipe
Remember those lifelike animatronic characters from Disney rides or sci-fi movies? The ones where the eyes seem to truly look at you, blinking with perfect timing?
What if you could build one yourself — and control it just by moving your hand?
Today, We’ll combine Arduino, Python, MediaPipe Hand Tracking, and Servo Motors to build an animatronic eye controlled entirely by hand gestures. Using a webcam and computer vision, we’ll track our fingers in real time and convert those movements into servo commands that move the eyelid and eyeball.
🧠 Our previous project controlled an LED’s brightness using finger distance. This animatronic eye is a major leap forward:
📦 What You’ll Need
Hardware Components
| Component | Quantity |
|---|---|
| Arduino Uno (or compatible board: Nano/Mega) | 1 |
| Micro servo (SG90 or similar) | 2 |
| 3D-printed or craft-built eye mechanism | 1 |
| Breadboard | 1 |
| Jumper wires (male-to-female recommended) | a few |
| Computer with webcam | 1 |
I highly recommend getting a complete starter kit that includes everything you need to create a wide range of projects.
Software:
- Python 3.11 (critical – MediaPipe doesn’t yet support 3.12+)
- PyCharm Community Edition (free)
- Arduino IDE (just for one upload)
🔧 Step 1: Prepare Your Arduino
Just like before, your Arduino needs the StandardFirmata sketch:
- Open Arduino IDE
- Connect your Arduino via USB
- Navigate to:
File → Examples → Firmata → StandardFirmata - Click Upload
✅ Close the Arduino IDE — we’re working entirely in Python now.
🎯 Step 2: Build the Animatronic Eye
You have two options here:
Option A: 3D Print a Mechanism (Recommended)
Search Thingiverse or Printables for “animatronic eye servo mechanism“. You’ll find designs that hold:
- One servo for eyelid rotation (vertical axis)
- One servo for eyeball panning (horizontal axis)
Option B: DIY Craft Version
Materials:
- 2 ping pong balls (one for eye, one for socket)
- Hot glue gun
- Cardboard or foam board
- Two small screws for servo horns
Assembly:
- Cut a hole in a box/board for the “eye socket.”
- Mount one servo to control the eyelid (a cardboard flap)
- Mount the second servo to pan the eyeball left/right
- Connect both servos to your breadboard/Arduino
Wiring Diagram
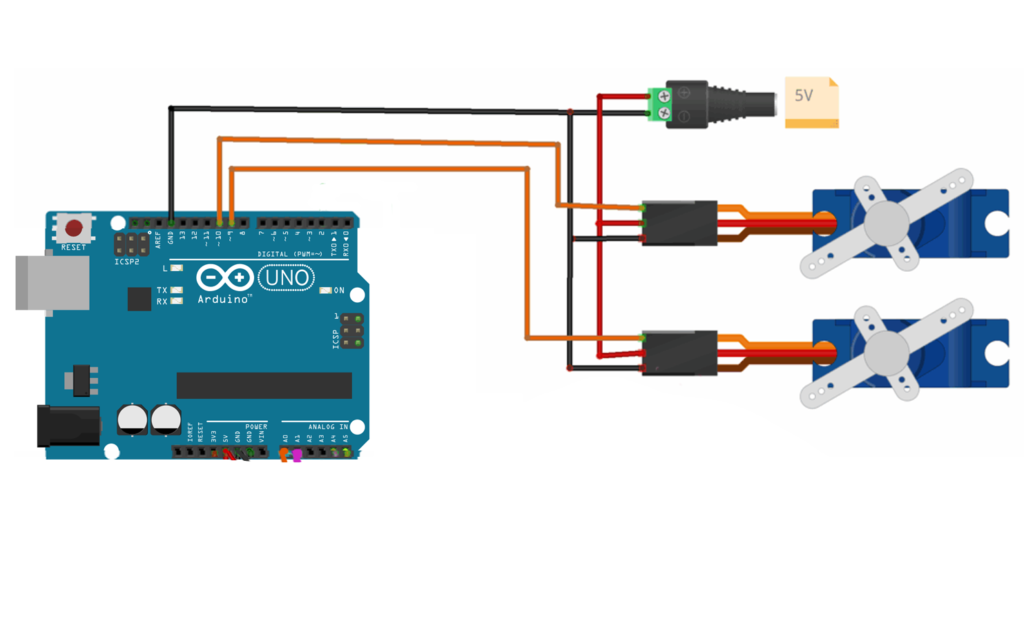
⚠️ Power warning: Two servos can draw significant current. If you experience resets or erratic movement, use an external 5V power supply (shared ground with Arduino).
💻 Step 3: The Complete Code
Create a new Python project in PyCharm: animatronic_eye
Before running: Download the MediaPipe hand landmark model:
- Download
hand_landmarker.taskfrom Google’s MediaPipe repository - Place it in the same folder as your Python script
Now, copy this complete, corrected code:
"""
Animatronic Eye Control with Hand Gestures
Controls two servos: eyelid (pin 9) and eyeball (pin 10)
"""
# STEP 1: Import the necessary modules.
import cv2
import numpy as np
import mediapipe as mp
from mediapipe.tasks import python
from mediapipe.tasks.python import vision
from pyfirmata2 import Arduino

# ========== CONFIGURATION ==========
PORT = 'COM5'        # CHANGE THIS to your Arduino port
LidPin = 9          # PWM pin on Arduino
BallPin = 10        # PWM pin on Arduino$
# ===================================

# --- 1. Connect to Arduino via PyFirmata ---
print("Connecting to Arduino...")
board = Arduino(PORT)

LidServo = board.get_pin(f'd:{LidPin}:s')  # 's' = Servo output
BallServo = board.get_pin(f'd:{BallPin}:s')  # 's' = Servo output
print("✅ Arduino ready")

# --- 2. Setup MediaPipe Hand Tracking ---
base_options = python.BaseOptions(model_asset_path='hand_landmarker.task')
options = vision.HandLandmarkerOptions(base_options=base_options,
                                       num_hands=1)
detector = vision.HandLandmarker.create_from_options(options)


# --- 3. Start Webcam ---
# !! Use CAP_DSHOW to bypass default Windows 11 backend issues
cap = cv2.VideoCapture(0, cv2.CAP_DSHOW)
cap.set(cv2.CAP_PROP_FRAME_WIDTH, 800)
cap.set(cv2.CAP_PROP_FRAME_HEIGHT, 600)

w = cap.get(cv2.CAP_PROP_FRAME_WIDTH)
h = cap.get(cv2.CAP_PROP_FRAME_HEIGHT)

print("📸 Webcam started. Show your hand to the camera.")
print("👉 Press 'q' to quit.")

while cap.isOpened():
    success, frame = cap.read()
    if not success:
        continue

    # Mirror image for natural feel
    frame = cv2.flip(frame, 1)

    # Convert BGR -> RGB for MediaPipe
    rgb = cv2.cvtColor(frame, cv2.COLOR_BGR2RGB)

    # Load the input image from a numpy array.
    mp_image = mp.Image(image_format=mp.ImageFormat.SRGB, data=rgb)

    # Detect hand landmarks from the input image.
    result = detector.detect(mp_image)

    # Default angles (if no hand detected)
    LidAngle = BallAngle = 0.0
    print(result)

    print("Hands detected:", len(result.hand_landmarks))

    if result.hand_landmarks:
        for hand_landmarks in result.hand_landmarks:
            # Draw all 21 landmarks
            #mp_draw.draw_landmarks(frame, hand_landmarks, mp_hands.HAND_CONNECTIONS)

            # Get thumb tip (ID 4) and index tip (ID 8)
            thumb = hand_landmarks[4]
            index = hand_landmarks[8]

            # Convert normalized coordinates to pixel positions
            x1, y1 = int(thumb.x * w), int(thumb.y * h)
            x2, y2 = int(index.x * w), int(index.y * h)

            # Draw circles and line
            cv2.circle(frame, (x1, y1), 10, (255, 0, 0), cv2.FILLED)
            cv2.circle(frame, (x2, y2), 10, (255, 0, 0), cv2.FILLED)
            cv2.line(frame, (x1, y1), (x2, y2), (0, 255, 255), 3)

            # Euclidean distance between fingertips
            distance = np.linalg.norm([x2 - x1, y2 - y1])

            # Map distance (pixels) to Angle  (0 to 90)
            LidAngle = np.interp(distance, [20, 200], [0, 90])
            LidAngle = max(0.0, min(90, LidAngle))

            # Map thumb.x to Angle  (0 to 90)
            BallAngle = np.interp(thumb.x, [0, 1], [0, 90])
            BallAngle = max(0.0, min(90, BallAngle))

            # Send to Arduino
            LidServo.write(LidAngle)
            BallServo.write(BallAngle)

            # ----- On-screen UI: Brightness bar -----
            bar_height = int(np.interp(LidAngle, [0, 90], [400, 150]))
            cv2.rectangle(frame, (50, 150), (85, 400), (0, 255, 0), 2)
            cv2.rectangle(frame, (50, bar_height), (85, 400), (0, 255, 0), cv2.FILLED)
            percent = int((LidAngle/90) * 100)
            cv2.putText(frame, f"{percent}%", (40, 140),
                        cv2.FONT_HERSHEY_SIMPLEX, 1, (0, 255, 0), 2)
            cv2.putText(frame, f"Dist: {int(distance)}px", (10, 50),
                        cv2.FONT_HERSHEY_SIMPLEX, 0.7, (255, 255, 255), 2)

    else:
        # No hand detected → Reset Servos
        LidServo.write(45)
        BallServo.write(50)

    # Show the video feed
    cv2.imshow("Gesture Controlled Eye", frame)

    if cv2.waitKey(1) & 0xFF == ord('q'):
        break

# --- Cleanup ---
cap.release()
cv2.destroyAllWindows()
board.exit()
print("👋 Goodbye!")
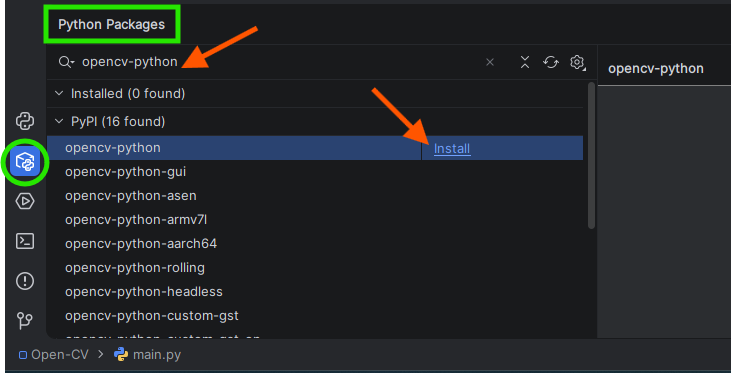
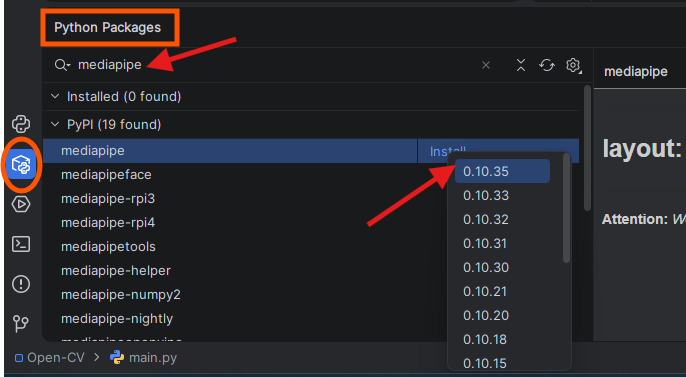
⭐ Install the required Python packages:
| Library | Purpose |
|---|---|
OpenCV (opencv-python) | Capturing and displaying webcam video |
| MediaPipe | Hand tracking and gesture recognition |
| NumPy | Mathematical calculations and distance measurement |
| PyFirmata2 | Communication between Python and Arduino |

🚀 Step 4: Run Your Animatronic Eye
- Connect your Arduino via USB
- Double-check the PORT in the code (line 18)
- Verify
hand_landmarker.taskis in your project folder - In PyCharm, Press the Green Button → Run
What you should see:
- A webcam window opens, showing your hand
- The servos are moving as you:
- Pinch thumb and index → Eyelid closes
- Move your hand left/right → Eyeball tracks
🎮 Gesture Mapping Explained
Let’s break down the two control gestures:
Gesture 1: Eyelid Control (Blink)
distance = distance between thumb tip and index tip
lid_angle = map(distance, [20, 200], [0, 90])
- Pinch fingers together (20px) → Eyelid closes to 0°
- Spread fingers apart (200px) → Eyelid opens to 90°
- Why 0-90°? Most micro servos have a 0-180° range, but eyelids need only ~90° of motion. Using a smaller range gives finer control.
Gesture 2: Eyeball Control (Panning)
eyeball_angle = map(thumb_tip.x, [0.0, 1.0], [0, 90])
- Thumb far left (thumb.x ≈ 0) → Eyeball points left (0°)
- Thumb in center (thumb.x ≈ 0.5) → Eyeball centers (~45°)
- Thumb far right (thumb.x ≈ 1) → Eyeball points right (90°)
Why use a thumb? Instead of palm position?
Because your thumb naturally moves when you point, giving a more expressive “pointing” gesture for the eyeball.
💡 What Makes This Project Special
Compared to the LED Dimmer:
- Two independent actuators → True multi-gesture control
- Servos instead of LEDs → Physical movement, not just brightness
- MediaPipe Tasks API → Modern, better performance, future-proof
- Neutral fallback → Hardware doesn’t “jump” when the hand disappears
Real-World Applications:
- Prosthetic eye control for animatronic characters
- Assistive technology for people with limited mobility
- Interactive art installations that “watch” visitors
- Robotic companion that makes eye contact
Instead of hand tracking, make the eye follow your face using MediaPipe Face Detection. The eye would then maintain eye contact with you!
🏁 Final Thoughts
You’ve just built something remarkable:
✅ Dual gesture recognition (distance + position)
✅ Two independent servos working together
✅ Modern MediaPipe Tasks API
✅ Smooth, real-time control from webcam to hardware
This is the same technology used in Hollywood animatronics, just on your desk for a fraction of the cost.
Your animatronic eye isn’t just a project — it’s a foundation. From here, you can build:
- A robot head that makes eye contact
- A smart mirror that watches your gestures
- A therapeutic companion for children
Now go make that eye blink. It’s waiting to see what you’ll create next. 👁️🤖