Getting Started with the ESP32-CAM 🚀Complete Guide
The ESP32-CAM is one of the most exciting and affordable microcontrollers in the IoT and embedded vision world. For under $10, this tiny board packs:
- 📡 WiFi + Bluetooth
- 📷 Built-in camera
- 💾 MicroSD card support
- 🧠 Powerful ESP32 processor
However, because it lacks a built-in USB port, getting started can be a bit tricky for beginners. This guide will walk you through everything you need to know, from the hardware required to streaming your first live video over Wi-Fi.
🧰 What You Need?
Unlike a standard Arduino or an ESP32 dev board, the ESP32-CAM does not have a USB port. Therefore, you will need a few extra components to program it.
Essential Hardware:
- ESP32-CAM Module: The most common variant is the AI-Thinker model .
- USB-to-Serial Adapter: An FTDI programmer (or any adapter with a CH340 chip) is required to connect the board to your computer. *Note: If you purchase an ESP32-CAM-MB board, it comes with a built-in USB interface, making this adapter unnecessary
- Jumper Wires: Female-to-female wires are needed to connect the FTDI adapter to the ESP32-CAM pins .
- Power Supply: During Wi-Fi transmission, the board draws significant current. An unstable USB port might cause crashes. A dedicated 5V power supply (at least 2A) is recommended for stable operation.
If you want to follow along with my projects, I highly recommend getting a complete ESP32 + Cam starter kit. It will save you time, money, and frustration—and help you learn IoT much faster.
🔌 Step 1: Wiring the ESP32-CAM (FTDI)
You must use an FTDI to program your ESP32-Cam board:
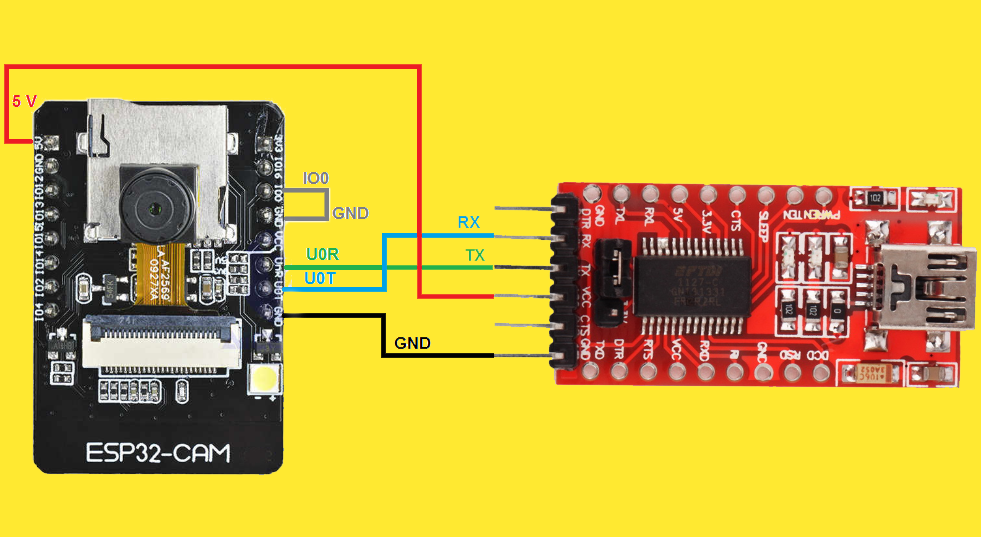
📌 Connections:
| FTDI | ESP32-CAM |
|---|---|
| 5V (5V Jumper Trigger) | 5V (Use 5V, not 3.3V) |
| GND | GND |
| TX | U0R |
| RX | U0T |
| GND → IO0 (for flashing mode) |
⚠️ Important:
Connecting IO0 to GND puts the ESP32-CAM into “flashing mode“. You must have this connection made before powering on the board to upload new code. Once the upload is complete, you must disconnect IO0 from GND and press the reset button to run the program normally.
Step 2: Installing USB Drivers (Windows Users)
This step is critical for Windows! The ESP32 Cam needs specific drivers to communicate with your computer. First, open up your device manager:
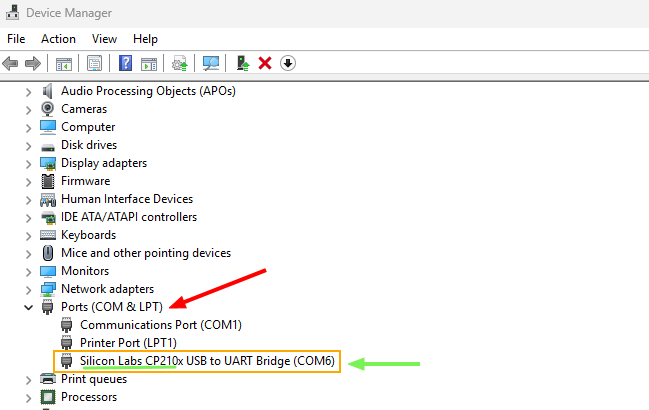
- Check your ESP32’s USB chip (usually CP2102 or CH340): You could go to “Device Manager” from your computer and check for the driver name
- Download drivers:
- CP210x: Silabs Driver
- CH340: WCH Driver
- Install it, then restart your computer
💻 Step 3: Install Arduino IDE & ESP32 Board
Download and install the Arduino IDE for your operating system.
Next, we need to add ESP32 support:
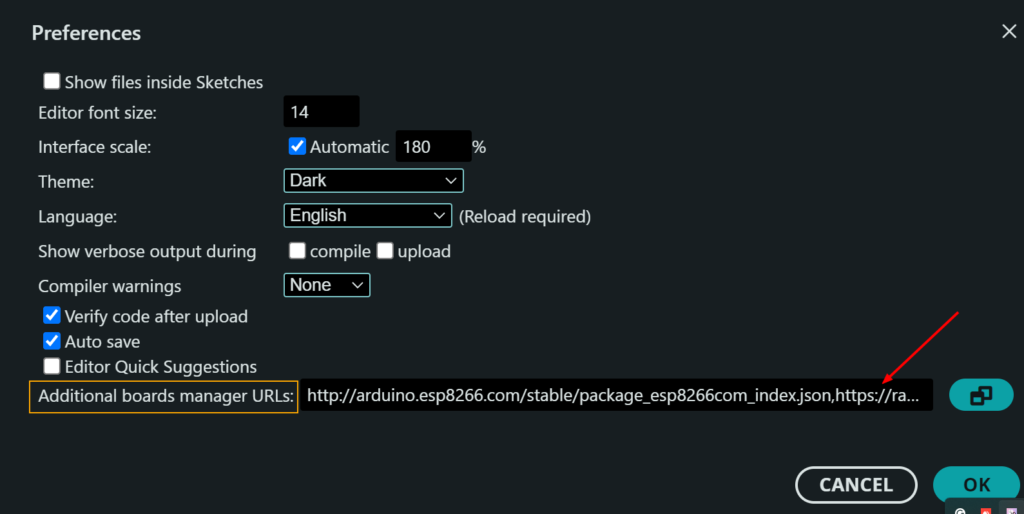
- From the Arduino IDE, Head over to File → Preferences.
- In Additional Boards Manager URLs, paste this text: http://arduino.esp8266.com/stable/package_esp8266com_index.json, https://raw.githubusercontent.com/espressif/arduino-esp32/gh-pages/package_esp32_index.json
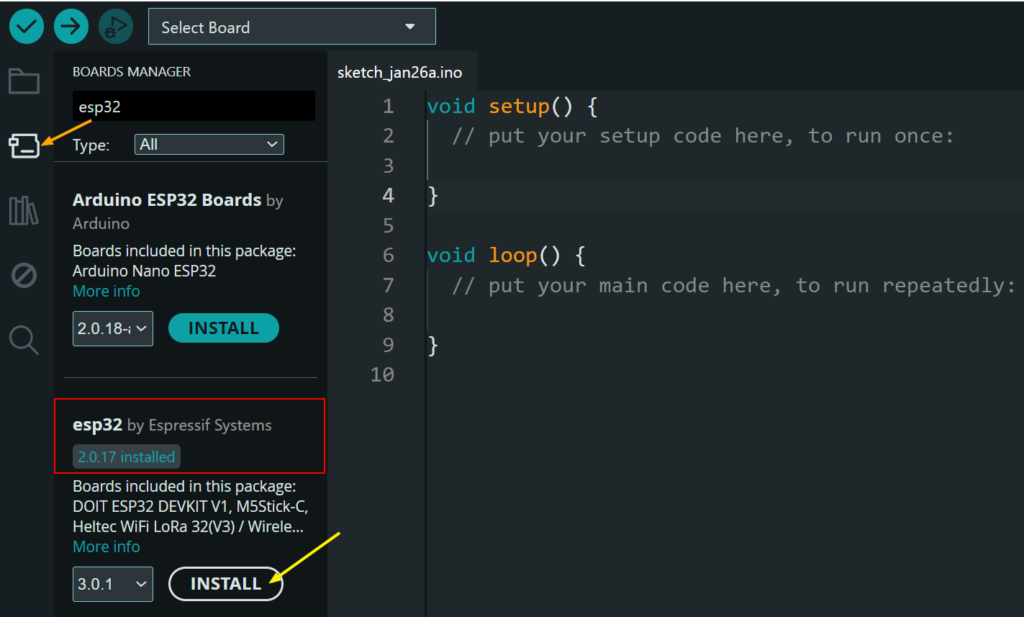
- Next, go to Tools → Board → Boards Manager, search “ESP32”, and install “esp32 by Espressif Systems”.
📷 Step 4: Upload the Camera Web Server Example
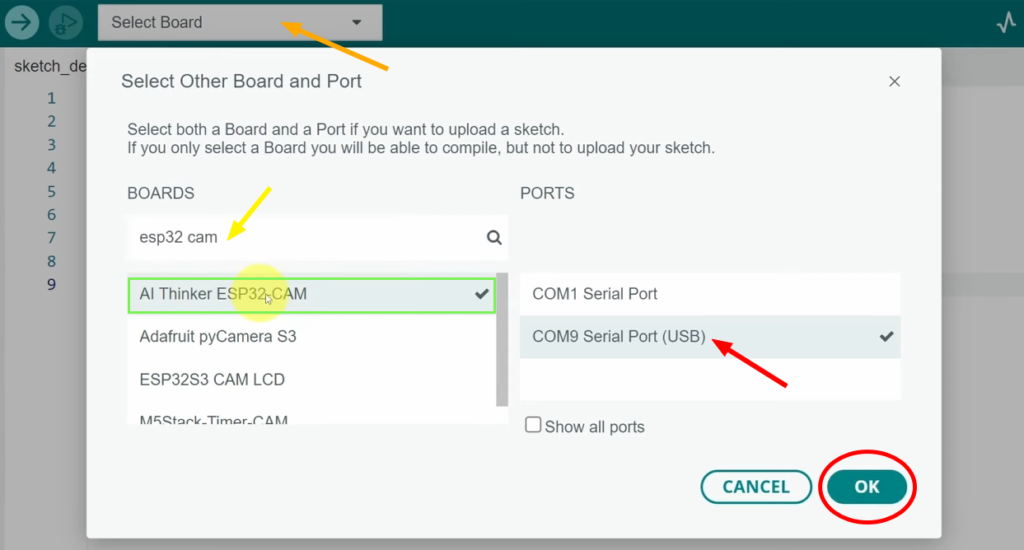
- First, select the Board
AI Thinker ESP32-CAMand choose the right COM Port - Now Go to:
File → Examples → ESP32 → Camera → CameraWebServer
#include "esp_camera.h"
#include <WiFi.h>

// Select camera model
// ===================
//#define CAMERA_MODEL_WROVER_KIT // Has PSRAM
//#define CAMERA_MODEL_ESP_EYE // Has PSRAM
//#define CAMERA_MODEL_ESP32S3_EYE // Has PSRAM
//#define CAMERA_MODEL_M5STACK_PSRAM // Has PSRAM
//#define CAMERA_MODEL_M5STACK_V2_PSRAM // M5Camera version B Has PSRAM
//#define CAMERA_MODEL_M5STACK_WIDE // Has PSRAM
//#define CAMERA_MODEL_M5STACK_ESP32CAM // No PSRAM
//#define CAMERA_MODEL_M5STACK_UNITCAM // No PSRAM
#define CAMERA_MODEL_AI_THINKER // Has PSRAM
//#define CAMERA_MODEL_TTGO_T_JOURNAL // No PSRAM
//#define CAMERA_MODEL_XIAO_ESP32S3 // Has PSRAM

#include "camera_pins.h"

// ===========================
// Enter your WiFi credentials
// ===========================
const char* ssid = "**********";
const char* password = "**********";

void startCameraServer();
void setupLedFlash(int pin);

void setup() {
  Serial.begin(115200);
  Serial.setDebugOutput(true);
  Serial.println();

  camera_config_t config;
  config.ledc_channel = LEDC_CHANNEL_0;
  config.ledc_timer = LEDC_TIMER_0;
  config.pin_d0 = Y2_GPIO_NUM;
  config.pin_d1 = Y3_GPIO_NUM;
  config.pin_d2 = Y4_GPIO_NUM;
  config.pin_d3 = Y5_GPIO_NUM;
  config.pin_d4 = Y6_GPIO_NUM;
  config.pin_d5 = Y7_GPIO_NUM;
  config.pin_d6 = Y8_GPIO_NUM;
  config.pin_d7 = Y9_GPIO_NUM;
  config.pin_xclk = XCLK_GPIO_NUM;
  config.pin_pclk = PCLK_GPIO_NUM;
  config.pin_vsync = VSYNC_GPIO_NUM;
  config.pin_href = HREF_GPIO_NUM;
  config.pin_sccb_sda = SIOD_GPIO_NUM;
  config.pin_sccb_scl = SIOC_GPIO_NUM;
  config.pin_pwdn = PWDN_GPIO_NUM;
  config.pin_reset = RESET_GPIO_NUM;
  config.xclk_freq_hz = 20000000;
  config.frame_size = FRAMESIZE_UXGA;
  config.pixel_format = PIXFORMAT_JPEG; // for streaming
  //config.pixel_format = PIXFORMAT_RGB565; // for face detection/recognition
  config.grab_mode = CAMERA_GRAB_WHEN_EMPTY;
  config.fb_location = CAMERA_FB_IN_PSRAM;
  config.jpeg_quality = 12;
  config.fb_count = 1;

  // if PSRAM IC present, init with UXGA resolution and higher JPEG quality
  //                      for larger pre-allocated frame buffer.
  if(config.pixel_format == PIXFORMAT_JPEG){
    if(psramFound()){
      config.jpeg_quality = 10;
      config.fb_count = 2;
      config.grab_mode = CAMERA_GRAB_LATEST;
    } else {
      // Limit the frame size when PSRAM is not available
      config.frame_size = FRAMESIZE_SVGA;
      config.fb_location = CAMERA_FB_IN_DRAM;
    }
  } else {
    // Best option for face detection/recognition
    config.frame_size = FRAMESIZE_240X240;
#if CONFIG_IDF_TARGET_ESP32S3
    config.fb_count = 2;
#endif
  }

#if defined(CAMERA_MODEL_ESP_EYE)
  pinMode(13, INPUT_PULLUP);
  pinMode(14, INPUT_PULLUP);
#endif

  // camera init
  esp_err_t err = esp_camera_init(&config);
  if (err != ESP_OK) {
    Serial.printf("Camera init failed with error 0x%x", err);
    return;
  }

  sensor_t * s = esp_camera_sensor_get();
  // initial sensors are flipped vertically and colors are a bit saturated
  if (s->id.PID == OV3660_PID) {
    s->set_vflip(s, 1); // flip it back
    s->set_brightness(s, 1); // up the brightness just a bit
    s->set_saturation(s, -2); // lower the saturation
  }
  // drop down frame size for higher initial frame rate
  if(config.pixel_format == PIXFORMAT_JPEG){
    s->set_framesize(s, FRAMESIZE_QVGA);
  }

#if defined(CAMERA_MODEL_M5STACK_WIDE) || defined(CAMERA_MODEL_M5STACK_ESP32CAM)
  s->set_vflip(s, 1);
  s->set_hmirror(s, 1);
#endif

#if defined(CAMERA_MODEL_ESP32S3_EYE)
  s->set_vflip(s, 1);
#endif

// Setup LED FLash if LED pin is defined in camera_pins.h
#if defined(LED_GPIO_NUM)
  setupLedFlash(LED_GPIO_NUM);
#endif

  WiFi.begin(ssid, password);
  WiFi.setSleep(false);

  while (WiFi.status() != WL_CONNECTED) {
    delay(500);
    Serial.print(".");
  }
  Serial.println("");
  Serial.println("WiFi connected");

  startCameraServer();

  Serial.print("Camera Ready! Use 'http://");
  Serial.print(WiFi.localIP());
  Serial.println("' to connect");
}

void loop() {
  // Do nothing. Everything is done in another task by the web server
  delay(10000);
}
Before uploading the sketch, put your own Wi-Fi credentials by adjusting these lines of code:
const char* ssid = "YOUR_WIFI_NAME";
const char* password = "YOUR_WIFI_PASSWORD";
Then press the Upload Button (Arrow). Once it’s done uploading:
- Disconnect GPIO0 from the GND
- And press the Reset button
🌐 Step 5: Access the Camera Stream
After resetting, the board will attempt to connect to your Wi-Fi.
Open the Serial Monitor: Go to Tools > Serial Monitor. Make sure the baud rate is set to 115200.
Getting the IP Address: If you press the reset button on the ESP32-CAM. The Serial Monitor will display debugging information. Once connected to Wi-Fi, it will print an IP address, usually starting with 192.168.x.x
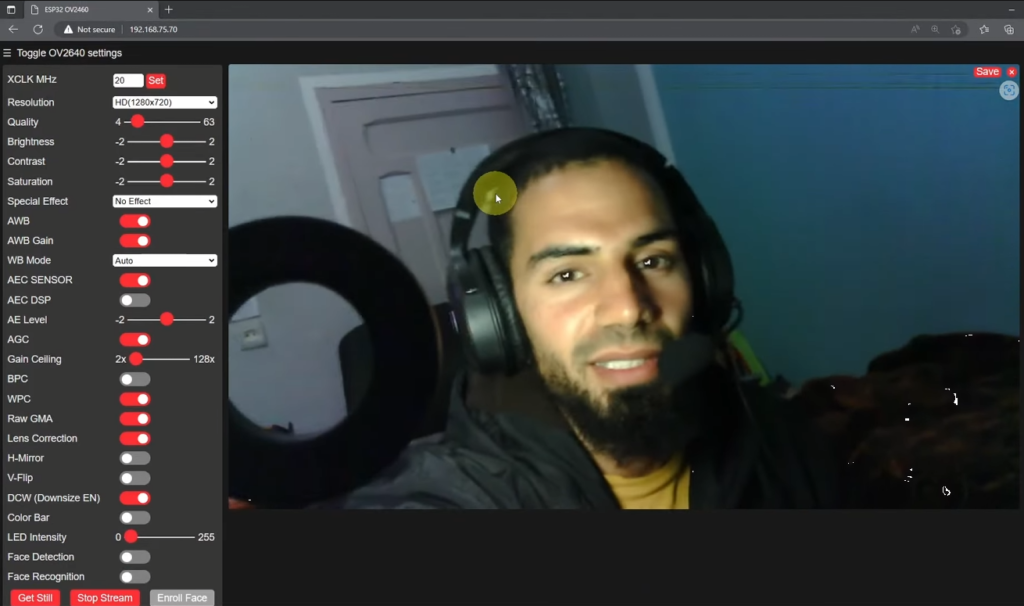
View the Stream: Open a web browser on your phone or computer (connected to the same Wi-Fi network) and enter that IP address.
🎉 You now have a live-streaming camera over Wi-Fi!
🔁 Project Overview (In Simple Terms)
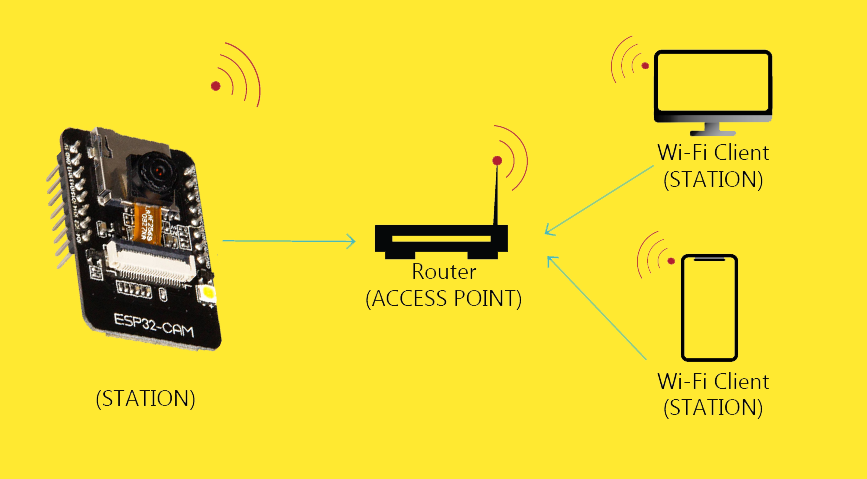
Our ESP32-CAM acts like a tiny website hosted inside the board:
📡 It connects to WiFi using the SSID and password you provided
🌐 Then, it keeps waiting for visitors (your browser)
📷 When you enter the ESP32’s IP address, it captures images
📤 and sends them back as a live stream
🔥 What Can You Build?
With ESP32-CAM, you can create:
- 📷 Home security camera
- 🚪 Smart doorbell
- 👁 Face detection system
- 📡 Wireless surveillance system
- 🧠 AI object recognition project
🛠 Troubleshooting Tips
✅ If upload fails:
- Check that the GPIO Pin 0 is connected to GND
- Make sure the correct COM port is selected
- Try pressing RESET during upload
✅ If camera doesn’t stream:
- Ensure stable 5V power
- Check WiFi credentials
- Try a different USB cable
💡 Final Thoughts
The ESP32-CAM is one of the best low-cost IoT camera modules for beginners and advanced makers alike. With WiFi, camera support, and powerful processing, it opens the door to endless smart projects.
If you’re into IoT, security systems, or smart home projects — this module is a must-have!