Control an ESP32 from Anywhere 🌍 in the World Using Google Firebase
Introduction
Imagine being able to turn on a light in your living room while sitting on a beach in Thailand. Or check the temperature of your greenhouse from your office. With an ESP32 and Google Firebase, this isn’t science fiction — it’s surprisingly simple.
So, I’ll show you how to control an LED (or any device) connected to an ESP32 from anywhere in the world using Firebase Realtime Database. No port forwarding, no static IP, no MQTT broker management. Just pure cloud power.
📌 Before We Begin: If you’re completely new to the ESP32, I recommend checking out my previous blog post, an Ultimate ESP32 Beginner’s Guide.
🧰 Components Needed
| Component | Quantity |
|---|---|
| ESP32 development board | 1 |
| LED (any color) | 1 |
| 220Ω resistor | 1 |
| Breadboard & jumper wires | few |
| Micro-USB cable | 1 |
💡 Note: You can replace the LED with a relay module to control fans, pumps, or other AC/DC devices.
🔌 Hardware Setup
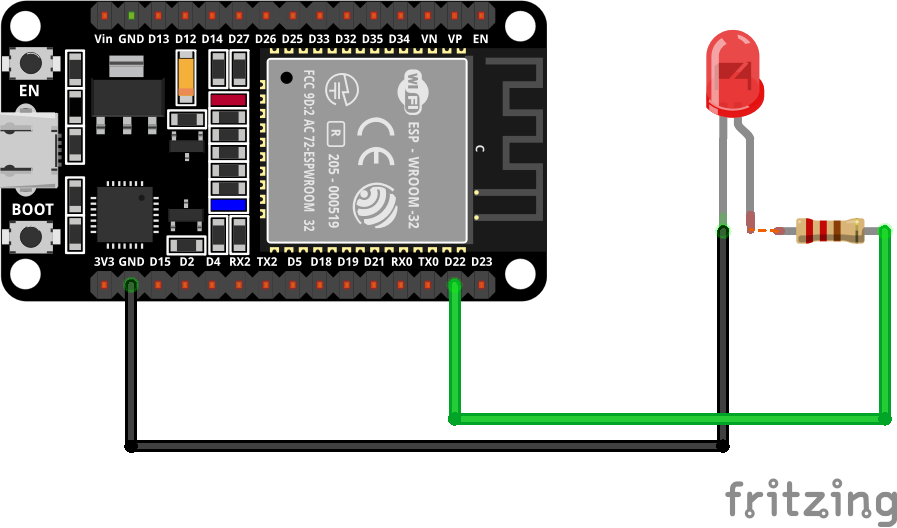
Connect the LED to the ESP32 as follows:
- LED anode (long leg) → Pin D22 via a 220Ω resistor
- LED cathode (short leg) → GND
That’s it. The hardware side is trivial. The real magic happens in the cloud and the code.
⚙️ How the Project Works
The concept is simple:
- The ESP32 connects to Wi-Fi
- It connects to Firebase Realtime Database
- It reads a value (
0or1) from the database - Based on the value, it turns the LED ON or OFF
So basically, Firebase acts as a remote control panel.
☁️ Step 1: Setting Up Google Firebase
Firebase is Google’s mobile and web development platform. We’ll use its Realtime Database feature.
1.1 Create a Firebase Project
- Go to the Firebase Console account (an email is required)
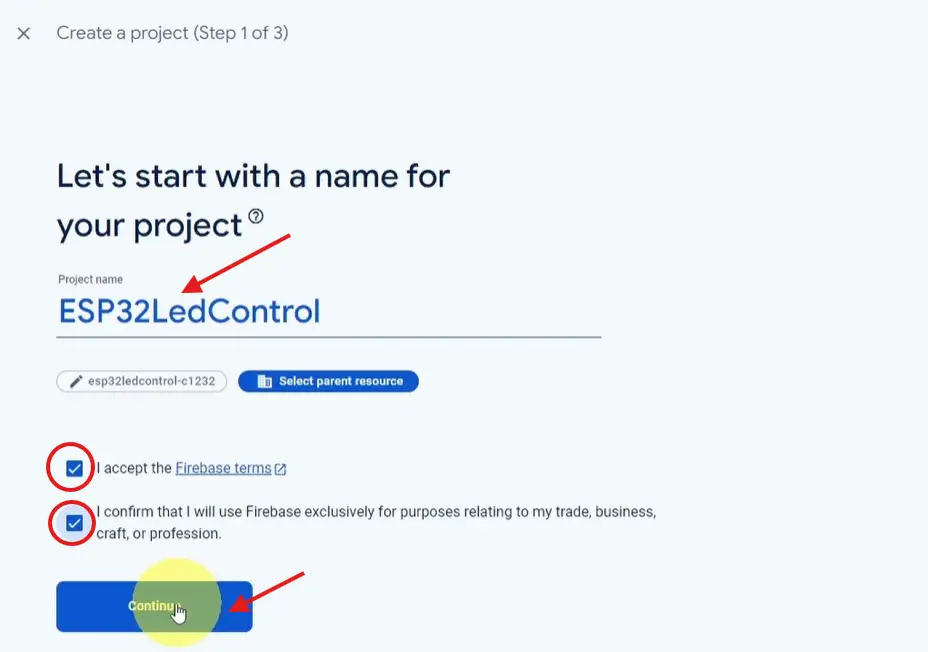
- Click “Create a project” → Name it (e.g., “ESP32-Remote-Control”) → Continue
- Disable Google Analytics (optional) → Click Create project
1.2 Create Realtime Database
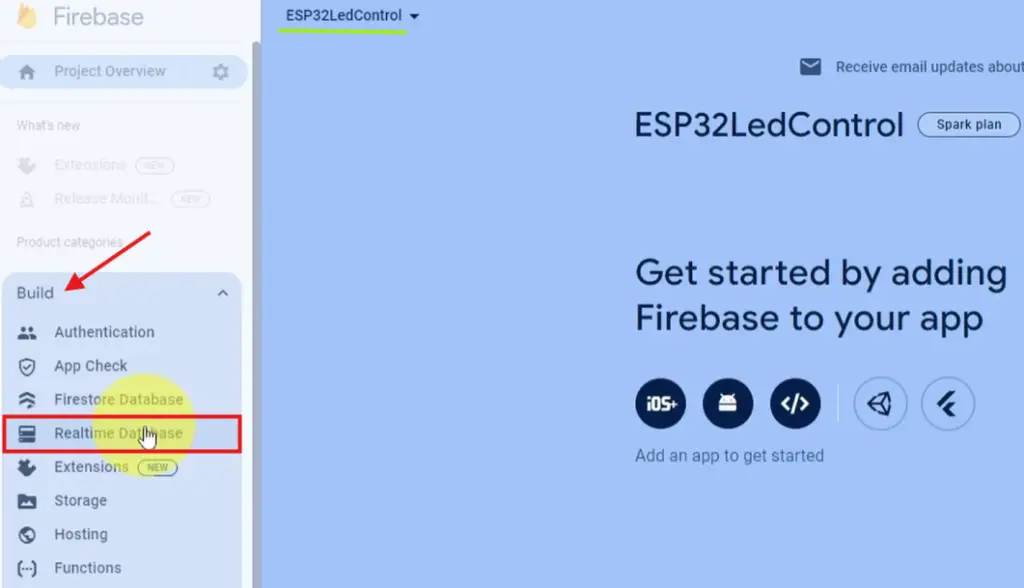
- In the left sidebar → Build → Realtime Database
- Click “Create Database”
- Start in test mode (for development) → Enable
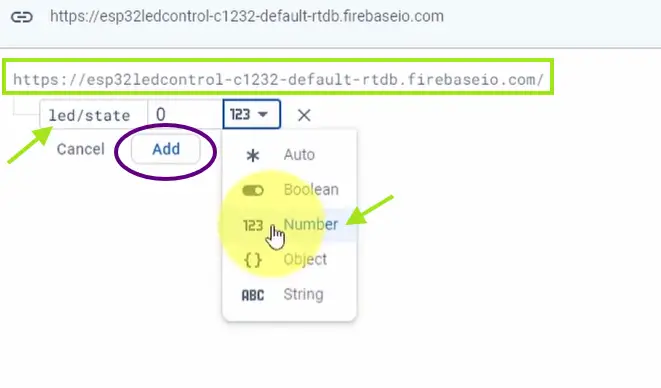
- Add a new key/value using the + icon → Name it (e.g., “led/state”) → Add
- Note the database URL for the code (looks like:
https://your-project.firebaseio.com)
1.3 Set Up Authentication
We need email/password authentication.
- Left sidebar → Build → Authentication
- Click “Get started”
- Enable Email/Password sign-in method → Enable
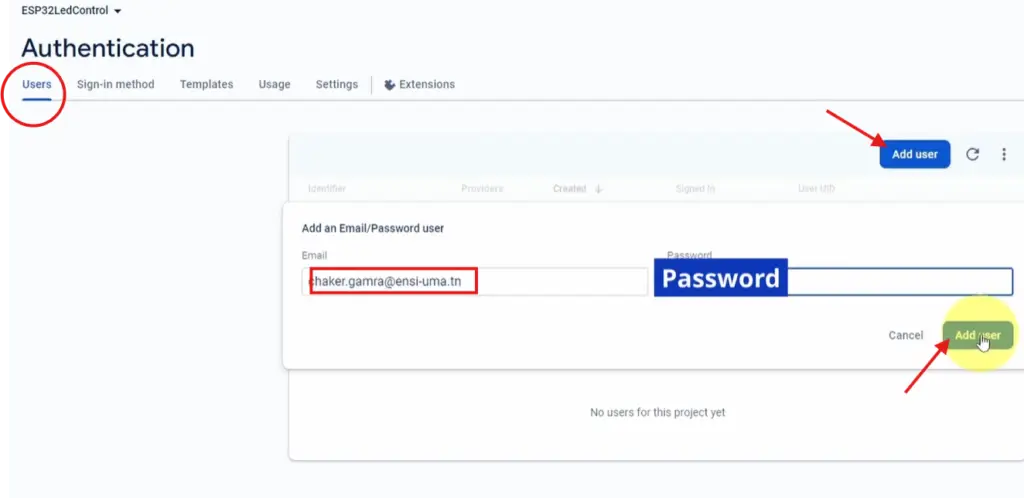
- Go to “Users” tab → “Add user”
- Create an email/password pair (Remember these for the code)
1.4 Get Your Web API Key
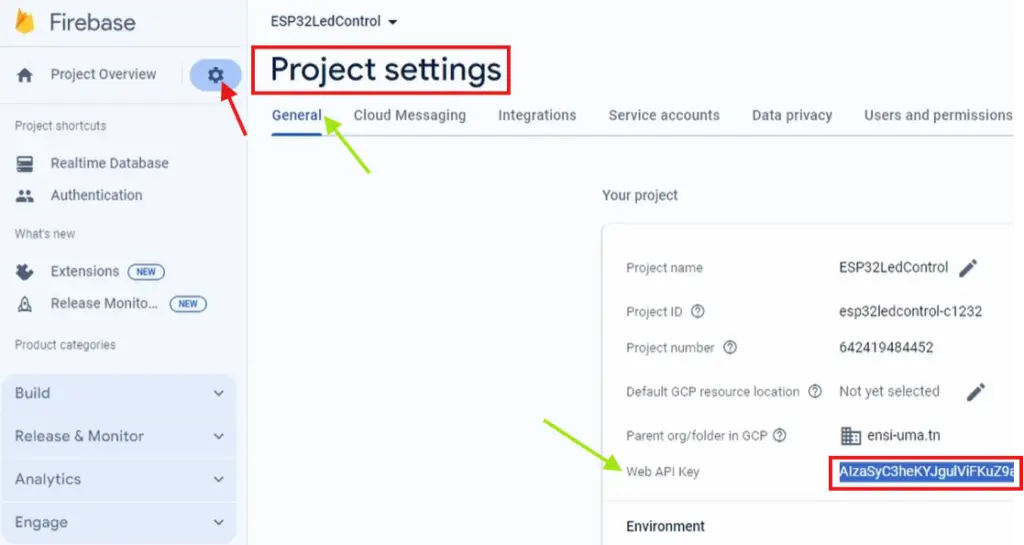
- From the left sidebar → Select Project settings (gear icon)
- Under “Your project” → Select General
- Copy the “Web API Key”
Now you have everything to continue working on the project code:
- ✅ API Key
- ✅ RTDB URL
- ✅ User Email & Password
📝 Step 2: Understanding the Code
Here’s the complete code (I’ll explain each section after).
#include <WiFi.h>
#include <Firebase_ESP_Client.h>

/* 1. Define the WiFi credentials */
#define WIFI_SSID "Your_SSID"
#define WIFI_PASSWORD "YOUR_PASSWORD"

/* 2. Define the API Key */
#define API_KEY "YOUR_API_KEY"

/* 3. Define the RTDB URL */
#define DATABASE_URL "YOUR_RTDB_URL"

/* 4. Define the user Email and password that already added in your project */
#define USER_EMAIL "user_email"
#define USER_PASSWORD "user_password"

// Define Firebase Data object
FirebaseData fbdo;

FirebaseAuth auth;
FirebaseConfig config;

unsigned long sendDataPrevMillis = 0;

const int ledPin = 22;

void setup()
{
  pinMode(ledPin, OUTPUT);
  digitalWrite(ledPin, LOW);

  Serial.begin(115200);
  WiFi.begin(WIFI_SSID, WIFI_PASSWORD);

  Serial.print("Connecting to Wi-Fi");
  while (WiFi.status() != WL_CONNECTED)
  {
    Serial.print(".");
    delay(300);
  }
  Serial.println();
  Serial.print("Connected with IP: ");
  Serial.println(WiFi.localIP());
  Serial.println();

  /* Assign the api key (required) */
  config.api_key = API_KEY;

  /* Assign the user sign in credentials */
  auth.user.email = USER_EMAIL;
  auth.user.password = USER_PASSWORD;

  /* Assign the RTDB URL (required) */
  config.database_url = DATABASE_URL;

  //  WiFi reconnection enabled
  Firebase.reconnectNetwork(true);

  // Since v4.4.x, BearSSL engine was used, the SSL buffer need to be set.
  // Large data transmission may require larger RX buffer, otherwise connection issue or data read time out can be occurred.
  fbdo.setBSSLBufferSize(4096 /* Rx buffer size in bytes from 512 - 16384 */, 1024 /* Tx buffer size in bytes from 512 - 16384 */);

  // Limit the size of response payload to be collected in FirebaseData
  fbdo.setResponseSize(2048);
  Firebase.begin(&config, &auth);
  Firebase.setDoubleDigits(5);
  config.timeout.serverResponse = 10 * 1000;
}

void loop()
{
  // Firebase.ready() should be called repeatedly to handle authentication tasks.
  if (Firebase.ready() && (millis() - sendDataPrevMillis > 1000 || sendDataPrevMillis == 0))
  {
    sendDataPrevMillis = millis();

  int ledState;
   if(Firebase.RTDB.getInt(&fbdo, "/led/state", &ledState)){
    digitalWrite(ledPin, ledState);
   }else{
    Serial.println(fbdo.errorReason().c_str());
   }
  }
}
🔍 Code Breakdown
WiFi & Firebase Includes
#include <WiFi.h>
#include <Firebase_ESP_Client.h>
WiFi.h: Connects the ESP32 to your networkFirebase_ESP_Client.h: The magic library that handles all Firebase communication
Configuration Defines
Replace the placeholders with your actual values:
WIFI_SSID/WIFI_PASSWORD: Your home/work Wi-Fi credentialsAPI_KEY: From Firebase project settingsDATABASE_URL: Your Realtime Database URLUSER_EMAIL/USER_PASSWORD: The authentication credentials you created
The Heart of the Remote Control
Firebase.RTDB.getInt(&fbdo, "/led/state", &ledState)
This line reads an integer value from the Firebase Realtime Database at the path /led/state. If the value is 1, the LED turns ON. If 0, it turns OFF.
Because the database lives in Google’s cloud, you can change that value from any device with internet access — a phone, laptop, or even another microcontroller.
Why loop() Checks Every Second
if (millis() - sendDataPrevMillis > 1000)
This prevents the ESP32 from flooding Firebase with requests. Once per second is more than enough for responsive control and keeps you within free tier limits.
🚀 Step 3: Installing Required Libraries
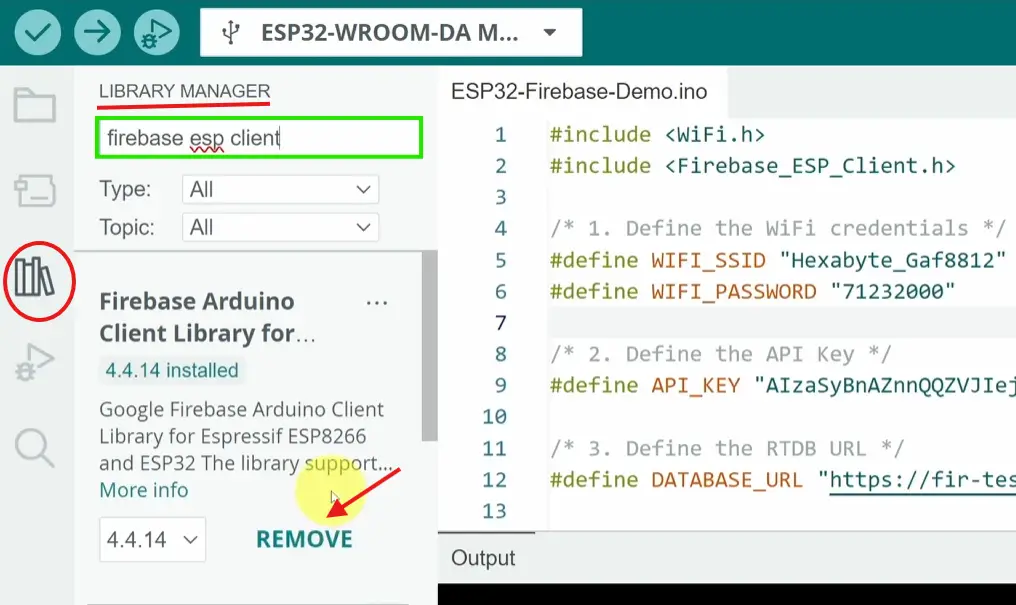
You need the Firebase ESP Client library.
- Open Arduino IDE → Sketch → Include Library → Manage Libraries
- Search for “Firebase ESP Client” by mobizt
- Install the latest version (v4.x)
Also, make sure you have the ESP32 board package installed (via Boards Manager).
📤 Step 4: Upload and Test
- Connect your ESP32 via USB
- Select the correct board and port in the Arduino IDE
- Modify the code with your credentials
- Click Upload
Open the Serial Monitor (115200 baud). You should see:
Connecting to Wi-Fi.....
Connected with IP: 192.168.x.x
🎮 Step 5: Controlling from Anywhere
Now for the fun part — changing the LED state from anywhere in the world.
Method 1: Using Firebase Console (Quick Test)
- Go to your Firebase Realtime Database console
- Create a new path:
led/state - Set its value to
1→ Your LED turns ON - Change it to
0→ LED turns OFF

🎉 Congratulations! You just controlled an ESP32 from a web browser in the cloud.
Method 2: Build a Simple Web Dashboard
You can create an HTML/JavaScript page that writes to the same path. Here’s a minimal example:
html
<!DOCTYPE html>
<html>
<head>
    <title>ESP32 Remote Control</title>
</head>
<body>
    <button onclick="controlLED(1)">Turn ON</button>
    <button onclick="controlLED(0)">Turn OFF</button>

    <script src="https://www.gstatic.com/firebasejs/9.0.0/firebase-app-compat.js"></script>
    <script src="https://www.gstatic.com/firebasejs/9.0.0/firebase-database-compat.js"></script>
    <script>
        const firebaseConfig = {
            apiKey: "YOUR_API_KEY",
            databaseURL: "YOUR_RTDB_URL",
            // ... other config values
        };
        firebase.initializeApp(firebaseConfig);
        const db = firebase.database();

        function controlLED(state) {
            db.ref('led/state').set(state);
        }
    </script>
</body>
</html>
Host this page on GitHub Pages, Netlify, or even a local server, and you have a full remote control panel accessible from any browser.
⚠️ Important Security Considerations
The test mode shown above is fine for learning, but for real-world use:
🔐 1. Move to Secure Rules
Replace the default test rules with:
{
  "rules": {
    "led": {
      "state": {
        ".read": "auth != null",
        ".write": "auth != null"
      }
    }
  }
}
This ensures only authenticated users can read/write.
🔐 2. Use Environment Variables
Never hardcode credentials in code you share. Use:
#define WIFI_SSID     getenv("WIFI_SSID")
#define WIFI_PASSWORD getenv("WIFI_PASSWORD")
🔐 3. Add a Simple “Secret” Path
For extra safety, add a secondary check:
String secret;
Firebase.RTDB.getString(&fbdo, "/system/secret", &secret);
if (secret == "mySecretToken123") {
    // Allow control
}
💡 Project Ideas to Take Further
- Remote Pet Feeder – Activate a servo from anywhere
- Plant Watering System – Read soil moisture and write pump state
- Door Lock Monitor – Read reed switch state, write to Firebase
- Temperature Logger – Send DHT22 data to Firebase every minute
✅ Final Thoughts
You’ve just built a globally accessible device controller using an ESP32 and Google Firebase. The same pattern works for sensors, motors, displays — anything you can connect to an ESP32.
The beauty of this approach is that you’re not locked into any proprietary IoT platform. Firebase is a general-purpose cloud database with excellent SDKs, a generous free tier, and global infrastructure.
Now build something amazing — and control it from the beach.