Weather Station with ESP32, LCD Screen, and OpenWeatherMap API
Let’s build a DIY weather station using an ESP32 and a 16×2 LCD screen. The ESP32 will connect to the internet, retrieve live weather data from the OpenWeatherMap API, and display the results on the LCD.
This project is perfect for beginners learning IoT, APIs, and embedded programming.
By the end of this guide, you will learn how to:
- Connect an ESP32 to Wi-Fi
- Fetch data from a web API
- Parse JSON data
- Display information on an LCD screen
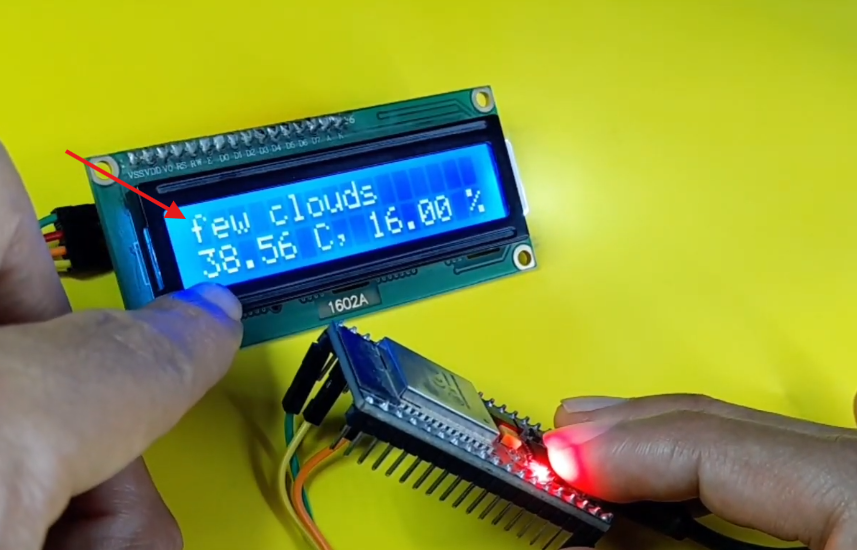
The display might show something like:
Project Overview
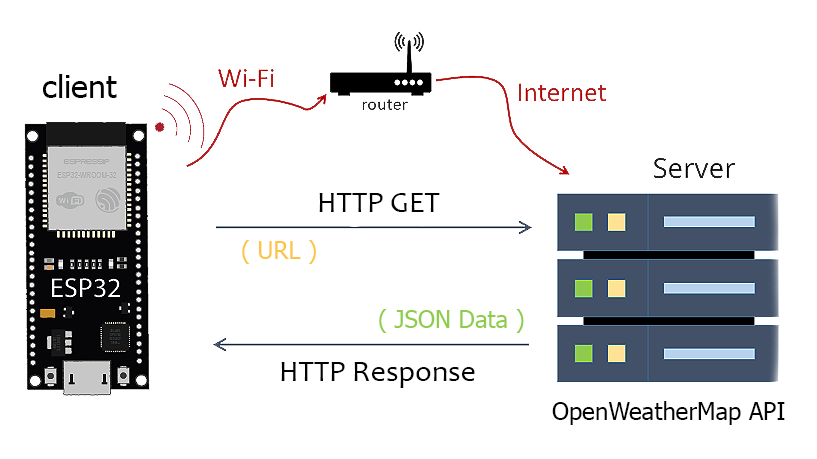
The weather station works as follows:
- The ESP32 connects to your Wi-Fi network.
- It sends an HTTP request to the weather API.
- The API returns weather information in JSON format.
- The ESP32 extracts useful data like temperature and humidity.
- The information is displayed on a 16×2 LCD screen.
Components Required
To build this project, you will need the following components:
Hardware
- ESP32 Development Board (any variant: ESP32 DevKit, NodeMCU-32S, etc.)
- LCD Display 16×2 (with I2C adapter – highly recommended to save pins)
- Jumper Wires (Female to Female)
- USB Cable for power/programming
Before We Begin: If you’re completely new to the ESP32, I recommend checking out my previous blog post, an Ultimate ESP32 Beginner’s Guide. We’ve covered the basics of setting up your development environment, installing board support, and uploading your first program.
Software
- Arduino IDE Download the latest version
- OpenWeatherMap API account
Step 1: Create an OpenWeatherMap Account
To retrieve weather data, you need an API key.
- Go to the OpenWeatherMap website.
- Create a free account.
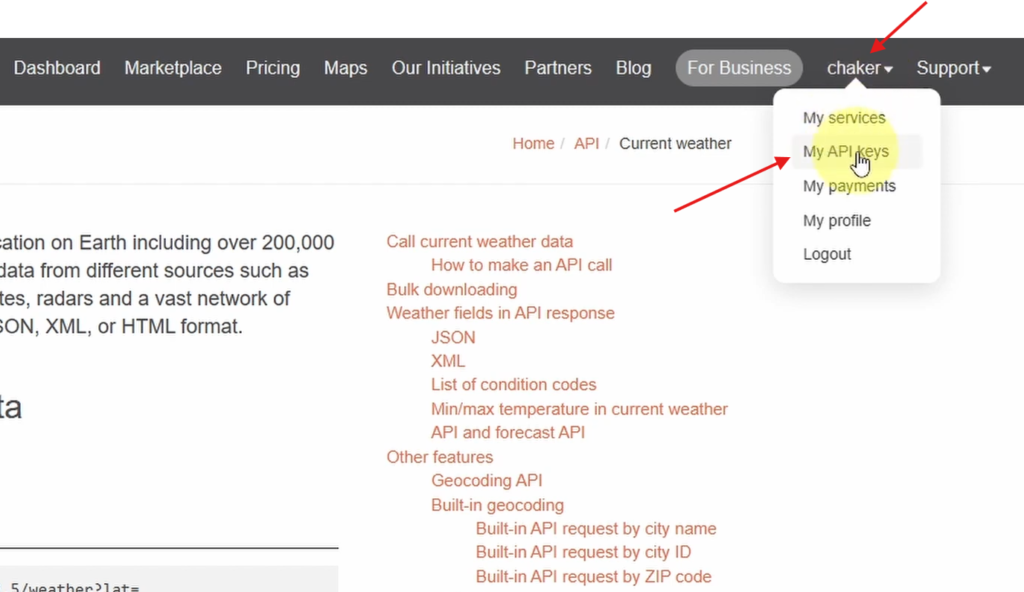
- Navigate to My API Keys in your dashboard.
- Generate a new key.
Example:
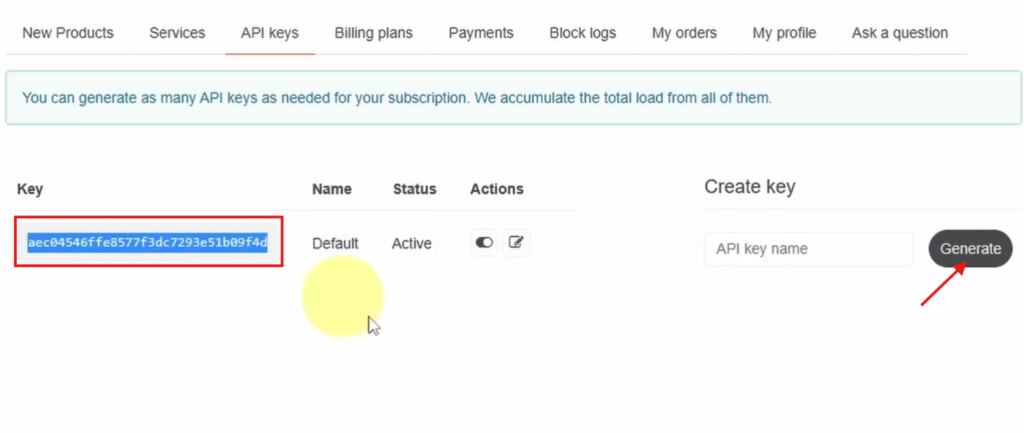
We will use this key to authenticate our API requests.
Step 2: Connect the LCD to the ESP32
Most modern LCD modules include an I2C interface, which greatly simplifies wiring.
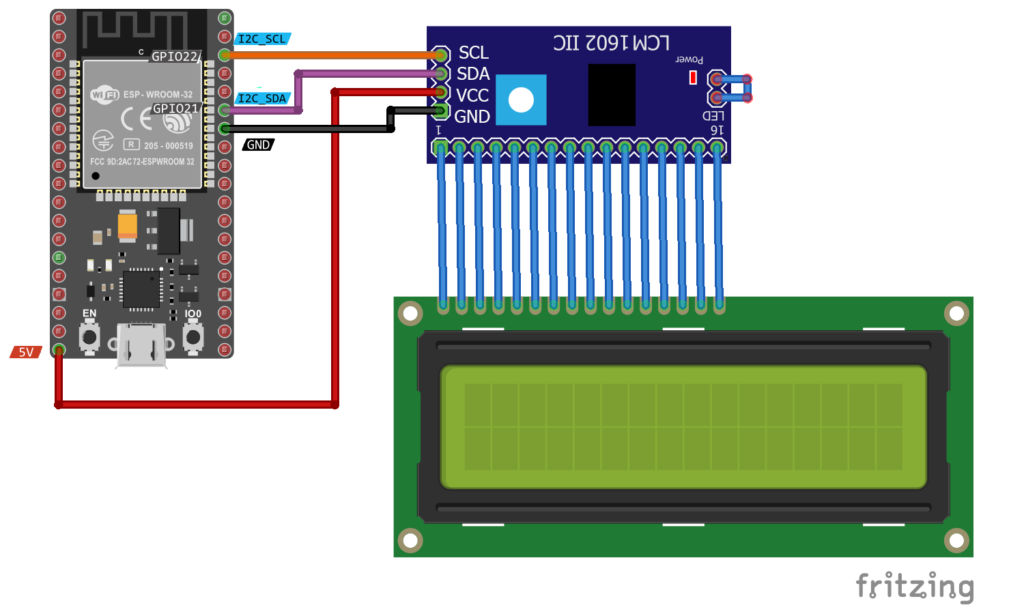
| LCD Pin | ESP32 Pin |
|---|---|
| VCC | 5V |
| GND | GND |
| SDA | GPIO21 |
| SCL | GPIO22 |
This allows the LCD to communicate with the ESP32 using the I2C protocol.
Step 3: ESP32 Complete Code
#include <WiFi.h>
#include <HTTPClient.h>
#include <ArduinoJson.h>
#include <LiquidCrystal_I2C.h>

//LCD Object (0x3F or 0x27)
LiquidCrystal_I2C lcd(0x3F, 16, 2);

//Put your WiFi Credentials here
const char* ssid = "yourssid";
const char* password = "yourpassword";

//URL Endpoint for the API
String URL = "http://api.openweathermap.org/data/2.5/weather?";
String ApiKey = "PUT_YOUR_APIKey_Here";

// Replace with your location Credentials
String lat = "36.736813369199396";
String lon = "3.087043199273793";

void setup() {
  Serial.begin(115200);

  // Setup LCD with backlight and initialize
  lcd.init();
  lcd.backlight();
  lcd.clear();

  // We start by connecting to a WiFi network
  WiFi.begin(ssid, password);

  while (WiFi.status() != WL_CONNECTED) {
    delay(500);
    Serial.print(".");
  }

  Serial.println("");
  Serial.println("WiFi connected.");
  Serial.println("IP address: ");
  Serial.println(WiFi.localIP());
}

void loop() {
  // wait for WiFi connection
  if (WiFi.status() == WL_CONNECTED) {

    HTTPClient http;

    //Set HTTP Request Final URL with Location and API key information
    http.begin(URL + "lat=" + lat + "&lon=" + lon + "&units=metric&appid=" + ApiKey);

    // start connection and send HTTP Request
    int httpCode = http.GET();

    // httpCode will be negative on error
    if (httpCode > 0) {

      //Read Data as a JSON string
      String JSON_Data = http.getString();
      Serial.println(JSON_Data);

      //Retrieve some information about the weather from the JSON format
      DynamicJsonDocument doc(2048);
      deserializeJson(doc, JSON_Data);
      JsonObject obj = doc.as<JsonObject>();

      //Display the Current Weather Info
      const char* description = obj["weather"][0]["description"].as<const char*>();
      const float temp = obj["main"]["temp"].as<float>();
      const float humidity = obj["main"]["humidity"].as<float>();

      lcd.clear();
      lcd.print(description);
      lcd.setCursor(0, 1);
      lcd.print(temp);
      lcd.print(" C, ");
      lcd.print(humidity);
      lcd.print(" %");

    } else {
      Serial.println("Error!");
      lcd.clear();
      lcd.print("Can't Get DATA!");
    }

    http.end();

  }

  //Wait for 30 seconds
  delay(30000);
}
Before uploading this code, you need to make some modifications:
📚 Required Libraries
First, install these libraries from the Arduino IDE → Library Manager:
- WiFi (built-in)
- HTTPClient (built-in)
- ArduinoJson
- LiquidCrystal_I2C
These libraries allow the ESP32 to:
- Connect to Wi-Fi
- Communicate with web APIs
- Parse JSON responses
- Control the LCD
🔧 Insert WiFi-Credentials and API-Key
Second, put your network credentials in the following lines:
//Put your WiFi Credentials here
const char* ssid = "YourWiFiSSID";
const char* password = "YourWiFiPassword";
And of course, your API Key:
String ApiKey = "PUT_YOUR_APIKey_Here";🌐 Setting Up Your Location
You’ll need to modify the latitude and longitude coordinates to match your location:
// Replace with your location Credentials
String lat = "36.736813369199396";
String lon = "3.087043199273793";
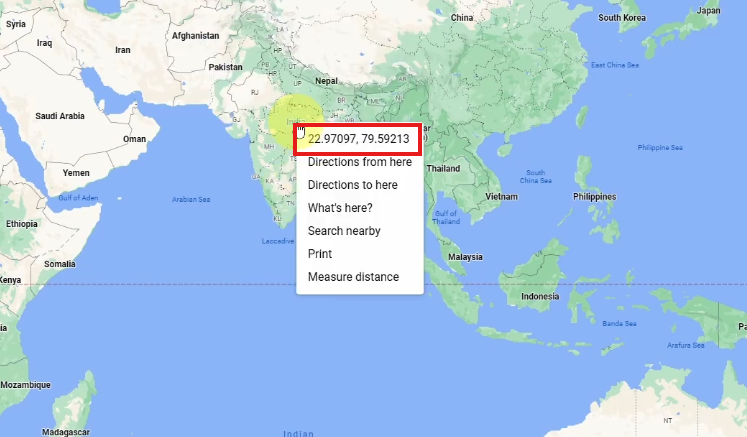
📍To find your coordinates:
- Copy the latitude and longitude numbers
- Open Google Maps
- Right-click on your location
- Select “What’s here?”
Now, select your ESP Board and COM port, then click the Upload button. Your LCD should now display real-time weather information.
Understanding the Weather API Request
The API endpoint looks like this:
https://api.openweathermap.org/data/2.5/weather?lat={lat}&lon={lon}&appid={API key} The API returns data in JSON format.
Example response:
{
 "main":{
   "temp":21.3,
   "humidity":64
 },
  "weather": [
    {
      "id": 501,
      "main": "Rain",
      "description": "moderate rain",
      "icon": "10d"
    }
  ]
}
Our ESP32 will extract:
- temperature
- humidity
- weather condition
How the Code Works
Wi-Fi Connection:
The ESP32 connects to the local network using:
WiFi.begin(ssid, password);
It waits until the connection is successful.
Sending the Weather Request:
The ESP32 sends an HTTP GET request to the API:
    HTTPClient http;

    //Set HTTP Request Final URL with Location and API key information
    http.begin(URL + "lat=" + lat + "&lon=" + lon + "&units=metric&appid=" + ApiKey);

    // start connection and send HTTP Request
    int httpCode = http.GET();
The server then returns weather information.
Parsing JSON Data
The ArduinoJson library extracts useful values from the response:
- weather description
- temperature
- humidity
      //Read Data as a JSON string
      String JSON_Data = http.getString();
      Serial.println(JSON_Data);

      //Retrieve some information about the weather from the JSON format
      DynamicJsonDocument doc(2048);
      deserializeJson(doc, JSON_Data);
      JsonObject obj = doc.as<JsonObject>();

      //Display the Current Weather Info
      const char* description = obj["weather"][0]["description"].as<const char*>();
      const float temp = obj["main"]["temp"].as<float>();
      const float humidity = obj["main"]["humidity"].as<float>();
Displaying Data on the LCD
Next, our weather data is displayed on the screen:
      lcd.clear();
      lcd.print(description);
      lcd.setCursor(0, 1);
      lcd.print(temp);
      lcd.print(" C, ");
      lcd.print(humidity);
      lcd.print(" %");
The screen updates every 30 seconds.
Possible Improvements
Once your basic weather station is working, you can enhance it by adding:
- 🌡️ Temperature and humidity sensors
- 🌬️ Wind speed display
- 🌧️ Rain detection
- 📊 OLED or TFT display
- 📡 MQTT cloud connectivity
You could also build a complete IoT weather dashboard.
Conclusion
In this project, we built a Wi-Fi-connected weather station using the ESP32 and the OpenWeatherMap API. This simple system demonstrates how embedded devices can communicate with cloud services to retrieve real-time data.
Projects like this are a great way to learn IoT development, API integration, and embedded programming.