🚀 Getting Started with Raspberry Pi Pico
📌 Introduction
The Raspberry Pi Pico is a powerful and affordable microcontroller board built around the RP2040 chip designed by the Raspberry Pi Foundation. It costs only $4.
Whether you’re a beginner in electronics or a maker looking for a low-cost development board, the Pico is an excellent starting point.
In this guide, you’ll learn:
- What Raspberry Pi Pico is
- Its specifications
- Pinout overview
- How to set up the software
- How to upload your first program
🧠 1. What is Raspberry Pi Pico?
The Raspberry Pi Pico is a microcontroller board, not a full computer like the Raspberry Pi 4. It’s designed to do one thing at a time, efficiently and cheaply.
So, this pico is ideal for physical computing projects—controlling lights and motors, and reading buttons and sensors. At its heart is the brand new RP2040 chip, designed in-house by Raspberry Pi.
Here are some Common use cases:
- Robotics
- IoT projects (W version)
- Automation systems
- Sensor-based applications
- DIY electronics projects
- Monitoring Systems

⚙️ 2. Raspberry Pi Pico Specifications
The Raspberry Pi Pico is a compact microcontroller board based on the RP2040 chip, featuring:
| Feature | Description |
|---|---|
| Microcontroller | RP2040 |
| CPU | Dual-core ARM Cortex-M0+ |
| Clock Speed | Up to 133 MHz |
| RAM | 264 KB SRAM |
| Flash | 2 MB |
| GPIO Pins | 26 |
| ADC Channels | 3 |
| PWM | 16 Channels |
| USB | Micro USB |
📍 4. Pinout Explanation
The following picture shows you the Raspberry Pi Pico pinout and the function supported by each pin.
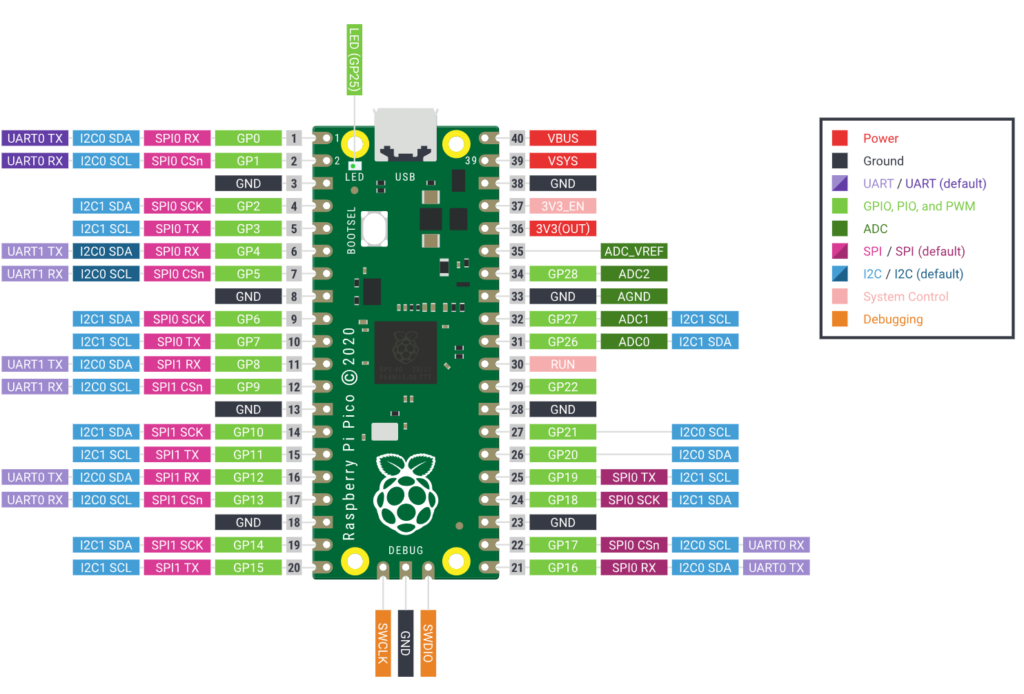
The Pi Pico comes with a total of 40 pins, but 26 of which are programmable GPIOs (general-purpose input/output pins) that you can use to connect peripherals.
The pins fall into several categories:
Power Pins (3 total):
- VBUS (Pin 40): This is the 5V power directly from the USB port when the Pico is powered via USB. If you’re powering the Pico from a battery, this pin will not output anything. Use this to power 5V components, but be careful—it’s only available when USB is connected.
- VSYS (Pin 39): The main input voltage pin (1.8-5.5V). If you’re powering the Pico from a battery pack or external power supply, this is where you connect it. The Pico’s voltage regulator takes this input and converts it to 3.3V for the board.
- 3V3_OUT (Pin 36): The 3.3V output from the Pico’s internal voltage regulator. This is what you’ll use to power most sensors and components. Maximum draw: ~300mA total for everything connected to this pin and the GPIO pins combined.
- The GND pins are colored in black in the diagram.
💻 5. Programming with MicroPython
You can program the Pico using Micropython, C/C++, or even the Arduino IDE
For beginners, we recommend MicroPython.
🐍 Step 1: Adding MicroPython Firmware
MicroPython is a version of Python designed to run on microcontrollers. It’s the most popular way to program the Pico because it’s simple and interactive.
- First Go to the official MicroPython website
- Download the correct MicroPython UF2 file for your board (Pico):
- While holding the BOOTSEL button of the Pi-Pico.
- Plug the Pico into your PC using a USB cable.
- Then release the button.

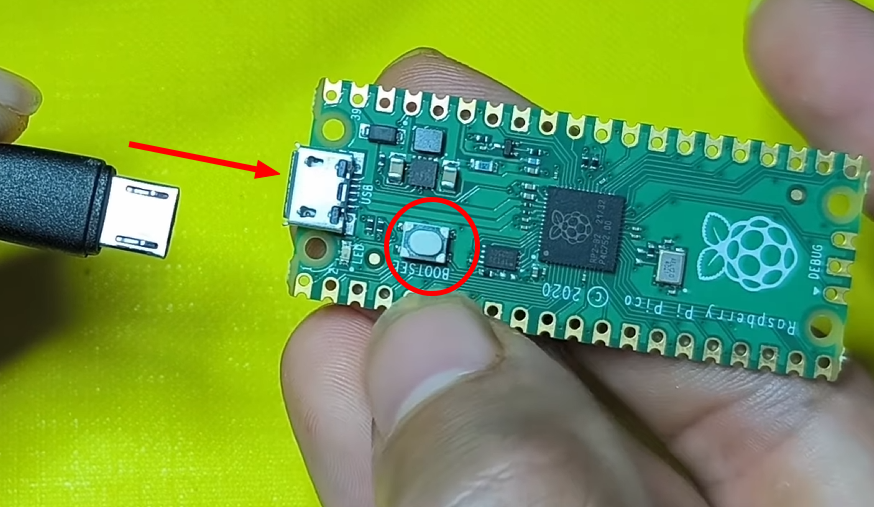
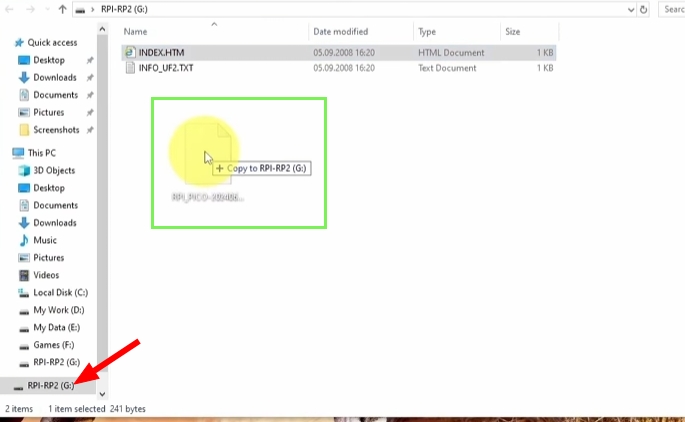
The board will appear as a USB drive.
Now Copy the .uf2 file to the Pico drive, and you are Done ✅
🖥️ Step 2: Installing Thonny IDE
Now, we need a way to write code and send it to the Pico. Thonny is a free, simple editor perfect for this.
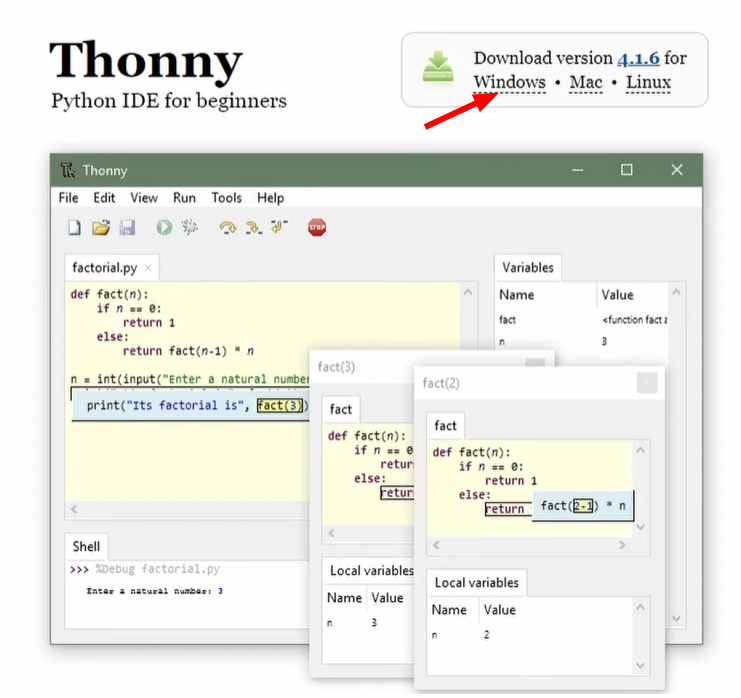
- Download and install Thonny from https://thonny.org/.
- Open Thonny IDE on your Computer.
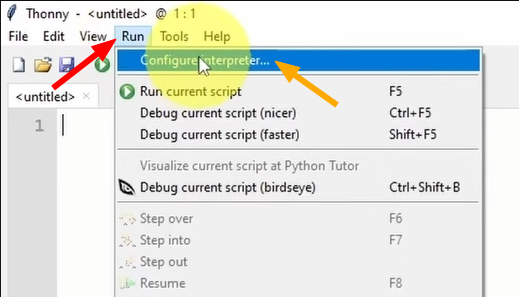
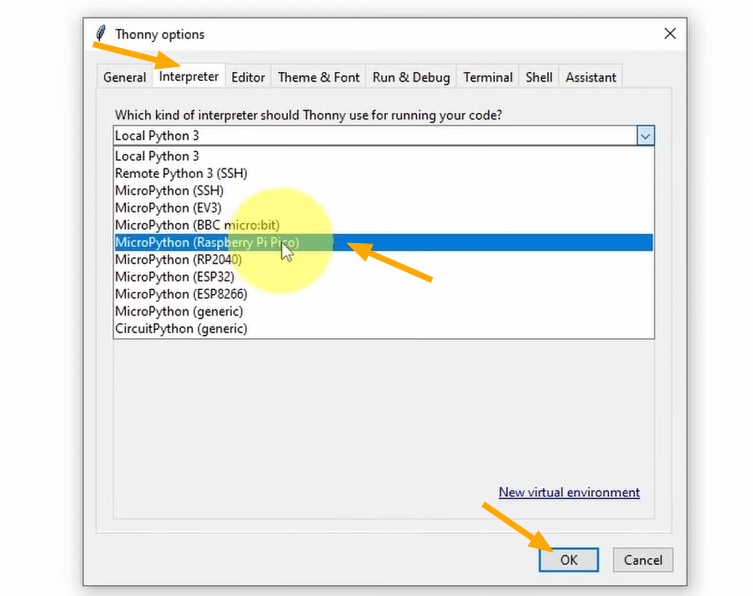
- Go to Run -> Configure Interpreter.
- In the interpreter tab, select “MicroPython (Raspberry Pi Pico)” from the dropdown menu.
- Ensure the Port or WebREPL is set to auto-detect. Click OK.
If everything is working, you should see a “MicroPython” prompt (>>>) in the “Shell” window at the bottom of Thonny.
And let’s make our first program!
📝 Step 3: MicroPython Code
Before building real projects, let’s test our Raspberry Pi Pico using its built-in LED.
Type the following code into the top editor pane of Thonny:
from machine import Pin
import time

# Set up the built-in LED pin (GP25) as an output
led = Pin(25, Pin.OUT)

# Loop forever
while True:
    led.toggle() # Turn the LED on or off
    time.sleep(1) # Wait for 1 second
▶️Step 4: Uploading the Code
At the top of Thonny, click the green ▶ Run button.
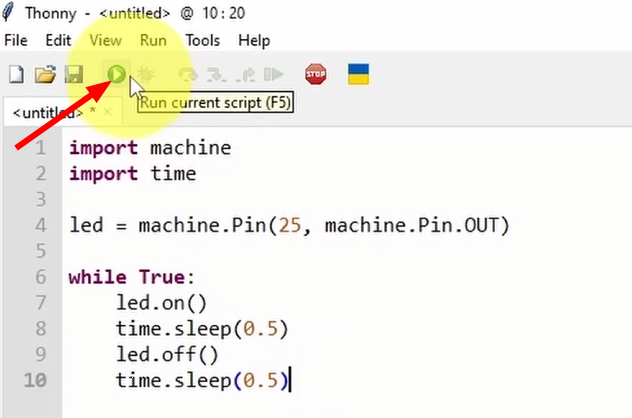
The onboard LED should now blink every 0.5 seconds 🎉

🔍 6. How This Code Works
Now let’s break it down clearly:
In MicroPython, the machine library is what allows your program to talk directly to the hardware of the Raspberry Pi Pico.
from machine import PinThis line tells MicroPython:
“I want to use the Pin feature from the machine library.”
Inside the machine library, there are many tools.
We only import Pin because we need to control a GPIO pin.
led = Pin(25, Pin.OUT)
Sets GPIO 25 as an output pin.
led.toggle()
Switches LED state (ON → OFF → ON → OFF).
time.sleep(0.5)
Waits 0.5 seconds.
What happens?
- The code runs immediately
- The onboard LED starts blinking
- If you unplug the Pico, the program disappears
⚠️ Important:
At this stage, the program is NOT saved permanently.
It only runs temporarily in RAM.
💾 7. Save the Code Permanently
Now that we confirmed the code works, let’s make it run automatically every time the Pico powers on.
On startup, the Raspberry Pi Pico automatically looks for a file called main.py:
So Follow these steps to save it to your Pi Pico:
- Click File → Save As
- Choose Raspberry Pi Pico
- Name the file:
main.py
- Click Save
🔥 8. Next Steps
Now that you understand the basics, you can try:
- Reading a button input
- Using PWM for LED fading
- Reading analog values from sensors
- Connecting an OLED display
- Building a temperature monitoring system
🎯 Conclusion
The Raspberry Pi Pico is one of the best beginner-friendly microcontroller boards available today.
✔ Affordable
✔ Powerful
✔ Easy to program
✔ Massive community support
With just a simple LED and a few lines of code, you’ve taken your first step into embedded systems development.