ESP32 Home Automation Setup (WiFi & Switch Control)
Introduction
In this new Project, we will transform an ESP32 into a powerful smart home controller. By the end, you will be able to control 4 appliances (like lights or fans) in two ways:
- 📱 Your smartphone
- 🔘 Physical push buttons
We will use the ESP32’s built-in Wi-Fi to host a local web server. No third-party cloud services are required, which means the system is fast, private, and works even if your internet goes down (as long as your phone is on the same Wi-Fi Network).
🧰 What You’ll Need?
- Hardware:
- 1x ESP32 Development Board (e.g., ESP32 DevKit, NodeMCU-32S, or ESP32-C3).
- 4x 5V Relays (or a 4-channel relay module)
- 4x Push buttons
- 1x Breadboard
- Jumper wires
- 4x Appliances (or bulbs with holders) – Note: High-voltage AC appliances require extreme caution. For testing, use 4 LEDs with 220Ω resistors.
- Software:
- Arduino IDE Or VSCode
- ESP32 Board Support Package
Note: If you haven’t set up your IDE with ESP32 support yet, please follow my previous ESP32 Guide
🔌 Circuit Connections:
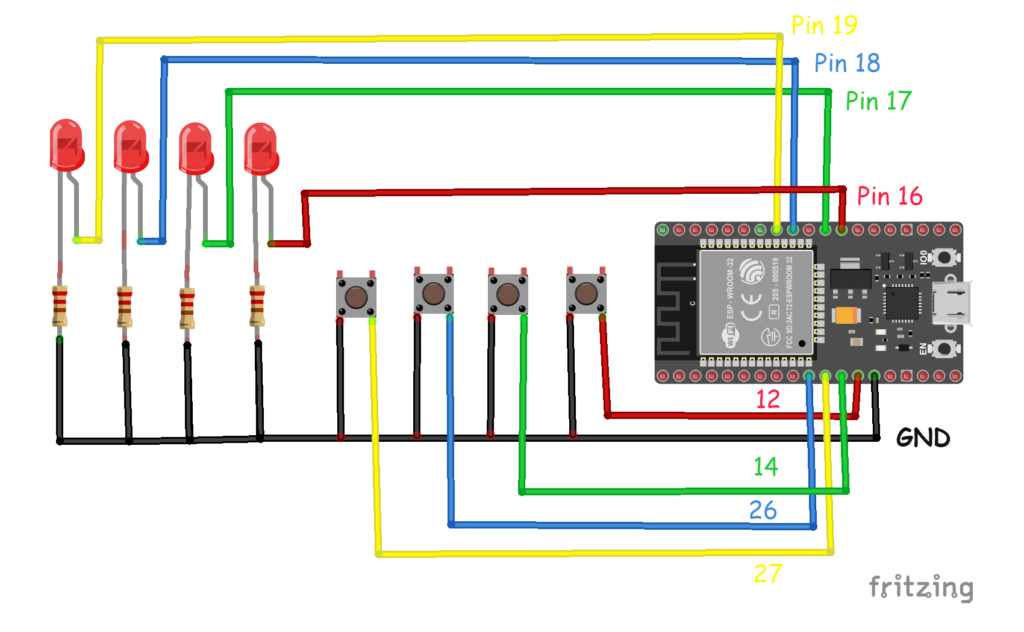
We will connect the ESP32 to 4 leds and then we can replace them with a 4-channel relay module.
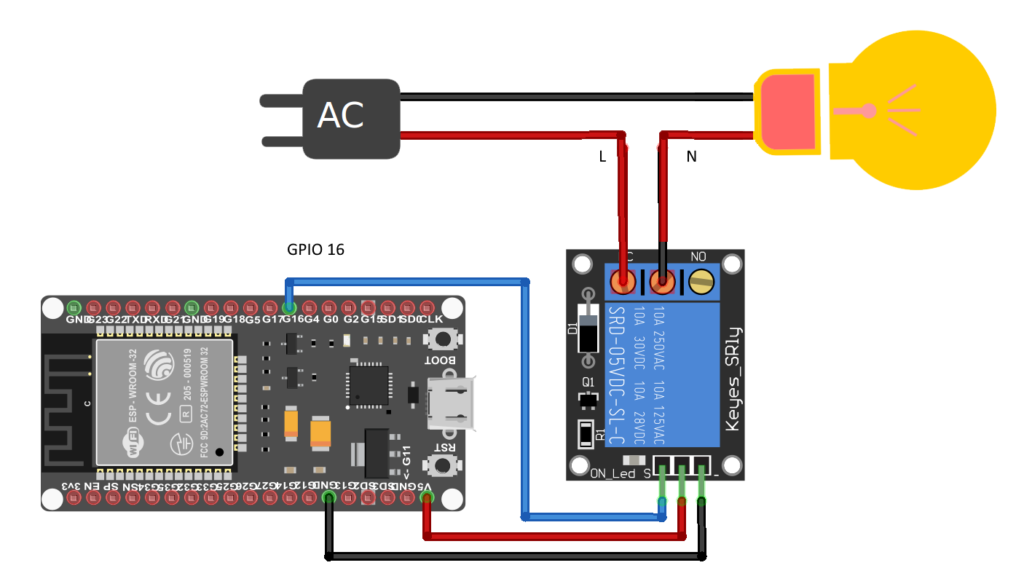
Warning: If you are connecting high-voltage AC appliances (110V/220V), ensure the relays are rated for it. Keep the high-voltage wiring separate from the low-voltage ESP32 wiring and do not work on wiring while the system is plugged into mains power.
The Complete Code ✅
This code does three things:
- Connects to your Wi-Fi (SSID/Password)
- Creates a web server that displays buttons for each appliance.
- Listens for physical button presses and updates the pin states.
#include <WiFi.h>
#include <AsyncTCP.h>
#include <ESPAsyncWebServer.h>
#include <ESPmDNS.h>
const char *ssid = "SSID-NAME";
const char *password = "YOUR-PASSWORD";
// Create AsyncWebServer object on port 80
AsyncWebServer server(80);
// Create an Event Source on /events
AsyncEventSource events("/events");
struct device {
const int id;
const int pin;
const int btnPin;
int prevBtnState;
int status; // 0:off, 1:on
};
struct device d1 = { 1, 16, 12, 0, 0 };
struct device d2 = { 2, 17, 14, 0, 0 };
struct device d3 = { 3, 18, 26, 0, 0 };
struct device d4 = { 4, 19, 27, 0, 0 };
String processor(const String &var) {
if (var == "btn1txt") {
return d1.status == 0 ? "ON" : "OFF";
} else if (var == "btn2txt") {
return d2.status == 0 ? "ON" : "OFF";
} else if (var == "btn3txt") {
return d3.status == 0 ? "ON" : "OFF";
} else if (var == "btn4txt") {
return d4.status == 0 ? "ON" : "OFF";
} else if (var == "btn1class") {
return d1.status == 0 ? "button" : "button2";
} else if (var == "btn2class") {
return d2.status == 0 ? "button" : "button2";
} else if (var == "btn3class") {
return d3.status == 0 ? "button" : "button2";
} else if (var == "btn4class") {
return d4.status == 0 ? "button" : "button2";
}
return String();
}
const char index_html[] PROGMEM = R"rawliteral(
<!DOCTYPE HTML><html>
<head>
<meta name='viewport' content='width=device-width, initial-scale=1'>
<title>ESP32 Home Automation</title>
<style>
html { font-family: arial; display: inline-block; margin: 0px auto; text-align: center;}
.button {
background-color: mediumseagreen;
border: none;
color: white;
padding: 10px 15px;
text-decoration: none;
font-size: 24px;
cursor: pointer;
margin: 3px;
}
.button2 {
background-color: gray;
border: none;
color: white;
padding: 10px 15px;
text-decoration: none;
font-size: 24px;
cursor: pointer;
margin: 3px;
}
.button3 {
background-color: crimson;
border: none;
color: white;
padding: 5px 10px;
text-decoration: none;
font-size: 22px;
cursor: pointer;
margin: 2px;
}
</style>
</head>
<body>
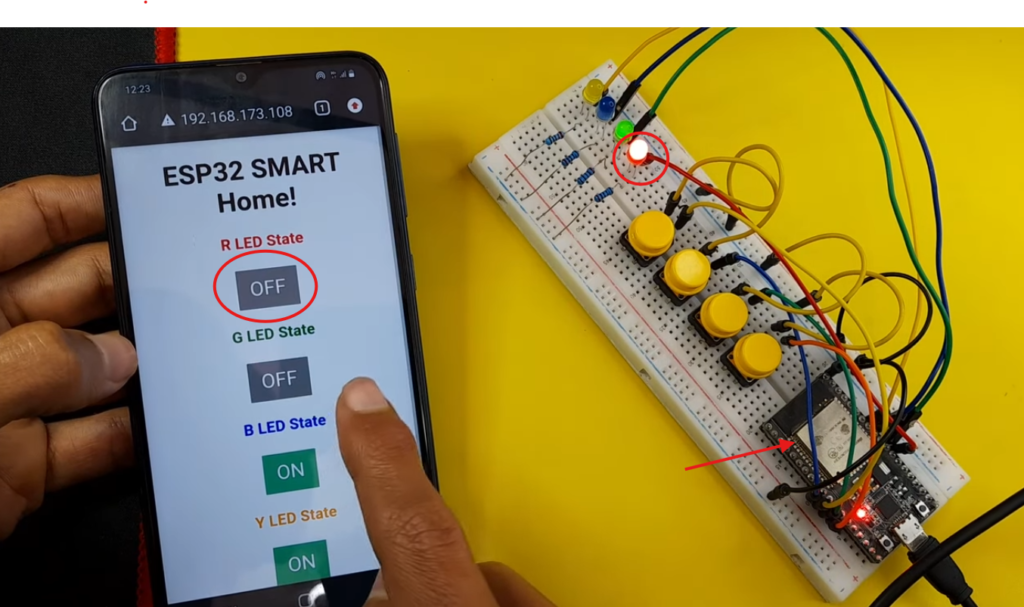
<h1>ESP32 SMART Home!</h1>
<h3 style='color: red;'\>R LED State</h3>
<p><a href='/set?button_id=1'><button id='btn1' class='%btn1class%'>%btn1txt%</button></a></p>
<h3 style='color: green;'>G LED State</h3>
<p><a href='/set?button_id=2'><button id='btn2' class='%btn2class%'>%btn2txt%</button></a></p>
<h3 style='color: blue;'>B LED State</h3>
<p><a href='/set?button_id=3'><button id='btn3' class='%btn3class%'>%btn3txt%</button></a></p>
<h3 style='color: orange;'>Y LED State</h3>
<p><a href='/set?button_id=4'><button id='btn4' class='%btn4class%'>%btn4txt%</button></a></p>
<p><a href='/reset'><button class='button3'>Reset ALL</button></a></p>
<script>
if (!!window.EventSource) {
var source = new EventSource('/events');
source.addEventListener('toggleState', function(e) {
console.log(e.data);
let jsonData = JSON.parse(e.data);
const element = document.getElementById(jsonData.id);
if(jsonData.status == 1){
element.innerHTML = 'OFF';
element.className = "button2";
}else{
element.innerHTML = 'ON';
element.className = "button";
}
}, false);
}
</script>
</body>
</html>)rawliteral";
void setup() {
Serial.begin(115200);
pinMode(d1.pin, OUTPUT);
pinMode(d2.pin, OUTPUT);
pinMode(d3.pin, OUTPUT);
pinMode(d4.pin, OUTPUT);
pinMode(d1.btnPin, INPUT_PULLUP);
pinMode(d2.btnPin, INPUT_PULLUP);
pinMode(d3.btnPin, INPUT_PULLUP);
pinMode(d4.btnPin, INPUT_PULLUP);
WiFi.mode(WIFI_STA);
WiFi.begin(ssid, password);
Serial.println("");
// Wait for connection
while (WiFi.status() != WL_CONNECTED) {
delay(500);
Serial.print(".");
}
Serial.println("");
Serial.print("Connected to ");
Serial.println(ssid);
Serial.print("IP address: ");
Serial.println(WiFi.localIP());
// Set up mDNS responder: "esp32.local" to access webpage
if (!MDNS.begin("esp32")) {
Serial.println("Error setting up MDNS responder!");
while (1) {
delay(1000);
}
}
Serial.println("mDNS responder started");
// Add service to MDNS-SD
MDNS.addService("http", "tcp", 80);
// Handle Web Server Root
server.on("/", HTTP_GET, [](AsyncWebServerRequest *request) {
request->send_P(200, "text/html", index_html, processor);
});
// Send a GET request to <IP>/set?button_id=<id>
server.on("/set", HTTP_GET, [](AsyncWebServerRequest *request) {
if (request->hasParam("button_id")) {
int idValue = request->getParam("button_id")->value().toInt();
if (idValue == d1.id) {
togglePinState(&d1);
} else if (idValue == d2.id) {
togglePinState(&d2);
} else if (idValue == d3.id) {
togglePinState(&d3);
} else if (idValue == d4.id) {
togglePinState(&d4);
}
}
request->send_P(200, "text/html", index_html, processor);
});
server.on("/reset", HTTP_GET, [](AsyncWebServerRequest *request) {
resetAll();
request->send_P(200, "text/html", index_html, processor);
});
// Handle Web Server Events
events.onConnect([](AsyncEventSourceClient *client) {
if (client->lastId()) {
Serial.printf("Client reconnected! Last message ID that it got is: %u\n", client->lastId());
}
// send event with message "hello!", id current millis
// and set reconnect delay to 1 second
client->send("hello!", NULL, millis(), 10000);
});
server.addHandler(&events);
server.begin();
Serial.println("HTTP server started");
}
void loop() {
int newBtn1State = digitalRead(d1.btnPin);
int newBtn2State = digitalRead(d2.btnPin);
int newBtn3State = digitalRead(d3.btnPin);
int newBtn4State = digitalRead(d4.btnPin);
if (d1.prevBtnState == 1 & newBtn1State == 0) {
Serial.println(d1.status);
togglePinState(&d1);
}
if (d2.prevBtnState == 1 & newBtn2State == 0) {
togglePinState(&d2);
}
if (d3.prevBtnState == 1 & newBtn3State == 0) {
togglePinState(&d3);
}
if (d4.prevBtnState == 1 & newBtn4State == 0) {
togglePinState(&d4);
}
d1.prevBtnState = newBtn1State;
d2.prevBtnState = newBtn2State;
d3.prevBtnState = newBtn3State;
d4.prevBtnState = newBtn4State;
delay(10);
}
void togglePinState(struct device *d) {
if (d->status == 0) {
digitalWrite(d->pin, HIGH);
d->status = 1;
} else {
digitalWrite(d->pin, LOW);
d->status = 0;
}
//Create JSON DATA as String
char data[500];
snprintf(data, 500, "{\"id\":\"btn%d\", \"status\":%d}", d->id, d->status);
// Send Event to the Web Client to update button status
events.send(data, "toggleState", millis());
}
void resetAll() {
if (d1.status == 1) {
togglePinState(&d1);
}
if (d2.status == 1) {
togglePinState(&d2);
}
if (d3.status == 1) {
togglePinState(&d3);
}
if (d4.status == 1) {
togglePinState(&d4);
}
}
📚 Used Libraries:
#include <WiFi.h>
#include <AsyncTCP.h>
#include <ESPAsyncWebServer.h>
#include <ESPmDNS.h>
- WiFi.h → Connects ESP32 to your router (Built-in)
- AsyncTCP.h → Handles fast asynchronous communication
- ESPAsyncWebServer.h → Creates a web server (no blocking)
- ESPmDNS.h → Lets you access ESP32 via
esp32.localinstead of an IP address (Built-in)
🌐 WiFi Configuration:
const char *ssid = "SSID-NAME";
const char *password = "YOUR-PASSWORD";
👉 Make sure to replace these with your home WiFi credentials.
🧩 Device Structure:
struct device {
  const int id;
  const int pin;
  const int btnPin;
  int prevBtnState;
  int status;
};
💡 Instead of repeating code 4 times, I created a flexible system where each appliance is an object.
🔌 Device Initialization:
struct device d1 = { 1, 16, 12, 0, 0 };
struct device d2 = { 2, 17, 14, 0, 0 };
struct device d3 = { 3, 18, 26, 0, 0 };
struct device d4 = { 4, 19, 27, 0, 0 };
🌍 Web Server Setup:
AsyncWebServer server(80);
AsyncEventSource events("/events");
- Runs on port 80 (standard web server)
- Uses Server-Sent Events (SSE) for real-time updates
🎨 Dynamic Web Interface:
const char index_html[] PROGMEM = R"rawliteral(
This is our built-in web page inside the ESP32, which contains:
- Buttons for 4 devices
- ON/OFF state display
- Reset button
- JavaScript for real-time updates
📡 Real-Time Updates (Very Advanced):
var source = new EventSource('/events'); - ESP32 sends updates → browser updates instantly
- No page refresh needed
- Uses Server-Sent Events (SSE)
🌍 mDNS Setup:
MDNS.begin("esp32"); 👉 This allows us to access the web server (No need to remember IP ) using:
http://esp32.local
Testing the System
- First Upload the Code: Connect the ESP32 via USB, select the correct COM port, and click Upload.
- Next Open up the Serial Monitor (Tools > Serial Monitor) at 115200 baud.
- Wait for the ESP32 to connect. Note the IP address printed (e.g.,
192.168.1.100). - Manual Test: Press the physical buttons. You should hear the relays click and see the states change in the Serial Monitor.
- App Test: On your smartphone (connected to the same Wi-Fi), open a browser and enter the IP address. You should see the control panel. Tap the buttons to turn appliances on/off.
Troubleshooting Common Issues
| Problem | Likely Solution |
|---|---|
| ESP32 not connecting to Wi-Fi | Double-check SSID and password. Ensure your router uses 2.4GHz (ESP32 does not support 5GHz for this standard setup). |
| Relays not clicking | Check if the relay module requires 5V instead of 3.3V. If using an active LOW relay, invert the logic (!relayStates[i]). |
| Buttons trigger randomly | The pull-down resistors might be loose. Ensure the 10kΩ resistors are firmly connected between GPIO and GND. |
| Web page not loading | Ensure the phone and ESP32 are on the same network. Try typing http:// before the IP address. Disable cellular data on your phone to force Wi-Fi traffic. |
Conclusion & Next Steps
Now you have successfully built a dual-control smart home system. You now have a foundation to expand this project:
- Add an OLED Display: Show the IP address and relay states on a small screen so you don’t need the Serial Monitor.
- Implement MQTT: Replace the web server with MQTT (like Home Assistant integration) for a professional smart home setup.
- Add Voice Control: Use an ESP32-S3 with microphone support or integrate with Alexa via the
fauxmoESPlibrary. - Improve Safety: Enclose the project in a plastic box using a 3D Printer to prevent accidental shorts.
If you build this, share your setup in the comments below! What appliances are you planning to control?