The Ultimate ESP32: Beginner’s Guide
The ESP32 is one of the most popular microcontrollers in the maker, IoT, and DIY electronics world. Whether you want to build smart home projects, wireless sensors, or connected robots, the ESP32 is often the first (and best) choice.
1️⃣ What Is the ESP32?
It is a low-cost, low-power microcontroller with built-in Wi‑Fi and Bluetooth, developed by Espressif Systems. Unlike traditional Arduino boards that require extra modules for wireless communication, ESP32 has everything built in — making it perfect for IoT (Internet of Things) projects.
Why ESP32 stands out:
Here are 6 Key Features which let ESP32 stand out :
- ✅ Dual-core 32-bit processor (up to 240 MHz), allowing multitasking.
- 📶 Wireless Connectivity: Built-in Wi-Fi (802.11 b/g/n) and Bluetooth (BLE 4.2+).
- 🎛️ Rich I/O Options:
- 34+ GPIO pins (digital, analog, capacitive touch)
- Interfaces: SPI, I2C, I2S, UART, PWM
- Analog-to-digital converter (ADC)
- Digital-to-analog converter (DAC)
- ⚡Low Power Consumption: Multiple sleep modes for battery-powered projects.
- ⏱️ Timers, interrupts, UART, SPI, I
- 🔐 Hardware encryption & secure boot support
Popular ESP32 Variants:
There are many ESP32 boards, the most popular ones are:
| Variant | Key Differences | Best For |
|---|---|---|
| ESP32 DevKit V1 | Classic, widely available | Beginners, general projects |
| ESP32-S3 | USB OTG, AI instructions | Advanced IoT, voice recognition |
| ESP32-C3 | RISC-V core, lower cost | Wi-Fi + BLE basics |
| Lolin32 ESP32 | Built-in OLED Display | Display Projects |
| ESP32-CAM | Built-in camera, microSD slot | Video streaming, photography |
👉 If you want to follow along with my projects, I highly recommend getting a complete ESP32 starter kit.
🚀 It will save you time, money, and frustration—and help you learn IoT much faster.
2️⃣ Programming ESP32 (Arduino IDE)
Now that you know what an ESP32 is and why you must learn it today, we’re gonna start programming this powerful board and create some cool projects and useful devices.
You primarily need to choose a development environment and install the necessary drivers and board packages. The Arduino IDE remains the most beginner-friendly choice, while VS Code with PlatformIO is preferred for advanced development.
Step 1: Environment Setup and Requirements
Before programming the ESP32, prepare the following:
- ESP32 development board
- USB cable (data cable, not charge-only)
- Computer (Windows, Linux, or macOS)
- Arduino IDE: Download the latest version from arduino.cc.
- Installing USB Drivers (Windows Users)
This step is critical for Windows! The ESP32 needs specific drivers to communicate with your computer:
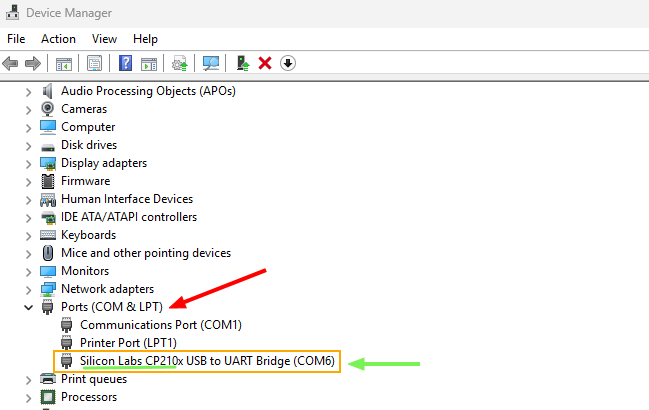
- Check your ESP32’s USB chip (usually CP2102 or CH340): You could go to “Device Manager” from your computer and check for the driver name
- Download drivers:
- CP210x: Silabs Driver
- CH340: WCH Driver
- Install it, then restart your computer
Troubleshooting:
- If the COM port doesn’t appear, try a different USB cable (some are power-only)
- In Device Manager, look for “Other devices” with yellow exclamation marks
- Mac/Linux users: Usually works without drivers
Step 2: Add ESP32 Board Support
Once the Arduino IDE is installed, we need to add ESP32 support:
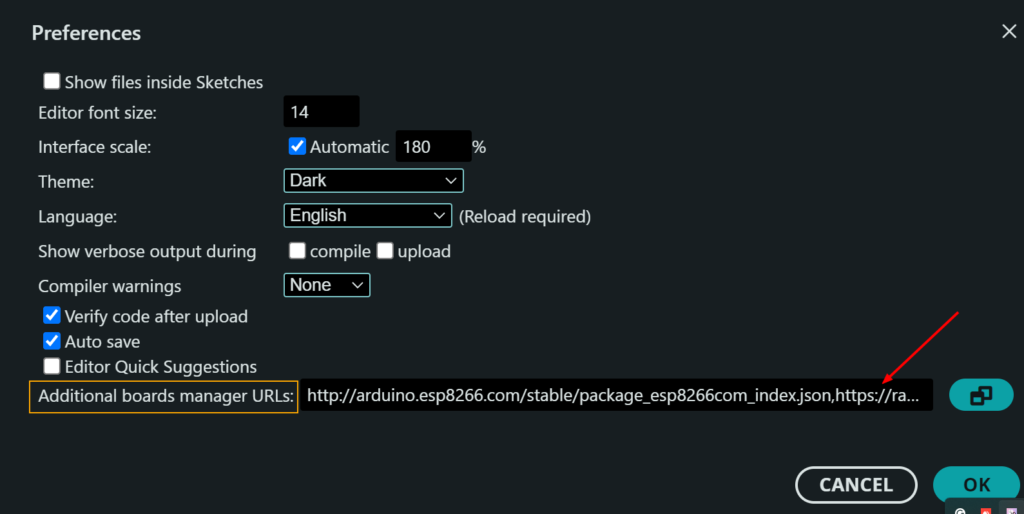
- From the Arduino IDE, Head over to File → Preferences.
- In Additional Boards Manager URLs, paste this text: http://arduino.esp8266.com/stable/package_esp8266com_index.json, https://raw.githubusercontent.com/espressif/arduino-esp32/gh-pages/package_esp32_index.json
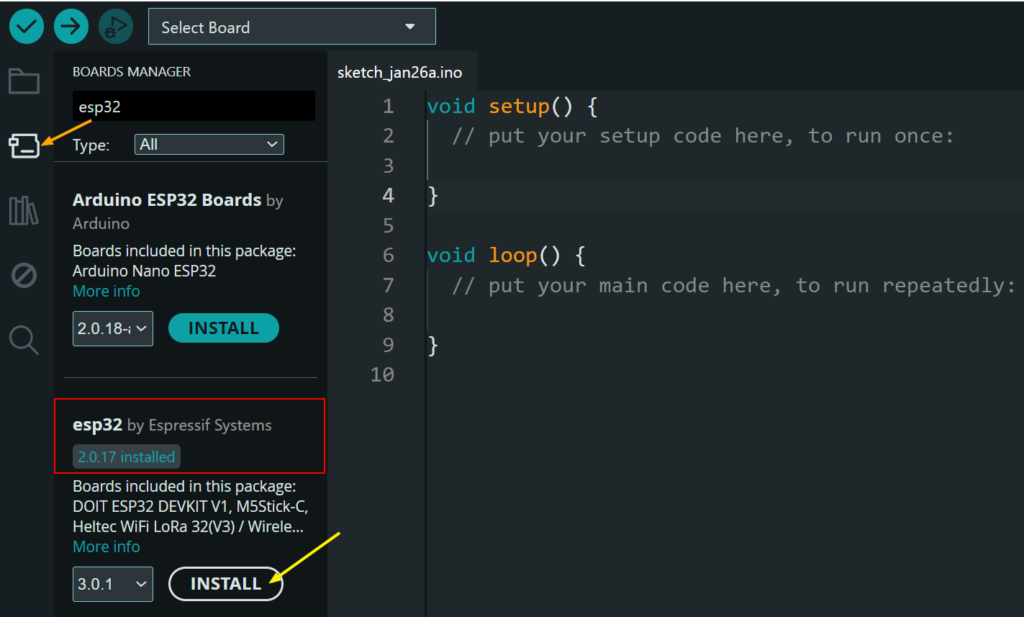
- Next, go to Tools → Board → Boards Manager, search “ESP32”, and install “esp32 by Espressif Systems”.
Step 3: Connect Your ESP32
- Use a (USB-C/micro-USB) cable to connect the board to your computer.
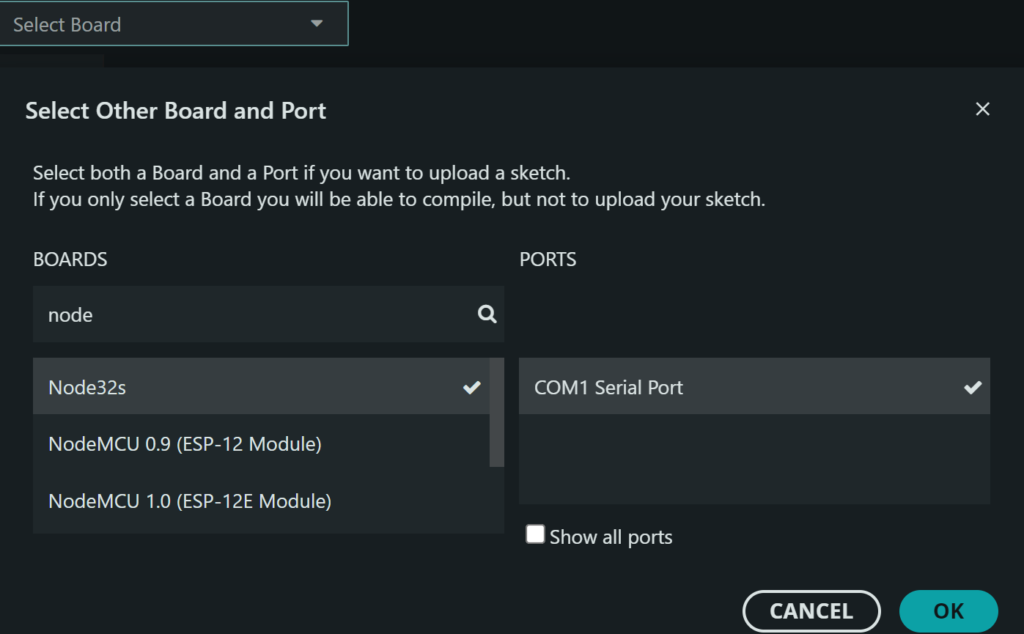
- Identify the correct Board and COM port by going to (Select Board)
- Select the appropriate COM port (Windows) or
/dev/tty...port (macOS/Linux) that your ESP32 is connected to. - Choose your specific board model (e.g.,
ESP32 Dev Module, Node32S …) then click OK
Step 4: Upload Your First Code (Blink LED)
Let’s upload a simple test program to check that our ESP32 board is working:
Go to File → Examples → 01.Basics → Blink
// the setup function runs once when you press reset or power the board
void setup() {
  // initialize digital pin LED_BUILTIN as an output.
  pinMode(LED_BUILTIN, OUTPUT);
}

// the loop function runs over and over again forever
void loop() {
  digitalWrite(LED_BUILTIN, HIGH);  // turn the LED on (HIGH is the voltage level)
  delay(1000);                      // wait for a second
  digitalWrite(LED_BUILTIN, LOW);   // turn the LED off by making the voltage LOW
  delay(1000);                      // wait for a second
}
Then click the Upload Arrow and watch the blue LED blink!
🔄 If the upload fails, press and hold the BOOT button on the ESP32 during upload.
Common Beginner Problems & Fixes
❌ Upload Failed
- Hold BOOT button while uploading
- Check correct board & port
❌ ESP32 Not Detected
- Try a different USB cable
- Install USB drivers (CP2102 / CH340)
❌ LED Not Blinking
- Wrong GPIO pin
- External LED needs a resistor
3️⃣ Wi-Fi LED Control (Access Point Web Server)
One of the most exciting features of the ESP32 is its ability to create a web server that you can control directly from your browser — no apps required.
In this simple example, we’ll turn the built-in LED ON and OFF from a web page using Wi-Fi.
📋 Complete Code:
#include <WiFi.h>
#include <WiFiClient.h>
#include <WiFiAP.h>
#define LED_BUILTIN 2 // Set the GPIO pin where you connected your test LED or comment this line out if your dev board has a built-in LED
// Set these to your desired credentials.
const char *ssid = "ESP32-AP";
const char *password = "12345678";
WiFiServer server(80);
void setup() {
pinMode(LED_BUILTIN, OUTPUT);
Serial.begin(115200);
Serial.println();
Serial.println("Configuring access point...");
// You can remove the password parameter if you want the AP to be open.
// a valid password must have more than 7 characters
if (!WiFi.softAP(ssid, password)) {
log_e("Soft AP creation failed.");
while(1);
}
IPAddress myIP = WiFi.softAPIP();
Serial.print("AP IP address: ");
Serial.println(myIP);
server.begin();
Serial.println("Server started");
}
void loop() {
WiFiClient client = server.available(); // listen for incoming clients
if (client) { // if you get a client,
Serial.println("New Client."); // print a message out the serial port
String currentLine = ""; // make a String to hold incoming data from the client
while (client.connected()) { // loop while the client's connected
if (client.available()) { // if there's bytes to read from the client,
char c = client.read(); // read a byte, then
Serial.write(c); // print it out the serial monitor
if (c == '\n') { // if the byte is a newline character
// if the current line is blank, you got two newline characters in a row.
// that's the end of the client HTTP request, so send a response:
if (currentLine.length() == 0) {
// HTTP headers always start with a response code (e.g. HTTP/1.1 200 OK)
// and a content-type so the client knows what's coming, then a blank line:
client.println("HTTP/1.1 200 OK");
client.println("Content-type:text/html");
client.println();
// the content of the HTTP response follows the header:
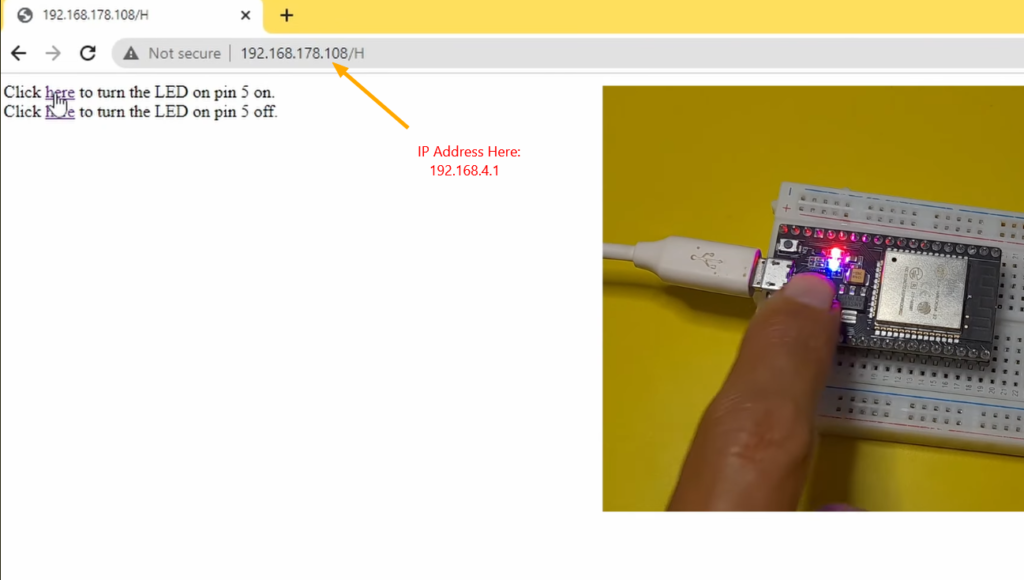
client.print("Click <a href=\"/H\">here</a> to turn ON the LED.<br>");
client.print("Click <a href=\"/L\">here</a> to turn OFF the LED.<br>");
// The HTTP response ends with another blank line:
client.println();
// break out of the while loop:
break;
} else { // if you got a newline, then clear currentLine:
currentLine = "";
}
} else if (c != '\r') { // if you got anything else but a carriage return character,
currentLine += c; // add it to the end of the currentLine
}
// Check to see if the client request was "GET /H" or "GET /L":
if (currentLine.endsWith("GET /H")) {
digitalWrite(LED_BUILTIN, HIGH); // GET /H turns the LED on
}
if (currentLine.endsWith("GET /L")) {
digitalWrite(LED_BUILTIN, LOW); // GET /L turns the LED off
}
}
}
// close the connection:
client.stop();
Serial.println("Client Disconnected.");
}
}🚀 Access Point Web Server (Testing)
- Upload the code to the ESP32 using the Upload Arrow
- Then Open Serial Monitor from the IDE and select (115200 baud rate)
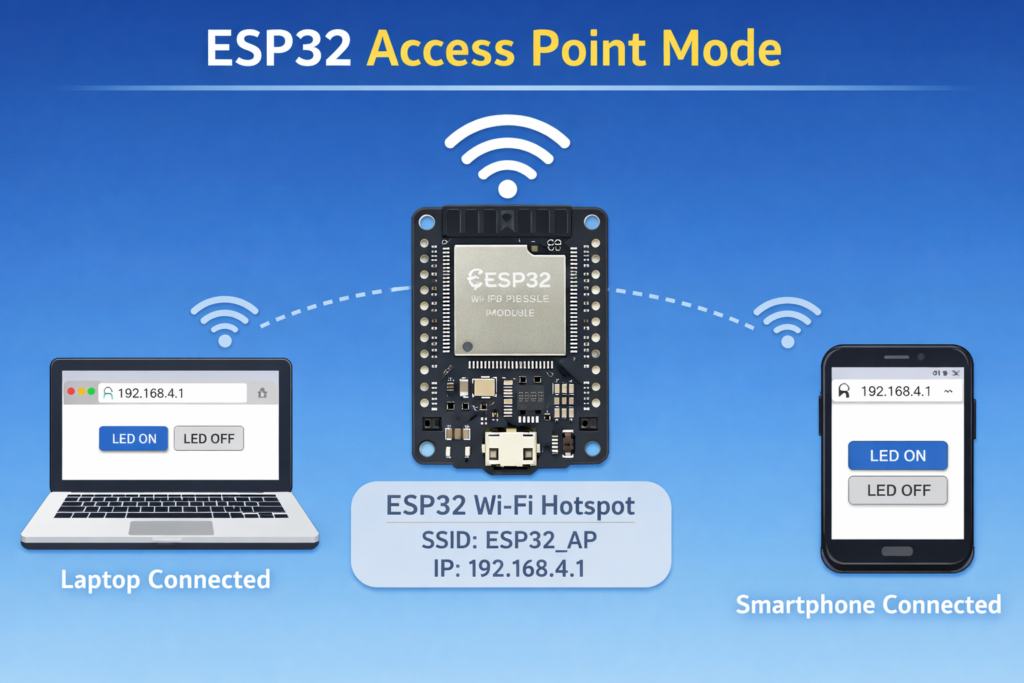
- Look for the Access Point IP address (usually
192.168.4.1) - On your phone or PC, connect to this Wi‑Fi network:
- SSID: “ESP32-AP”
- Password: “12345678”
- Open any browser, such us google chrome, and go to: http://192.168.4.1
- Now you can click the buttons to control the LED 🎉
This method is widely used in ESP32 configuration pages, smart devices, and portable projects.
- 🚫 No router or internet required
- 🔒 Fully local and secure
- 📱 Perfect for mobile control
- ⚡ Fast response time
🧠 Project Overview:
Let’s break down what actually happens behind the scenes so beginners truly understand how this project works.
WiFi.softAP(ssid, password);→ Makes the ESP32 creates its own Wi-Fi networkWiFiServer server(80);→ Starts a web server that listens for browser requestsserver.available()→ Checks if a browser has connectedclient.readStringUntil('\r')→ Reads the request from the browserif (request.indexOf("/LED=ON") != -1)→ Checks if the request is to turn the LED ONdigitalWrite(ledPin, HIGH/LOW)→ Turns the LED ON or OFFclient.println()→ Sends the HTML page back to the browser
This web server project demonstrates the real power of IoT: controlling physical devices remotely through a simple interface. Once you master this, you can control relays, motors, sensors, and more!
4️⃣Conclusion ✍️
The ESP32 opens doors to powerful IoT projects without breaking the bank. Grab a board, install the IDE, and start creating—your first connected device is just a few lines of code away!
Once you understand this concept, you unlock many possibilities — from smart switches and configuration pages to full web dashboards and home automation systems. The ESP32 gives you the freedom to experiment, learn, and build powerful connected projects with very little hardware.
Resources:
Next Project Ideas
- Wi-Fi Web Server: Host a simple webpage to control GPIOs.
- Sensor Hub: Log temperature/humidity to the cloud.
- Home Automation: Control lights via MQTT.