Build an Arduino RFID Door Lock System 🔐(RC522 + Solenoid Lock)
Security systems are becoming an essential part of modern homes and offices. Instead of traditional keys, RFID technology offers a simple and secure way to control access.
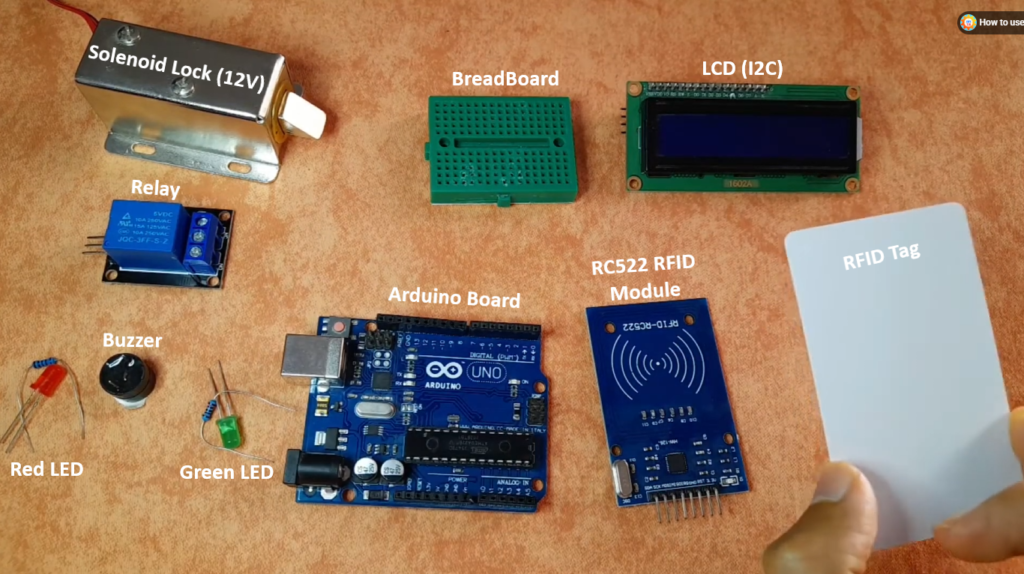
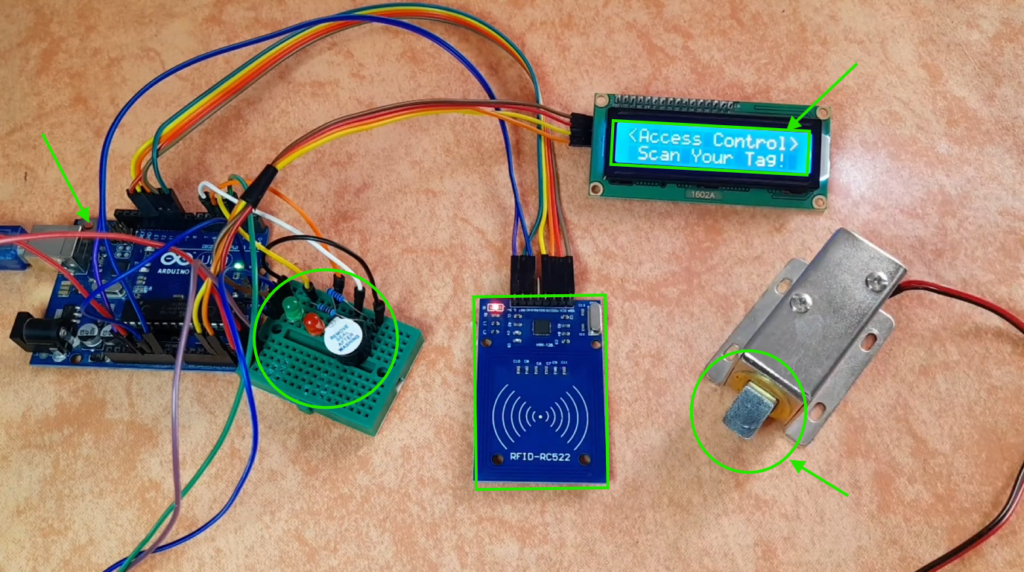
So let’s build a complete RFID door lock system using Arduino, an RC522 RFID reader, and a solenoid door lock. This system allows access only to authorized RFID cards and provides visual and audio feedback using LEDs, a buzzer, and an LCD.
🧰 Components You’ll Need
I highly recommend getting a complete starter kit that includes everything you need to create a wide range of projects.
| Component | Quantity |
|---|---|
| Arduino Uno/Nano | 1 |
| RC522 RFID Module | 1 |
| 13.56MHz RFID Tags/Cards | 1+ |
| Solenoid Lock (12V) | 1 |
| Relay Module (5V or 12V) | 1 |
| 16×2 LCD with I2C backpack | 1 |
| Red LED | 1 |
| Green LED | 1 |
| Buzzer (5V) | 1 |
| 220Ω resistors | 2 |
| 12V power supply (for solenoid) | 1 |
| Jumper wires & breadboard | as needed |
Note: The solenoid lock draws more current than an Arduino pin can supply. Always use a relay module to control it safely.
🔌 Wiring Diagrams (Pin Connections)
RC522 → Arduino
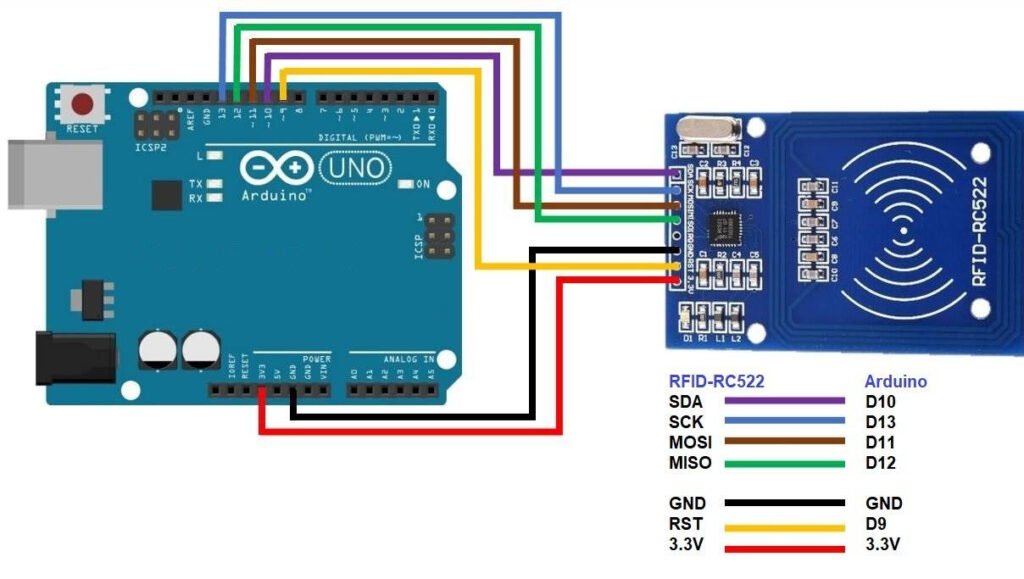
| RC522 Pin | Arduino Pin |
|---|---|
| SDA (SS) | 10 |
| SCK | 13 |
| MOSI | 11 |
| MISO | 12 |
| RST | 9 |
| 3.3V | 3.3V |
| GND | GND |
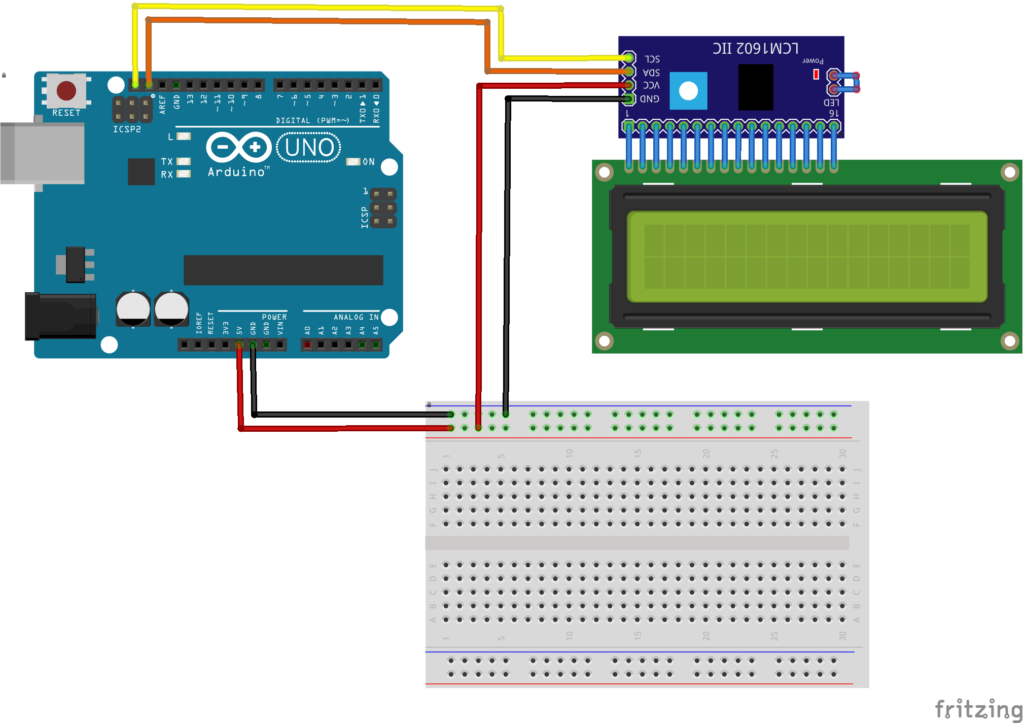
LCD (I2C)→ Arduino
Other Components
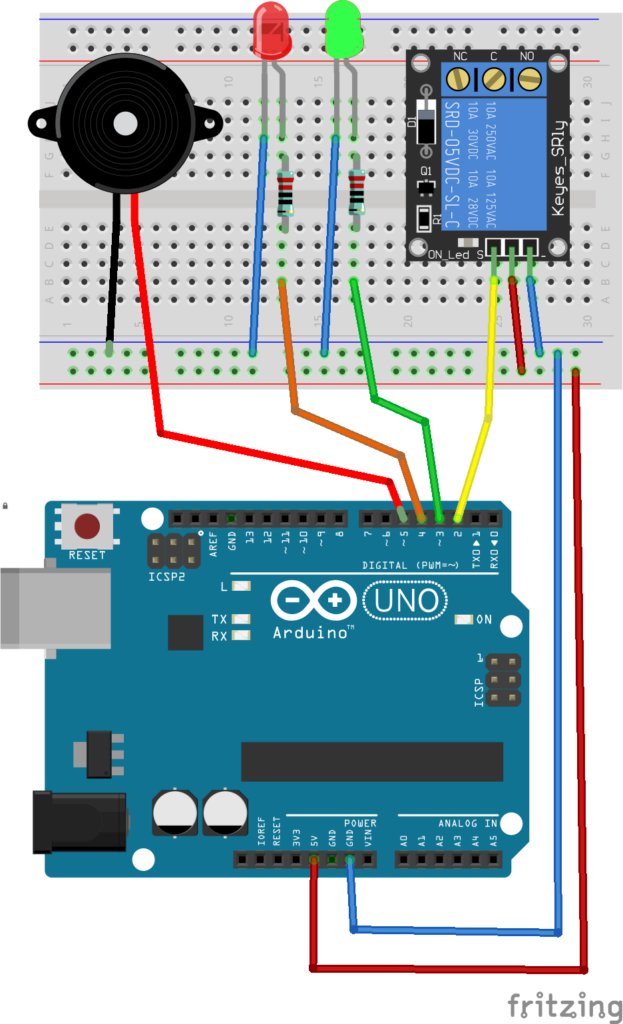
All LEDs and buzzer negatives go to GND.
💻 The Complete Arduino Code
This is the exact code I’m running on my system, which includes:
- RFID authentication
- Solenoid control
- LCD messages
- LED + buzzer feedback
//Arduino Door Lock Access Control Project
//Library: MFRC522,  https://github.com/miguelbalboa/rfid

#include <SPI.h>
#include <MFRC522.h>
#include <LiquidCrystal_I2C.h>

#define SS_PIN 10
#define RST_PIN 9

// Instance of the class MFRC522
MFRC522 rfid(SS_PIN, RST_PIN);

// Create LCD object : Use 0x27 If 0x3F Doesn't work
LiquidCrystal_I2C lcd(0x3F, 16, 2);

// Init array that will store new NUID
byte nuidPICC[4];

// Put Your access NUID Here
byte master[4] = {0x49, 0xA1, 0xDE, 0x6E};

// Pin connected to lock relay signal
int lockOutput = 2;

int greenLED = 3;
int redLED = 4;
int buzzerPin = 5;

void setup() {
  SPI.begin(); // Init SPI bus
  rfid.PCD_Init(); // Init MFRC522

  // Setup LCD with backlight and initialize
  lcd.init();
  lcd.backlight();
  printWelcomeMessage();

  // Set OUTPUT pins
  pinMode(lockOutput, OUTPUT);
  pinMode(greenLED, OUTPUT);
  pinMode(redLED, OUTPUT);
  pinMode(buzzerPin, OUTPUT);
}

void loop() {

  // Reset the loop if no new card present on the sensor/reader
  if ( ! rfid.PICC_IsNewCardPresent())
    return;

  // Verify if the NUID has been readed
  if ( ! rfid.PICC_ReadCardSerial())
    return;

  // Store NUID into nuidPICC array
  for (byte i = 0; i < 4; i++) {
    nuidPICC[i] = rfid.uid.uidByte[i];
  }

  // Checks whether the scanned tag is authorized
  if (getAccessState(master, nuidPICC) == true) {
    lcd.clear();
    lcd.setCursor(0, 0);
    lcd.print(" Access Granted!");

    // Turn on relay & green LED for 5 seconds
    digitalWrite(lockOutput, HIGH);
    digitalWrite(greenLED, HIGH);
    delay(4000);
    digitalWrite(lockOutput, LOW);
    digitalWrite(greenLED, LOW);

    delay(25);  //To fix (LCD, Solenoid) issue
    printWelcomeMessage();

  } else {
    lcd.clear();
    lcd.setCursor(0, 0);
    lcd.print(" Access Denied!");

    digitalWrite(redLED, HIGH);
    digitalWrite(buzzerPin, HIGH);
    delay(1000);
    digitalWrite(redLED, LOW);
    digitalWrite(buzzerPin, LOW);

    printWelcomeMessage();

  }
  // Halt PICC
  rfid.PICC_HaltA();

  // Stop encryption on PCD
  rfid.PCD_StopCrypto1();

}

bool getAccessState(byte accessCode[], byte newCode[]) {
  for (byte i = 0; i < 4; i++) {
    if (newCode[i] != accessCode[i]) {
      return false;
    }
  }
  return true;
}

void printWelcomeMessage() {
  lcd.clear();
  lcd.print("<Access Control>");
  lcd.setCursor(0, 1);
  lcd.print(" Scan Your Tag!");
}
📋 Step 1: Install Required Libraries
First, make sure to install these 2 libraries from the Arduino Library Manager:
- MFRC522 by Github Comunity→ To read and write RFID cards/tags
- LiquidCrystal_I2C Library → controls the LCD through the I2C interface.
🔍 Step 2: Get Your RFID Tag UID
Next, you need to get your tag’s unique UID using the RFID reader. By opening an example sketch using the installed library:
Head over to File > Examples > MFRC522 > DumpInfo
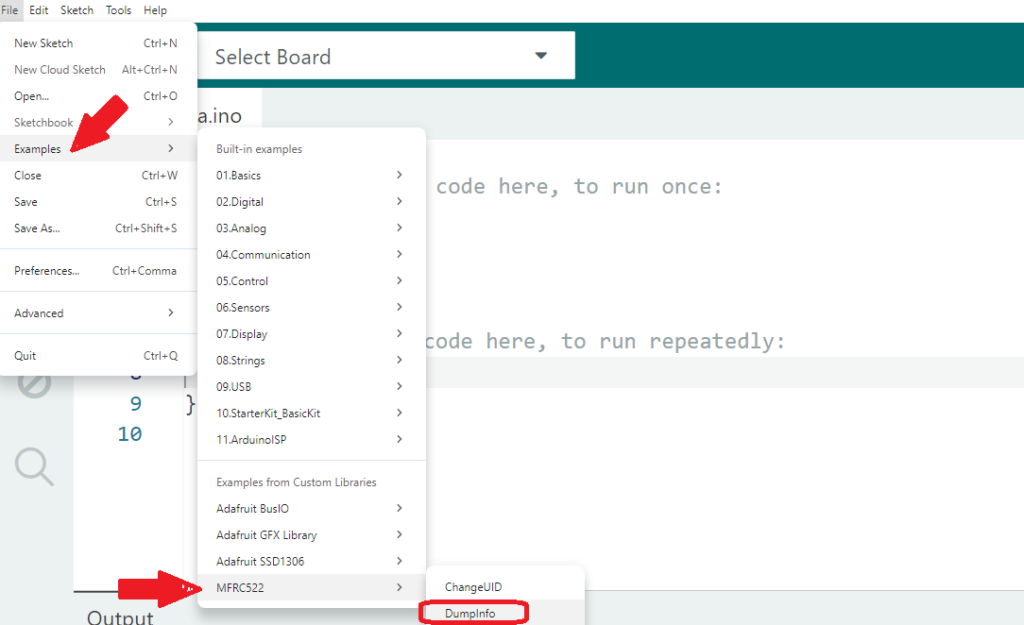
Or copy this sketch to your Arduino IDE. It will read any tag you scan and show you its unique ID.
#include <SPI.h>
#include <MFRC522.h>

#define RST_PIN         9
#define SS_PIN          10

MFRC522 mfrc522(SS_PIN, RST_PIN);

void setup() {
	Serial.begin(9600);
	while (!Serial);
	SPI.begin();
	mfrc522.PCD_Init();
	delay(4);
	mfrc522.PCD_DumpVersionToSerial();
	Serial.println(F("Scan PICC to see UID, SAK, type, and data blocks..."));
}

void loop() {
	if ( ! mfrc522.PICC_IsNewCardPresent()) {
		return;
	}
	if ( ! mfrc522.PICC_ReadCardSerial()) {
		return;
	}
	mfrc522.PICC_DumpToSerial(&(mfrc522.uid));
}- Upload the Dump Info sketch to your Arduino
- Open the Serial Monitor (Tools → Serial Monitor or
Ctrl+Shift+M) - Set the baud rate to 9600
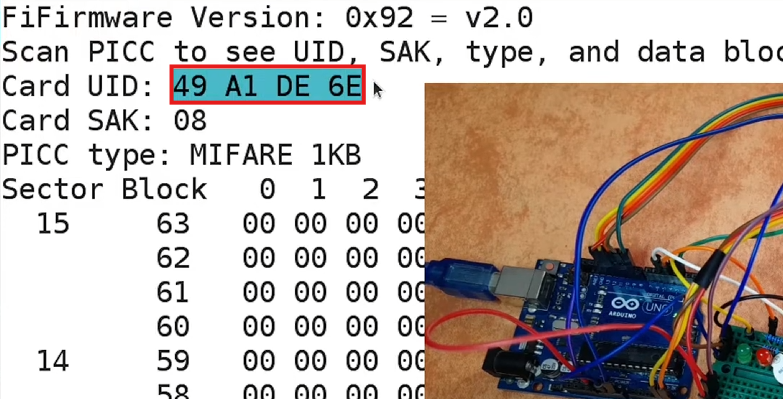
- Scan your RFID tag/card on the RC522 reader
- Copy the UID that appears — it will look something like:
✏️ Step 3: Update Your Main Door Lock Code
Now take that UID and replace the master array in your original door lock code:
// Put Your access NUID Here
byte master[4] = {0x49, 0xA1, 0xDE, 0x6E};
Once updated, you can upload the sketch to the Arduino board and start testing:

🧪 Testing & Troubleshooting
LCD shows nothing?
- Try changing the I2C address from
0x3Fto0x27in this line: LiquidCrystal_I2C lcd(0x3F, 16, 2); - Or run an I2C scanner sketch to find your LCD’s real address.
Solenoid not moving?
- The solenoid lock needs enough current (often 1–2A).
- Check your relay wiring — common mistake.
- Make sure the relay’s VCC is connected to an external 12V supply, not the Arduino’s 5V.
🧠 Complete Code Explanation:
In this section, we’ll break down how the Arduino code works to control the RFID door lock system.
🔹 1. Including Required Libraries
#include <SPI.h>
#include <MFRC522.h>
#include <LiquidCrystal_I2C.h>
- SPI.h → Enables communication between Arduino and the RFID module
- MFRC522.h → Controls the RFID reader
- LiquidCrystal_I2C.h → Manages the LCD using I2C
🔹 2. Defining Pins and Initializing Modules
#define SS_PIN 10
#define RST_PIN 9MFRC522 rfid(SS_PIN, RST_PIN);
LiquidCrystal_I2C lcd(0x3F, 16, 2);
SS_PINandRST_PINare used for RFID communicationrfidThe object initializes the RFID readerlcdThe object initializes the 16×2 LCD
🔹 3. Storing Authorized RFID Card UID
// Put Your access NUID Here
byte master[4] = {0x49, 0xA1, 0xDE, 0x6E};
- This array stores the UID of the authorized card
- Only this card can unlock the door
- You can replace it with your own card’s UID
💡 You can also extend the code to store multiple authorized tags using an array of arrays.
🔹 4. Defining Output Components
// Pin connected to lock relay signal
int lockOutput = 2;
int greenLED = 3;
int redLED = 4;
int buzzerPin = 5;
These pins control:
- Relay (door lock)
- Status LEDs
- Buzzer for alerts
🔹 5. Setup Function
void setup() {
  SPI.begin();
  rfid.PCD_Init();  lcd.init();
  lcd.backlight();
  printWelcomeMessage();  pinMode(lockOutput, OUTPUT);
  pinMode(greenLED, OUTPUT);
  pinMode(redLED, OUTPUT);
  pinMode(buzzerPin, OUTPUT);
}
- Initializes RFID and SPI communication
- Starts the LCD and turns on the backlight
- Displays a welcome message
- And sets all output pins
🔹 6. Main Loop – Detecting RFID Cards
  // Reset the loop if no new card present on the sensor/reader
  if ( ! rfid.PICC_IsNewCardPresent())
    return;

  // Verify if the NUID has been readed
  if ( ! rfid.PICC_ReadCardSerial())
    return;
This waits until a card is placed near the reader.
🔹 7. Storing the Scanned UID
  // Store NUID into nuidPICC array
  for (byte i = 0; i < 4; i++) {
    nuidPICC[i] = rfid.uid.uidByte[i];
  }
- Copies the scanned UID into an array
- This will be compared with the authorized UID
🔹 8. Checking Access Permission
if (getAccessState(master, nuidPICC))
- This calls a function to compare both UIDs
- And returns
trueIf they match
🔹 9. Access Granted Logic
    // Turn on relay & green LED for 5 seconds
    digitalWrite(lockOutput, HIGH);
    digitalWrite(greenLED, HIGH);
    delay(4000);
    digitalWrite(lockOutput, LOW);
    digitalWrite(greenLED, LOW);
When access is granted:
- Relay activates → door unlocks
- Green LED turns ON
- The door stays open for 4 seconds
- Then everything turns OFF
🔹 10. Access Denied Logic
    digitalWrite(redLED, HIGH);
    digitalWrite(buzzerPin, HIGH);
    delay(1000);
    digitalWrite(redLED, LOW);
    digitalWrite(buzzerPin, LOW);
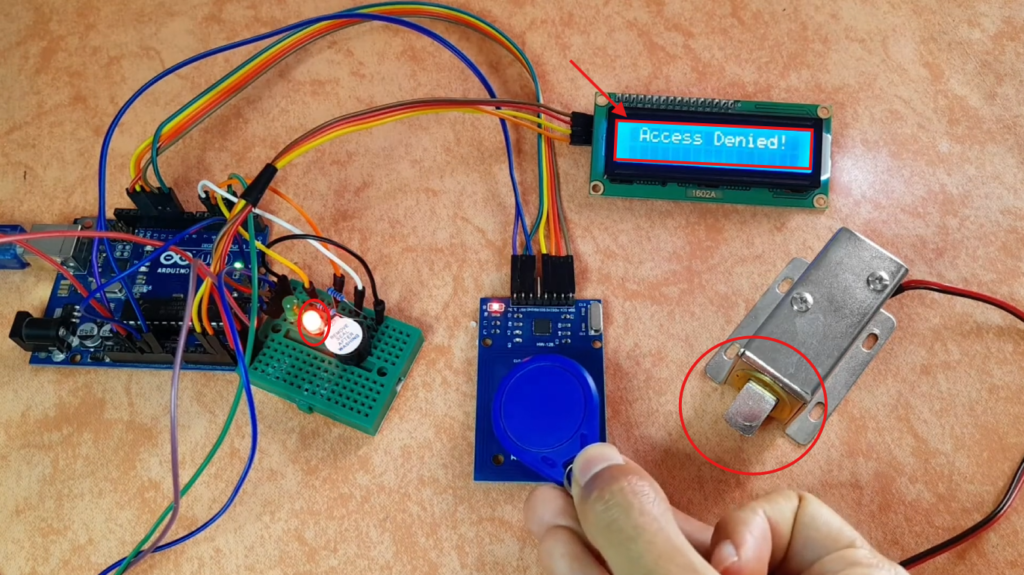
If access is denied:
- Red LED turns ON
- The buzzer sounds an alarm
- Lasts for 1 second
🔹 11. UID Comparison Function
bool getAccessState(byte accessCode[], byte newCode[]) {
  for (byte i = 0; i < 4; i++) {
    if (newCode[i] != accessCode[i]) {
      return false;
    }
  }
  return true;
}
Here we compare each byte of the UID; if all match → access is granted, otherwise → access is denied.
🔹 12. LCD Welcome Message Function
void printWelcomeMessage() {
  lcd.clear();
  lcd.print("<Access Control>");
  lcd.setCursor(0, 1);
  lcd.print(" Scan Your Tag!");
}
This function displays the default message on the LCD, which guides the user to scan their card.