Raspberry Pi GPIO Pins Explained 🧠 – Control Hardware with Python
The Raspberry Pi is a powerful SBC for interacting with the physical world. Thanks to its GPIO pins, you can control LEDs, read sensors, and build exciting DIY projects.
In this guide, we’ll learn how Raspberry Pi GPIO pins work and how to control them using Python.
Before we begin, make sure your Raspberry Pi is properly set up. If not, check out our Getting Started with Raspberry Pi guide first.
1️⃣ What Are GPIO Pins?
- GPIO pins are digital pins on your Raspberry Pi that you can program to either receive input (signals like sensors) or send output (turn devices on/off).
- There are usually 40 pins on modern Raspberry Pi boards (like Pi 3, 4, 5).
- Some are power pins (3.3V, 5V, GND)
- Some are special pins (I2C, SPI, UART)
- The rest are general-purpose pins (GPIOs)
2️⃣ GPIO Pinout 📌 Diagram
- Before connecting any device or sensor, it’s important to understand the Raspberry Pi GPIO pinout diagram. The pinout diagram shows the physical layout of the 40-pin header and explains the function of each pin.
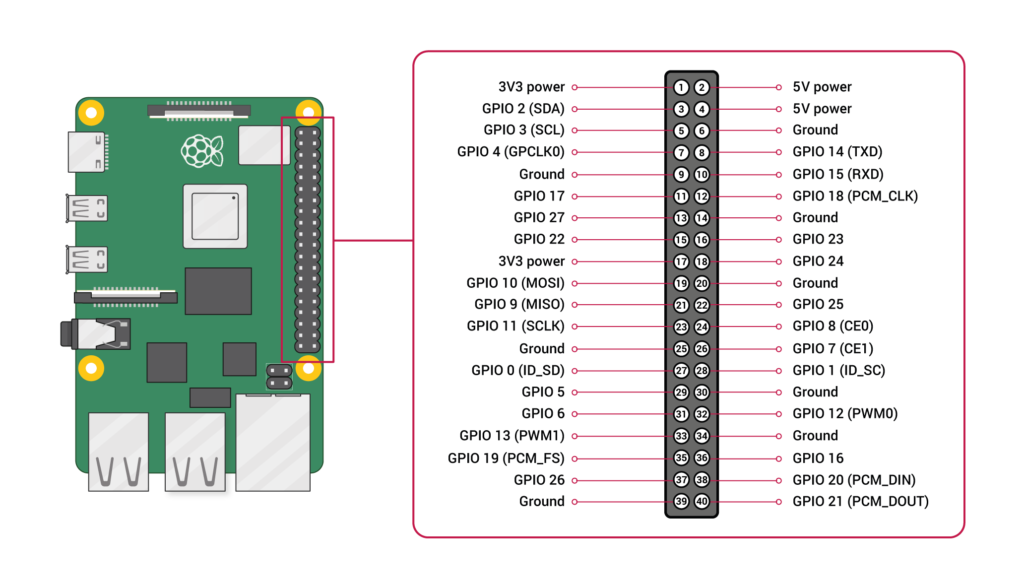
🔁 Pin Numbering: BCM vs Physical (BOARD)
The pinout diagram usually shows two numbering systems:
| Mode | Description |
|---|---|
| BCM | Uses Broadcom GPIO numbers (recommended) |
| BOARD | Uses physical pin numbers (1,2,3,4…40) |
- Example: GPIO 17 (BCM) = Physical pin 11
⚠️ GPIO pins work at 3.3V only. Connecting 5V directly to a GPIO pin can permanently damage your Raspberry Pi.
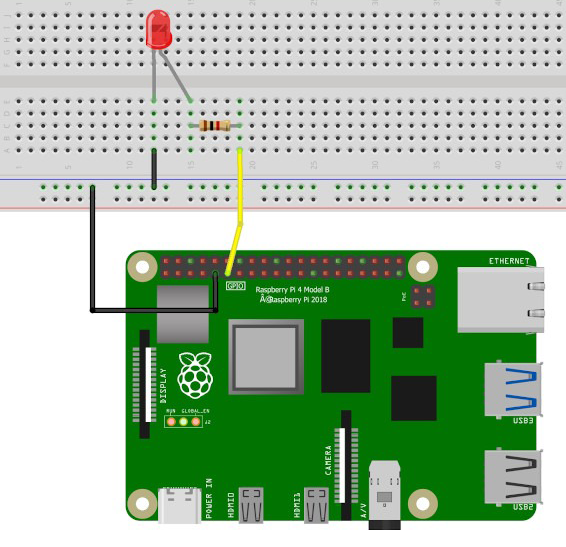
3️⃣ Prepare for GPIO Programming
🚀 Requirements:
- Raspberry Pi (any model)
- Raspberry Pi OS
- Python 3 (It is preinstalled)
- LED + 220Ω resistor
- Breadboard & jumper wires
🌐 Connecting to the Raspberry Pi via SSH
From another computer (Linux, macOS, or Windows with PowerShell):
ssh pi@raspberrypi.local/Or using the Pi’s IP address:
ssh pi@192.168.1.50Once connected, you will have full access to the Raspberry Pi terminal.
Install GPIO Library:
sudo apt update
sudo apt install python3-rpi.gpio
4️⃣ Start Controlling GPIO Pins (Python)
After connecting via SSH, you can control GPIO pins exactly the same way as if you were sitting in front of the Raspberry Pi.
🟡 Running Python GPIO Commands Interactively
You can control GPIO pins directly from the Python interpreter:
python3After running python3, you can start entering Python commands directly
import RPi.GPIO as GPIO
GPIO.setmode(GPIO.BCM)
GPIO.setup(17, GPIO.OUT)
GPIO.output(17, GPIO.HIGH)
GPIO.cleanup()
This is useful for quick testing and debugging.
import RPi.GPIO as GPIO
- Loads the Raspberry Pi GPIO library so Python can control the pins.
GPIO.setmode(GPIO.BCM)
- Sets the pin numbering system to BCM mode, which uses the Pi’s internal GPIO numbers (like GPIO17).
GPIO.setup(17, GPIO.OUT)
- Configures GPIO pin 17 as an output pin.
- Output pins can send voltage to connected devices like LEDs, buzzers, or relays.
GPIO.output(17, GPIO.HIGH)
- Turns GPIO 17 ON by sending 3.3V to the pin.
- Any connected device, like an LED, will activate.
GPIO.cleanup()
- Resets all GPIO pins to a safe default state.
🟢 Running a Python 🐍 Script File
Instead of typing commands one by one in the Python interpreter, you can write a Python script and run it in 3 Easy Steps:
Step1: Create a Python File Using Nano
- Open the terminal on your Raspberry Pi (or via SSH).
- Create a new Python file:
nano led_control.py
- Nano will open a blank editor where you can type your code.
Step2: Write Your GPIO Code
Here’s an example to turn an LED on and off:
import RPi.GPIO as GPIO
import time  # for delays

GPIO.setmode(GPIO.BCM)
GPIO.setup(17, GPIO.OUT)

try:
    while True:
        GPIO.output(17, GPIO.HIGH)  # Turn LED on
        time.sleep(1)
        GPIO.output(17, GPIO.LOW)   # Turn LED off
        time.sleep(1)
except KeyboardInterrupt:
    GPIO.cleanup()  # Reset GPIO pins safely
⚡ Tip: Make sure to save your file in Nano by pressing
CTRL+O→ Enter, thenCTRL+Xto exit.
Step3: Run the Python File
Now you can run your script from the terminal using:
python3 led_control.py
- The LED connected to GPIO 17 will turn on and off continuously, each one second.
- Understand How the Blinking LED Code Works:
import RPi.GPIO as GPIO
We start by loading the GPIO library so Python can talk to the Raspberry Pi’s pins.import time
We use this library to pause the program for a second so that the LED stays ON and OFF for a visible amount of time.GPIO.setmode(GPIO.BCM)
Sets the pin numbering mode: BCM mode uses the Raspberry Pi’s internal GPIO numbersGPIO.setup(17, GPIO.OUT)
It sets GPIO 17 as an output pin. Output pins can send electricity to devices like LEDs, buzzers, or relays — basically anything we want to control.while True:
This line starts a loop that repeats forever. The code inside will keep running until we tell it to stop.GPIO.output(17, GPIO.HIGH)
Turns the LED ON by sending 3.3V to GPIO 17.time.sleep(1)
Pauses the program for 1 second, so the LED stays ON long enough for us to notice.GPIO.output(17, GPIO.LOW)
Turns the LED OFF by cutting the voltage to the pin. The LED goes dark.time.sleep(1)
Pauses for another second, keeping the LED OFF before the loop repeats.except KeyboardInterrupt:
This catches CTRL+C if we want to stop the loop manually. It prevents errors and ensures the program exits cleanly.GPIO.cleanup()
Finally, this resets all GPIO pins to a safe state. It’s like turning off all the switches and tidying up before leaving — essential for keeping your Raspberry Pi and connected devices safe.
✅ That’s it! You’ve just run your GPIO code from a file, which is reusable and perfect for remote control over SSH.
5️⃣ What’s Next?
Now that you’ve learned how to control an LED, let’s take the next step and explore how your Raspberry Pi can read inputs from sensors (like buttons, motion detectors, or temperature sensors) to make things react automatically!