ESP32 Prayer Times LCD Device (Low-Cost IoT Project) 📿
Previously, we built a Prayer Times Display using Raspberry Pi, which was a powerful and flexible solution. The Raspberry Pi allowed advanced customization and a larger display interface.
However, one major downside of the Raspberry Pi project was the cost.
So let’s build a dedicated Smart Prayer Times Display using the ESP32 and a 16×2 I2C LCD screen. An ESP32 + I2C LCD costs only a fraction of a Raspberry Pi setup.
Our ESP32 Board will:
- ✅ Connect to WiFi
- ✅ Sync real-time using NTP Server
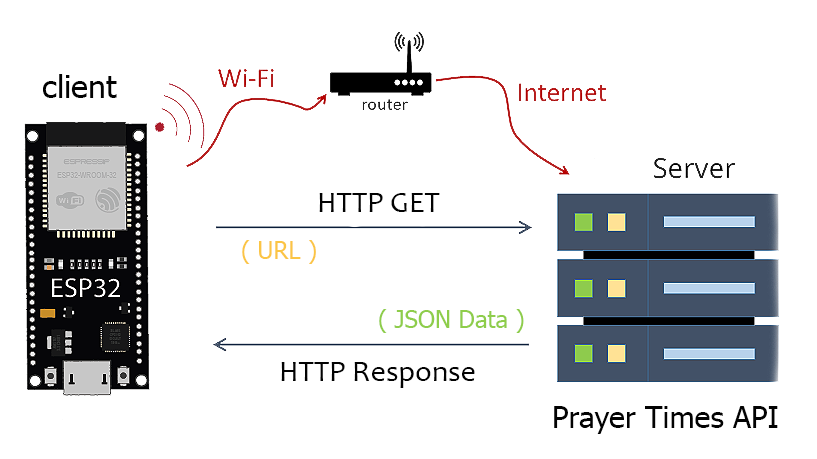
- ✅ Fetch daily prayer times from an online API (AlAdhan API)
- ✅ Display them on the LCD screen
- ✅ Automatically update every new day
It’s a practical project that combines IoT, API integration, and real-time clock functionality, perfect for:
- 🕌 Home prayer rooms
- 🏫 Schools
- 🏢 Offices
- 📚 IoT learning projects
🧰 Components Required
- ESP32 Development Board (any variant: ESP32 DevKit, NodeMCU-32S, etc.)
- LCD Display 16×2 (with I2C adapter – highly recommended to save pins)
- Jumper Wires (Female to Female)
- USB Cable for power/programming
Before We Begin: If you’re completely new to the ESP32, I recommend checking out my previous blog post, an Ultimate ESP32 Beginner’s Guide. We’ve covered the basics of setting up your development environment, installing board support, and uploading your first program.
🔌 Circuit Diagram & Connections
Since we are using an I2C LCD, wiring is very simple:
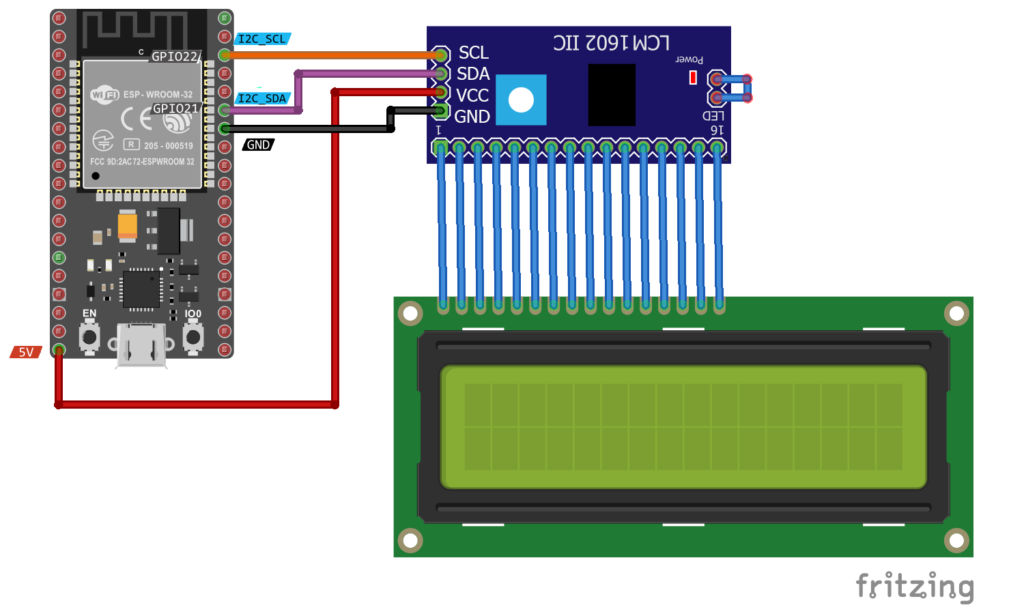
| LCD Pin | ESP32 Pin |
|---|---|
| VCC | 5V |
| GND | GND |
| SDA | GPIO 21 |
| SCL | GPIO 22 |
📝 Complete Code
#include <WiFi.h>
#include <HTTPClient.h>
#include <ArduinoJson.h>
#include "time.h"
#include "sntp.h"
#include <LiquidCrystal_I2C.h>

//LCD Object (0x3F or 0x27)
LiquidCrystal_I2C lcd(0x3F, 16, 2);

//Put your WiFi Credentials here
const char* ssid = "YourWiFiSSID";
const char* password = "YourWiFiPassword";

//URL Endpoint for the API
String URL = "https://api.aladhan.com/v1/timings/";

String latitude = "?latitude=34.43175467574712";
String longitude = "&longitude=8.777399305036454";

// Imsak,Fajr,Sunrise,Dhuhr,Asr,Maghrib,Sunset,Isha,Midnigh
String tune = "&tune=0,-2,-2,7,0,5,5,2,0";
String method = "&method=1";

String lastDate="";
struct Prayer {
  String name;
  String time;  // format "HH:MM"
};
Prayer prayers[5];  // 5 prayers

const char* ntpServer1 = "pool.ntp.org";
const char* ntpServer2 = "time.nist.gov";
const long gmtOffset_sec = 3600;
const int daylightOffset_sec = 3600;

void setup() {
  Serial.begin(115200);

  // Setup LCD with backlight and initialize
  lcd.init();
  lcd.backlight();
  lcd.clear();

  // set notification call-back function
  sntp_set_time_sync_notification_cb(timeavailable);
  sntp_servermode_dhcp(1);  // (optional)
  /**
   * This will set configured ntp servers and constant TimeZone/daylightOffset
   * should be OK if your time zone does not need to adjust daylightOffset twice a year,
   * in such a case time adjustment won't be handled automagicaly.
   */
  configTime(gmtOffset_sec, daylightOffset_sec, ntpServer1, ntpServer2);

  // We start by connecting to a WiFi network
  WiFi.begin(ssid, password);

  while (WiFi.status() != WL_CONNECTED) {
    delay(500);
    Serial.print(".");
  }

  Serial.println("");
  Serial.println("WiFi connected.");
  Serial.println("IP address: ");
  Serial.println(WiFi.localIP());
}

void loop() {
  // wait for WiFi connection
  if (WiFi.status() == WL_CONNECTED) {

    String dateTime = getCurrentDate();
    String newDate = dateTime.substring(0,10);
    String newTime = dateTime.substring(11);

    if( newDate != lastDate){
      setPrayerTimes(newDate);
      lastDate = newDate;
    }

    for(int i=0; i<5;i++){
      lcd.clear();
      lcd.setCursor(0,0);
      lcd.print(dateTime);
      lcd.setCursor(0,1);
      lcd.print(prayers[i].name + prayers[i].time);
      delay(3000);
    }
  }
}

// Callback function (get's called when time adjusts via NTP)
void timeavailable(struct timeval* t) {
  Serial.println("Got time adjustment from NTP!");
  getCurrentDate();
}
String getCurrentDate() {
  struct tm timeinfo;

  if (!getLocalTime(&timeinfo)) {
    Serial.println("No time available");
    return "";
  }

  char dateBuffer[17];
  strftime(dateBuffer, sizeof(dateBuffer), "%d-%m-%Y %H:%M", &timeinfo);
  return String(dateBuffer);
}
void setPrayerTimes(String date){
    HTTPClient http;

    //Set HTTP Request Final URL with Location and API key information
    http.begin(URL + date + latitude + longitude + method + tune);
    Serial.println(URL +date+ latitude + longitude + method + tune);
    // start connection and send HTTP Request
    int httpCode = http.GET();
    String result = "";
    // httpCode will be negative on error
    if (httpCode > 0) {

      //Read Data as a JSON string
      String JSON_Data = http.getString();
      Serial.println(JSON_Data);

      //Retrieve some information about the weather from the JSON format
      DynamicJsonDocument doc(2048);
      deserializeJson(doc, JSON_Data);
      JsonObject obj = doc.as<JsonObject>();

      //Get Prayer Times using API
      prayers[0].name = "Al-Fajr    ";
      prayers[0].time = obj["data"]["timings"]["Fajr"].as<String>();

      prayers[1].name = "Al-Dhuhr   ";
      prayers[1].time = obj["data"]["timings"]["Dhuhr"].as<String>();

      prayers[2].name = "Al-Asr     ";
      prayers[2].time = obj["data"]["timings"]["Asr"].as<String>();

      prayers[3].name = "Al-Maghrib ";
      prayers[3].time = obj["data"]["timings"]["Maghrib"].as<String>();

      prayers[4].name = "Al-Isha    ";
      prayers[4].time = obj["data"]["timings"]["Isha"].as<String>();

      Serial.print("DATA Found");
    } else {
      Serial.print("NO DATA Found!");
    }
    http.end();
}
Before uploading this code, you need to make some modifications:
📚 Required Libraries
First, install these libraries from the Arduino IDE → Library Manager:
- WiFi (built-in)
- HTTPClient (built-in)
- ArduinoJson
- LiquidCrystal_I2C
- time.h (built-in)
🔧 Insert Your WiFi-Credentials
Second, insert your network credentials in the following lines:
//Put your WiFi Credentials here
const char* ssid = "YourWiFiSSID";
const char* password = "YourWiFiPassword";
🌐 Setting Up Your Location
You’ll need to modify the latitude and longitude coordinates to match your location:
String latitude = "?latitude=YOUR_LATITUDE";
String longitude = "&longitude=YOUR_LONGITUDE";
📍To find your coordinates:
- Open Google Maps
- Right-click on your location
- Select “What’s here?”
- Copy the latitude and longitude numbers
⏱ Getting Your GMT Offset
The ESP32 uses NTP servers to get the current time in UTC (Coordinated Universal Time).
- GMT offset tells the ESP32 how many seconds to add or subtract from UTC to get local time.
- Daylight saving offset handles summer/winter time adjustments.
const long gmtOffset_sec = 3600;       // GMT +1 (Tunisia)
const int daylightOffset_sec = 3600;   // 1 hour daylight saving
gmtOffset_sec = 3600→ Tunisia is UTC+1 → 1 hour × 3600 secondsdaylightOffset_sec = 3600→ Add 1 hour if DST is active
Important: This does not automatically handle DST changes twice a year. If your region uses daylight saving, you may need to manually adjust daylightOffset_sec when DST starts/ends, or implement logic to check the date and update it automatically.
📌 Example for Other Locations:
| City | UTC Offset | DST Offset |
|---|---|---|
| Cairo, Egypt | +2 hours | 0 |
| Riyadh, KSA | +3 hours | 0 |
| Istanbul, TR | +3 hours | 0 (summer is permanent) |
| London, UK | 0 | +1 (summer) |
| New York, US | -5 hours | +1 (summer) |
How to convert:
GMT Offset (seconds) = UTC offset in hours × 3600
Daylight Offset (seconds) = DST in hours × 3600
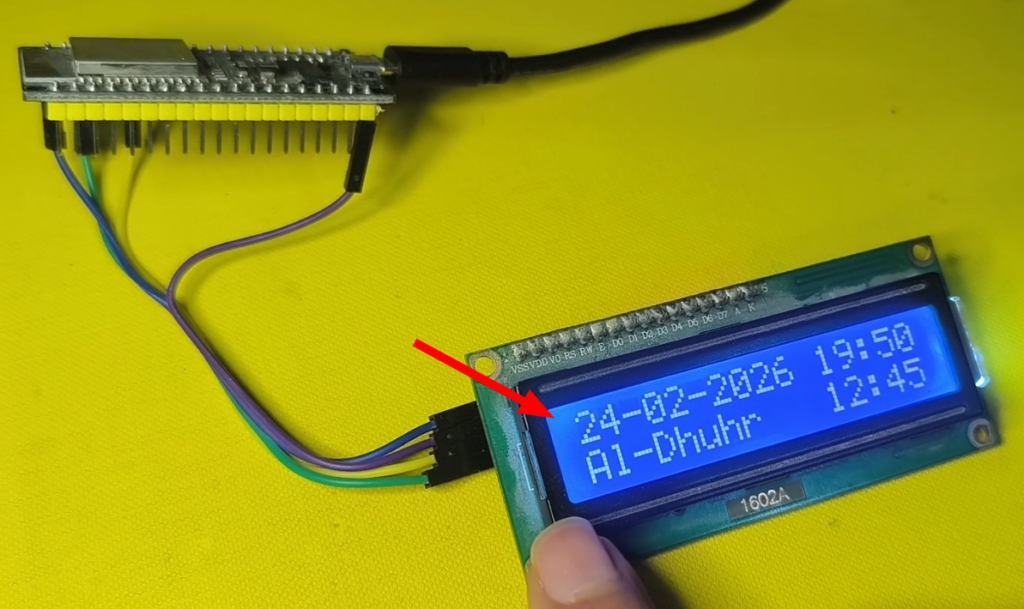
🚀 Final Result
Now, plug in your microcontroller via USB, select your ESP Board and COM port, then click the Upload button at the top bar:
Your LCD will continuously show:
24-02-2026 18:42
Al-Maghrib 17:58
🧠 Understanding The Code
Let’s break down the important parts:
1️⃣ Creating LCD Object
LiquidCrystal_I2C lcd(0x3F, 16, 2);
0x3F→ I2C address (sometimes 0x27)16→ 16 columns2→ 2 rows
2️⃣ Connecting to WiFi
WiFi.begin(ssid, password);
ESP32 waits until connected before continuing.
3️⃣ Getting Real Time (NTP)
configTime(gmtOffset_sec, daylightOffset_sec, ntpServer1, ntpServer2);
This synchronizes time from internet servers.
Why is this important?
Because the prayer API requires a valid date.
4️⃣ Fetching Prayer Times from API
http.begin(URL + date + latitude + longitude + method + tune);
We send:
- Date
- Latitude
- Longitude
- Calculation method
- Time adjustments (tune)
The response is JSON like:
{
  "data": {
    "timings": {
      "Fajr": "05:12",
      "Dhuhr": "12:34"
    }
  }
}
5️⃣ Parsing JSON
deserializeJson(doc, JSON_Data);
Then:
obj["data"]["timings"]["Fajr"].as<String>();
This extracts each prayer time.
6️⃣ Displaying on LCD
Inside the loop:
lcd.print(prayers[i].name + prayers[i].time);
delay(3000);
Each prayer is shown for 3 seconds.
🔁 Automatic Daily Update Logic
if(newDate != lastDate){
    setPrayerTimes(newDate);
    lastDate = newDate;
}
✔️ When date changes
✔️ Fetch new prayer times
✔️ Store them
✔️ Continue display
Very efficient — no unnecessary API calls.
🛠 Possible Improvements
You can upgrade this project by adding:
- 🔔 Buzzer for Adhan notification
- 🧭 Qibla direction with compass module
- 📶 Offline fallback mode
- 📱 Web configuration portal
- 🕰 Countdown to next prayer
🎯 Why This Project Is Powerful
This project teaches:
- IoT fundamentals
- API communication
- JSON parsing
- Real-time clock sync
- LCD interfacing
- Struct usage in Arduino
It combines hardware, internet, and real-time data — a complete IoT application.
📌 Conclusion
This project demonstrates how an ESP32 can transform a simple LCD into a practical, informative device. By combining WiFi connectivity, API integration, and real-time clock functionality, you’ve created a dedicated prayer times display that automatically updates daily.
This is a beautiful example of how microcontrollers can interact with real-world services to build meaningful Islamic technology projects. Feel free to customize the code further to suit your specific needs!