Send Emails Using ESP32 and ESP-MailClient Library (SMTP Server)
🚀 Introduction
Have you ever wanted your ESP32 to send you an email when motion is detected, temperature exceeds a threshold, or when your IoT device needs attention? So, sending emails directly from microcontrollers opens up a world of possibilities for remote monitoring and alert systems.
In this comprehensive guide, I’ll walk you through the complete process of sending emails using the ESP32 and the powerful ESP MailClient library. By the end, you’ll be able to integrate email notifications into any of your IoT projects.
This guide is beginner-friendly and works with VS Code (PlatformIO) and the Arduino IDE.
🧠 How the System Works
The process follows these steps:
- Our ESP32 connects to WiFi.
- The ESP MailClient library establishes a secure connection to the SMTP server.
- Then, ESP32 authenticates using email credentials.
- The email content is prepared.
- And the SMTP server delivers the email to the recipient’s inbox.

🧰 Requirements
🔹 Hardware Components
- ESP32 Development Board (any variant: ESP32 DevKit, NodeMCU-32S, etc.)
- Micro-USB Cable for programming and power
- A Computer (for uploading your code)
🚀 I highly recommend getting a complete ESP32 starter kit.
It will save you time, money, and frustration—and help you learn IoT much faster.
🔹 Software Requirements
- Arduino IDE Or VSCode
- ESP32 Board Support Package
- ESP MailClient Library
Note: If you haven’t set up your IDE with ESP32 support yet, please follow my previous ESP32 Guide
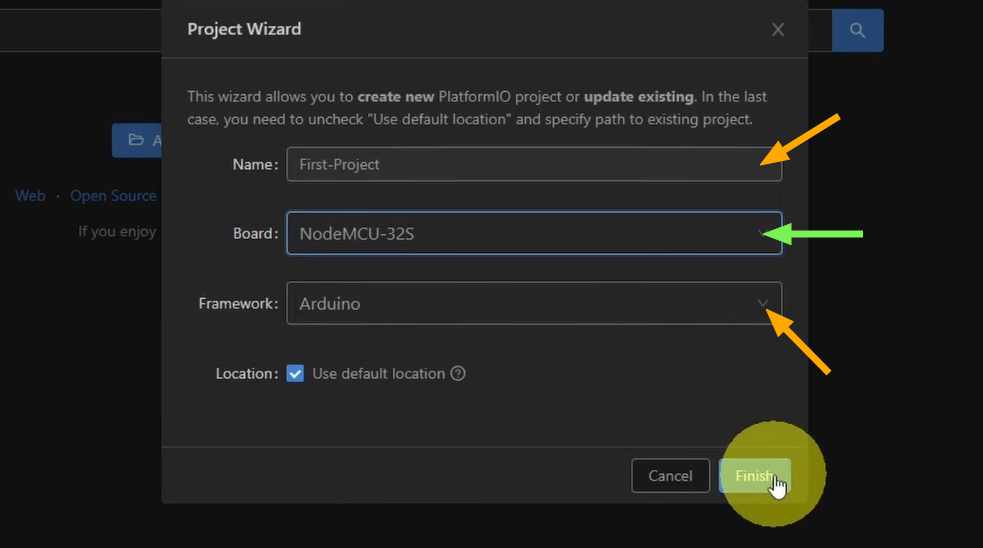
📁 Step 1: Create New PlatformIO Project
- Open VS Code
- Click PlatformIO → New Project
- Name your project (e.g.,
ESP32-SMTP-Email) - Select your ESP32 board (e.g., NodeMCU-32S)
- Choose Framework: Arduino
- and Click Finish
📦 Step 2: Add ESP MailClient Library
Open your platformio.ini file and add:
lib_deps = mobizt/ESP Mail Client@^3.4.24
Your full platformio.ini may look like this:
; PlatformIO Project Configuration File
;
;   Build options: build flags, source filter
;   Upload options: custom upload port, speed and extra flags
;   Library options: dependencies, extra library storages
;   Advanced options: extra scripting
;
; Please visit documentation for the other options and examples
; https://docs.platformio.org/page/projectconf.html

[env:nodemcu-32s]
platform = espressif32
board = nodemcu-32s
framework = arduino
monitor_speed = 115200
lib_deps = mobizt/ESP Mail Client@^3.4.24
Once you save the file, “PlatformIO” will automatically install the library.
🌐 Step 3: Configure SMTP Server
SMTP (Simple Mail Transfer Protocol) is the standard protocol for sending emails. Your ESP32 will act as an SMTP client, connecting to an SMTP server to deliver messages.
Choosing an Email Provider
| Provider | SMTP Server | Port (SSL) | Port (TLS) | Special Notes |
|---|---|---|---|---|
| Gmail | smtp.gmail.com | 465 | 587 | Requires App Password |
| Outlook | smtp-mail.outlook.com | 465 | 587 | Works with regular password |
| Yahoo | smtp.mail.yahoo.com | 465 | 587 | Requires App Password |
| Zoho | smtp.zoho.com | 465 | 587 | Business accounts only |
For Gmail:
SMTP Host: smtp.gmail.com
Port: 465
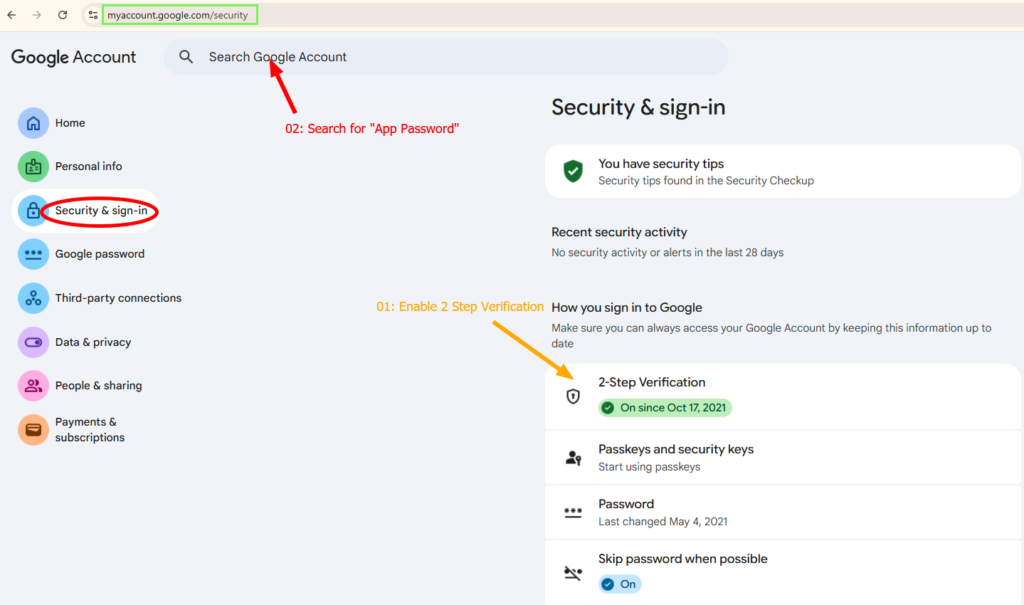
⚠ Important:
First, create a new Gmail account and go to: https://myaccount.google.com/security
- Enable 2-Step Verification
- Generate an App Password by Searching for App Password
- Use the App Password in your code
💻 Step 4: Complete Working Code
Edit your src/main.cpp by pasting this Code:
#include <Arduino.h>
#if defined(ESP32)
  #include <WiFi.h>
#elif defined(ESP8266)
  #include <ESP8266WiFi.h>
#endif
#include <ESP_Mail_Client.h>

#define WIFI_SSID "YOUR_WIFI_NAME"
#define WIFI_PASSWORD "YOUR_WIFI_PASSWORD"

/** The smtp host name e.g. smtp.gmail.com for GMail or smtp.office365.com for Outlook or smtp.mail.yahoo.com */
#define SMTP_HOST "smtp.gmail.com"
#define SMTP_PORT 465

/* The sign in credentials */
#define AUTHOR_EMAIL "your_email@gmail.com"
#define AUTHOR_PASSWORD "your_app_password"

/* Recipient's email*/
#define RECIPIENT_EMAIL "chaker.gamra@ensi-uma.tn"

/* Declare the global used SMTPSession object for SMTP transport */
SMTPSession smtp;

/* Callback function to get the Email sending status */
void smtpCallback(SMTP_Status status);

void setup(){
  Serial.begin(115200);
  Serial.println();
  WiFi.begin(WIFI_SSID, WIFI_PASSWORD);
  Serial.print("Connecting to Wi-Fi");
  while (WiFi.status() != WL_CONNECTED){
    Serial.print(".");
    delay(300);
  }
  Serial.println();
  Serial.print("Connected with IP: ");
  Serial.println(WiFi.localIP());
  Serial.println();

  // Set the network reconnection option
  MailClient.networkReconnect(true);

  smtp.debug(1);

  // Set the callback function to get the sending results
  smtp.callback(smtpCallback);

  // Declare the Session_Config for user defined session credentials
  Session_Config config;

  // Set the session config
  config.server.host_name = SMTP_HOST;
  config.server.port = SMTP_PORT;
  config.login.email = AUTHOR_EMAIL;
  config.login.password = AUTHOR_PASSWORD;
  config.login.user_domain = "";

  //Set the NTP config time
  config.time.ntp_server = F("pool.ntp.org,time.nist.gov");
  config.time.gmt_offset = 1;
  config.time.day_light_offset = 0;

  // Declare the message class
  SMTP_Message message;

  // Set the message headers
  message.sender.name = F("ESP");
  message.sender.email = AUTHOR_EMAIL;
  message.subject = F("ESP Test Email");
  message.addRecipient(F("Chaker"), RECIPIENT_EMAIL);

  //Send raw text message
  String textMsg = "Hello World! - Sent from ESP board";
  message.text.content = textMsg.c_str();
  message.text.charSet = "us-ascii";
  message.text.transfer_encoding = Content_Transfer_Encoding::enc_7bit;

  message.priority = esp_mail_smtp_priority::esp_mail_smtp_priority_low;
  message.response.notify = esp_mail_smtp_notify_success | esp_mail_smtp_notify_failure | esp_mail_smtp_notify_delay;


  /* Connect to the server */
  if (!smtp.connect(&config)){
    ESP_MAIL_PRINTF("Connection error, Status Code: %d, Error Code: %d, Reason: %s", smtp.statusCode(), smtp.errorCode(), smtp.errorReason().c_str());
    return;
  }

  if (!smtp.isLoggedIn()){
    Serial.println("\nNot yet logged in.");
  }
  else{
    if (smtp.isAuthenticated())
      Serial.println("\nSuccessfully logged in.");
    else
      Serial.println("\nConnected with no Auth.");
  }

  /* Start sending Email and close the session */
  if (!MailClient.sendMail(&smtp, &message))
    ESP_MAIL_PRINTF("Error, Status Code: %d, Error Code: %d, Reason: %s", smtp.statusCode(), smtp.errorCode(), smtp.errorReason().c_str());

}

void loop(){
}

/* Callback function to get the Email sending status */
void smtpCallback(SMTP_Status status){
  /* Print the current status */
  Serial.println(status.info());

  /* Print the sending result */
  if (status.success()){
    // ESP_MAIL_PRINTF used in the examples is for format printing via debug Serial port
    // that works for all supported Arduino platform SDKs e.g. AVR, SAMD, ESP32 and ESP8266.
    // In ESP8266 and ESP32, you can use Serial.printf directly.

    Serial.println("----------------");
    ESP_MAIL_PRINTF("Message sent success: %d\n", status.completedCount());
    ESP_MAIL_PRINTF("Message sent failed: %d\n", status.failedCount());
    Serial.println("----------------\n");

    for (size_t i = 0; i < smtp.sendingResult.size(); i++)
    {
      /* Get the result item */
      SMTP_Result result = smtp.sendingResult.getItem(i);

      // In case, ESP32, ESP8266 and SAMD device, the timestamp get from result.timestamp should be valid if
      // your device time was synched with NTP server.
      // Other devices may show invalid timestamp as the device time was not set i.e. it will show Jan 1, 1970.
      // You can call smtp.setSystemTime(xxx) to set device time manually. Where xxx is timestamp (seconds since Jan 1, 1970)

      ESP_MAIL_PRINTF("Message No: %d\n", i + 1);
      ESP_MAIL_PRINTF("Status: %s\n", result.completed ? "success" : "failed");
      ESP_MAIL_PRINTF("Date/Time: %s\n", MailClient.Time.getDateTimeString(result.timestamp, "%B %d, %Y %H:%M:%S").c_str());
      ESP_MAIL_PRINTF("Recipient: %s\n", result.recipients.c_str());
      ESP_MAIL_PRINTF("Subject: %s\n", result.subject.c_str());
    }
    Serial.println("----------------\n");

    // You need to clear sending result as the memory usage will grow up.
    smtp.sendingResult.clear();
  }
}
⚠ Before uploading it, you need to make some modifications:
First, insert your network credentials in the following lines:
#define WIFI_SSID "YOUR_WIFI_NAME"
#define WIFI_PASSWORD "YOUR_WIFI_PASSWORD"
Insert your SMTP server settings. If you’re using a Gmail account to send the emails, these are the settings:
#define SMTP_HOST "smtp.gmail.com"
#define SMTP_PORT 465
Type in the sender email login credentials (Your email and app password created previously).
/* The sign-in credentials */
#define AUTHOR_EMAIL "your_email@gmail.com"
#define AUTHOR_PASSWORD "your_app_password"
And insert the recipient (Receiver) email:
#define RECIPIENT_EMAIL "RECIPIENTE_EMAIL@XXXX.com"You may need to adjust the gmt_offset depending on your location so that the email is timestamped with the right time.
//Set the NTP config time
config.time.ntp_server = F("pool.ntp.org,time.nist.gov");
config.time.gmt_offset = 1;
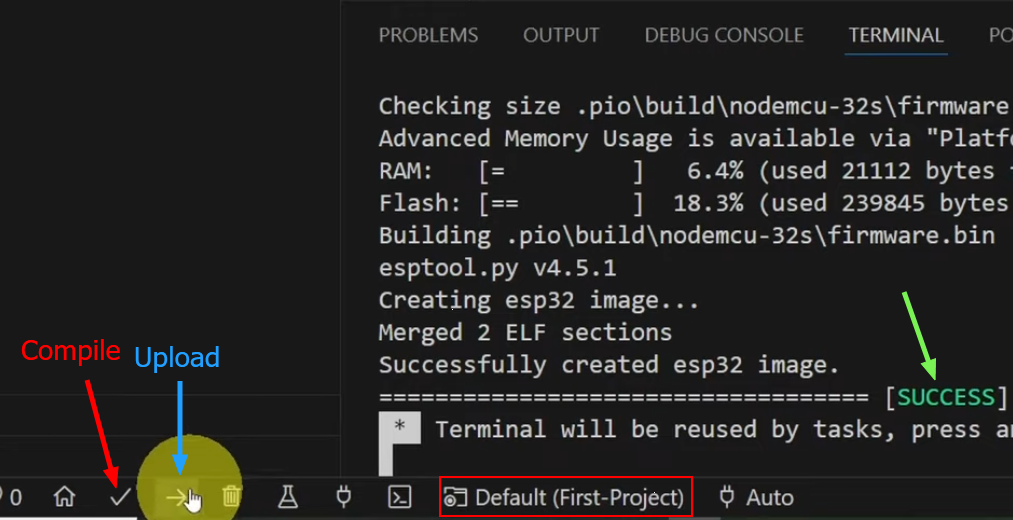
config.time.day_light_offset = 0;🔎 Step 5: Build and Upload
First, plug in your microcontroller via USB and click the Build button at the bottom bar: This checks your code for errors before uploading.
Next Click Upload or press: Ctrl + Alt + U
Wait for the “SUCCESS” Green message
If everything is correct, you should see:
Email sent successfully!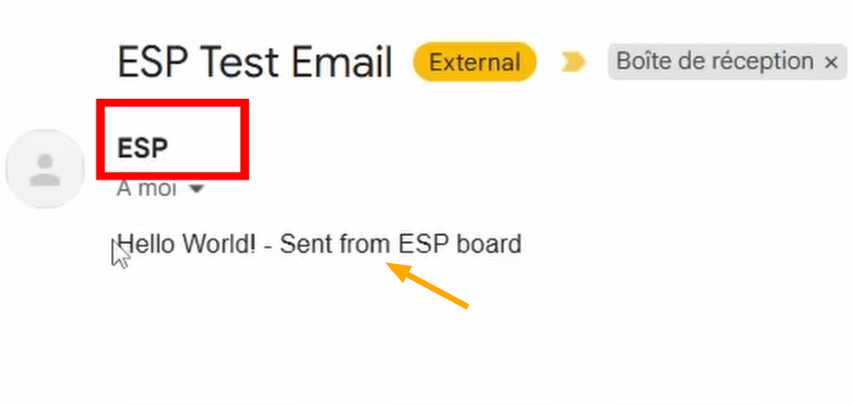
🛠 Troubleshooting
❌ Authentication Error
- Verify app password
- Make sure 2FA is enabled
❌ WiFi Not Connecting
- Double-check SSID
- Check your router
🎯 Conclusion
Sending emails from ESP32 using the ESP MailClient library is straightforward and powerful. You can now integrate email notifications into your IoT projects for alerts, reports, and monitoring.
The library handles the complex SMTP protocol, allowing you to focus on your application logic. Whether you need simple text alerts or formatted HTML reports with attachments, ESP MailClient has you covered.
Next Steps
Build a web interface to configure email settings
Implement email queuing for offline scenarios
Add sensor data logging to emails
Create weekly summary reports