Using an LCD Display with Raspberry Pi (Step By Step Guide)
Introduction
Using an LCD display with a Raspberry Pi is one of the most useful beginner projects in electronics and IoT. LCDs allow you to show text, sensor values, system status, and messages without needing a monitor or keyboard.
In this guide, you’ll learn how to connect a 16×2 LCD to a Raspberry Pi, install the required libraries, and display text using Python.
Before we begin, make sure your Raspberry Pi is properly set up. If not, check out our Getting Started with Raspberry Pi guide first.
Components Required
- Raspberry Pi (4 or 5 recommended)
- Boot media: microSD card (16GB+)
- Power supply
- 16×2 LCD Display with I2C Module
- Keyboard, mouse, and a monitor
You can also use a Raspberry Pi without a monitor (headless setup). With a basic starter kit and a network connection, you can control your Raspberry Pi remotely from another computer.
Raspberry Pi Circuit (I2C LCD)
The 16×2 I2C LCD is perfect for starters because it only uses 4 pins (instead of 16+ with parallel displays)
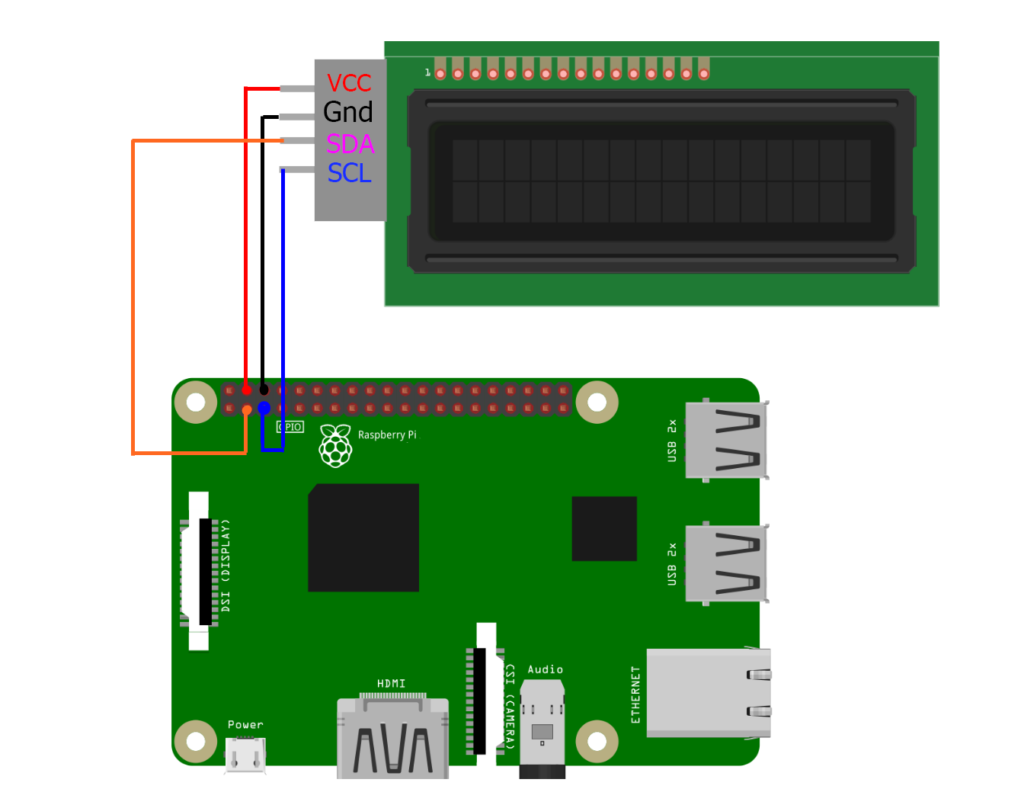
| LCD Pin | Raspberry Pi Pin |
|---|---|
| VCC | 5V (Pin 4) |
| GND | GND (Pin 6) |
| SDA | GPIO2 (Pin 3) |
| SCL | GPIO3 (Pin 5) |
Software Setup Guide
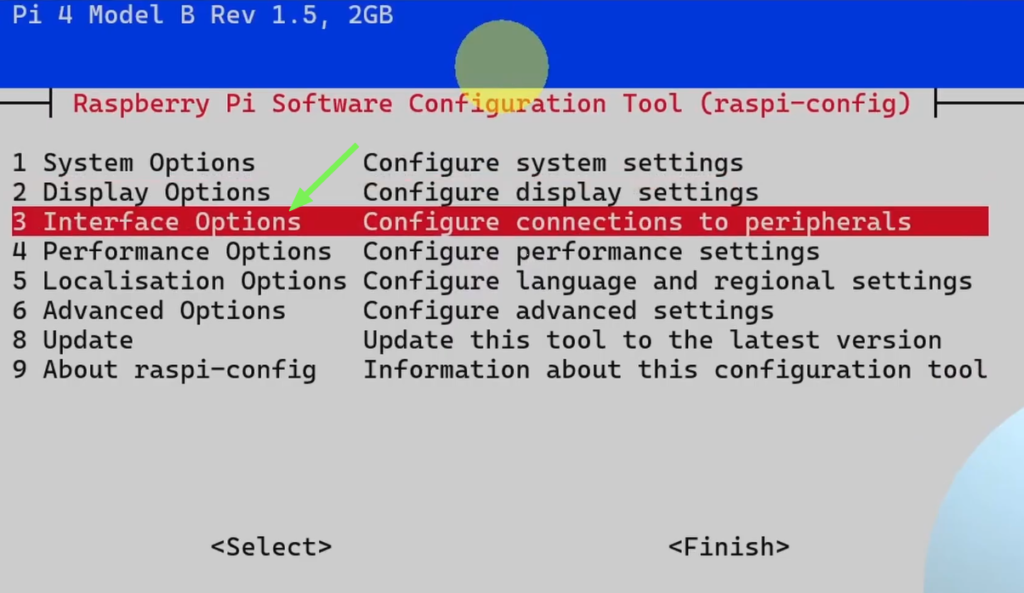
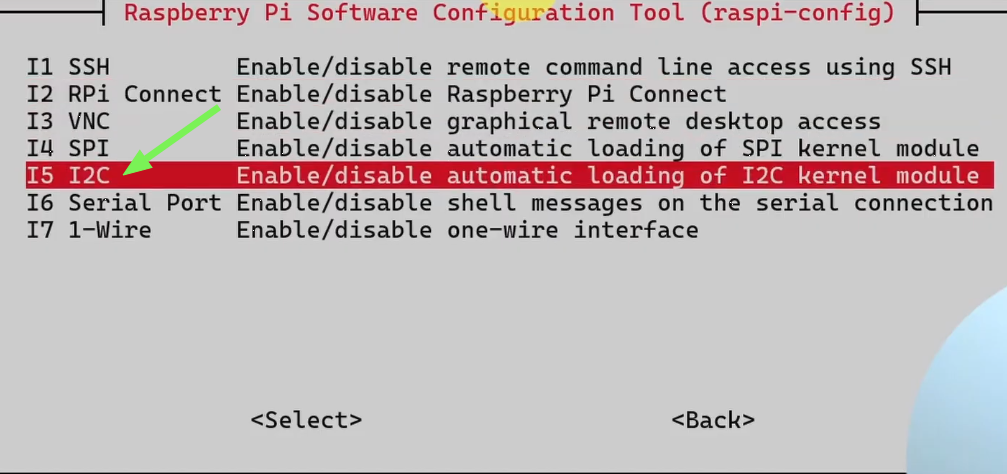
Step 1: Enable I2C Interface
- Open up the terminal
- And Run:
sudo raspi-config- Navigate to Interface Options → I2C → select Yes to enable it.
- Reboot the Raspberry Pi
Step 2: Install Required Libraries & Tools
First Update your system using:
sudo apt update
sudo apt upgrade
Next Install I2C tools:
sudo apt-get install i2c-toolsStep 3: Find your LCD’s I2C Address
Just Run This command:
sudo i2cdetect -y 1Look for a hexadecimal number (commonly 0x27 or 0x3F) – this is your display’s address.
Step 4: Create the LCD1602 Library Code
First, I am gonna create a folder for our project in which we have to create a Python code that has all of the display functions and methods using:
cd Desktop
mkdir display
cd display
touch LCD1602.py
nano LCD1602.py
Next Copy and paste this LCD1602 library code inside the file. This will handle all low-level communication with the LCD: (Save the Changes By Hitting Ctrl O > Enter > Ctrl X)
#!/usr/bin/env python3

import time
import smbus2 as smbus

BUS = smbus.SMBus(1)

def write_word(addr, data):
    global BLEN
    temp = data
    if BLEN == 1:
        temp |= 0x08
    else:
        temp &= 0xF7
    BUS.write_byte(addr ,temp)

def send_command(comm):
    # Send bit7-4 firstly
    buf = comm & 0xF0
    buf |= 0x04               # RS = 0, RW = 0, EN = 1
    write_word(LCD_ADDR ,buf)
    time.sleep(0.002)
    buf &= 0xFB               # Make EN = 0
    write_word(LCD_ADDR ,buf)

    # Send bit3-0 secondly
    buf = (comm & 0x0F) << 4
    buf |= 0x04               # RS = 0, RW = 0, EN = 1
    write_word(LCD_ADDR ,buf)
    time.sleep(0.002)
    buf &= 0xFB               # Make EN = 0
    write_word(LCD_ADDR ,buf)

def send_data(data):
    # Send bit7-4 firstly
    buf = data & 0xF0
    buf |= 0x05               # RS = 1, RW = 0, EN = 1
    write_word(LCD_ADDR ,buf)
    time.sleep(0.002)
    buf &= 0xFB               # Make EN = 0
    write_word(LCD_ADDR ,buf)

    # Send bit3-0 secondly
    buf = (data & 0x0F) << 4
    buf |= 0x05               # RS = 1, RW = 0, EN = 1
    write_word(LCD_ADDR ,buf)
    time.sleep(0.002)
    buf &= 0xFB               # Make EN = 0
    write_word(LCD_ADDR ,buf)

def init(addr, bl):
#    global BUS
#    BUS = smbus.SMBus(1)
    global LCD_ADDR
    global BLEN
    LCD_ADDR = addr
    BLEN = bl
    try:
        send_command(0x33) # Must initialize to 8-line mode at first
        time.sleep(0.005)
        send_command(0x32) # Then initialize to 4-line mode
        time.sleep(0.005)
        send_command(0x28) # 2 Lines & 5*7 dots
        time.sleep(0.005)
        send_command(0x0C) # Enable display without cursor
        time.sleep(0.005)
        send_command(0x01) # Clear Screen
        BUS.write_byte(LCD_ADDR, 0x08)
    except:
        return False
    else:
        return True

def clear():
    send_command(0x01) # Clear Screen

def openlight():  # Enable the backlight
    BUS.write_byte(0x27,0x08)
    BUS.close()

def write(x, y, str):
    if x < 0:
        x = 0
    if x > 15:
        x = 15
    if y <0:
        y = 0
    if y > 1:
        y = 1

    # Move cursor
    addr = 0x80 + 0x40 * y + x
    send_command(addr)

    for chr in str:
        send_data(ord(chr))

if __name__ == '__main__':
    init(0x27, 1)
    write(4, 0, 'Hello')
    write(7, 1, 'world!')
Since the LCD1602 library uses smbus2, you must install it before running any Code:
pip3 install smbus2
sudo apt install python3-smbus2
Step 5: Create the Main Python Program
Finally, we’re gonna create our demo.py file and open it using nano or Thonny IDE:
touch demo.py
nano demo.py
Let’s add the following example code:
import LCD1602
LCD1602.clear()
LCD1602.init(0x3F, 1) # Put your address found in Step 3
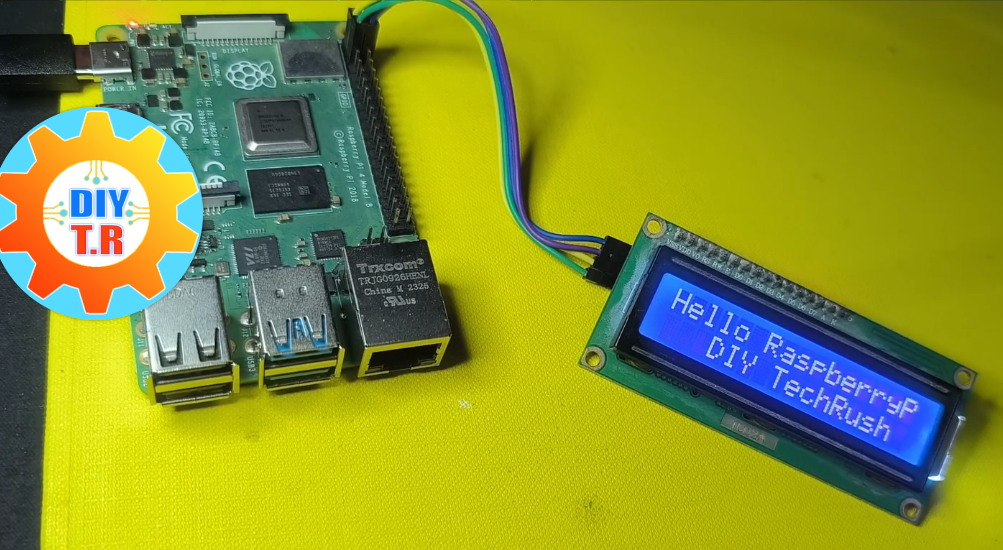
LCD1602.write(0, 0, 'Hello Raspberry')
LCD1602.write(3, 1, 'DIY TechRush')To save it with nano use Ctrl O > Enter > Ctrl X: Make sure you are inside the display folder, then run:
python3 demo.pyIf everything is connected correctly, the message “Hello Raspberry” will appear on the LCD screen.
Common Problems & Solutions
❌ LCD Not Displaying Text
- Check I2C address
- Adjust contrast using the potentiometer
❌ I2C Device Not Found
- Make sure I2C is enabled
- Check SDA and SCL wiring
❌ Garbled Characters
- Use the correct LCD library
- Verify voltage (5V recommended)
Project Ideas Using LCD
- Temperature & humidity monitor
- Raspberry Pi system status screen
- IoT dashboard
- Clock and timer
- Sensor value display
Conclusion
Using an LCD with Raspberry Pi is a great way to build real‑world electronics projects. I2C, wiring is simple, and the Python code is easy to understand.
Once you master LCDs, you can combine them with sensors, motors, and internet‑connected projects.
Happy building 🚀