Monitor Your Home Anywhere with ESP32 & “ThingSpeak “🌍
Ever wanted to keep an eye on your home’s temperature and humidity while you’re away?
So, let’s build a custom, affordable IoT monitoring device using an ESP32 microcontroller and a DHT sensor that sends temperature and humidity 🌡️ data to ThingSpeak (a popular IoT analytics platform).
You’ll be able to view real-time graphs and receive alerts from anywhere with an internet connection!
Before We Begin: If you’re completely new to the ESP32, I recommend checking out my previous blog post, an Ultimate ESP32 Beginner’s Guide. We’ve covered the basics of setting up your development environment, installing board support, and uploading your first program.
1️⃣ What You’ll Need?
🧰 Components Required
- ESP32 Development Board (any variant: ESP32 DevKit, NodeMCU-32S, etc.)
- DHT11 or DHT22 Temperature/Humidity Sensor
- Breadboard (optional but recommended)
- Jumper Wires (male-to-female or male-to-male)
- Micro-USB Cable for programming and power
- 10kΩ Resistor (only if using DHT11 without built-in pull-up)
🔧 I highly recommend getting a complete ESP32 starter kit.
It will save you time, money, and frustration—and help you learn IoT much faster.
📦 Software & Accounts
- Arduino IDE or VS Code & PlatformIO
- ESP32 Board Support Package
- ThingSpeak Account (free at thingspeak.com)
Note: If you haven’t set up your Arduino IDE with ESP32 support yet, please follow my previous ESP32 setup guide before proceeding.
2️⃣ What is ThingSpeak 🌐?
ThingSpeak is an IoT cloud platform that allows you to collect, store, analyze, and visualize data from hardware devices like ESP32, Arduino, and Raspberry Pi.
In simple words: 👉 it is the bridge between your ESP32 and the internet.
With ThingSpeak, you can:
- 📡 Receive sensor data from anywhere in the world
- 📊 Display live data using automatic graphs
- ☁️ Store historical temperature & humidity values
- 📱 Access your data from any browser or phone
- 🧠 Use MATLAB tools for analysis & alerts
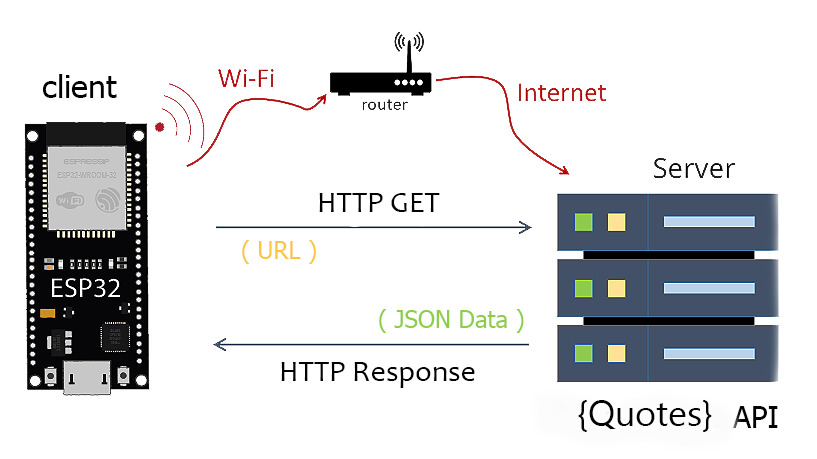
✅ In this project, the ESP32 reads temperature and humidity from a DHT sensor, then sends the data to ThingSpeak, where you can monitor your home remotely in real time 🌍
3️⃣ Step-by-Step Guide:
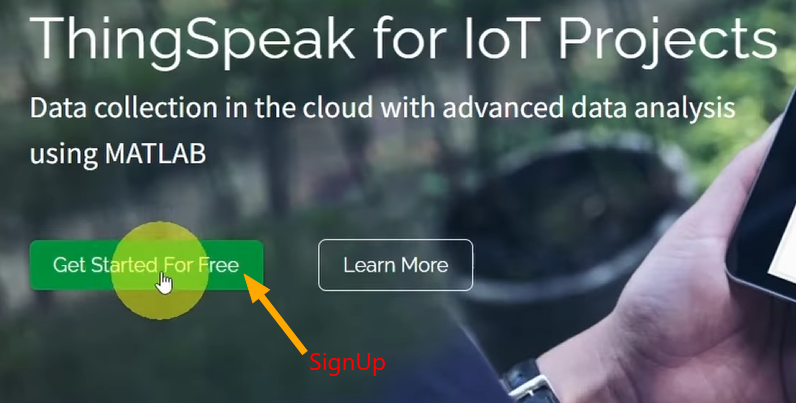
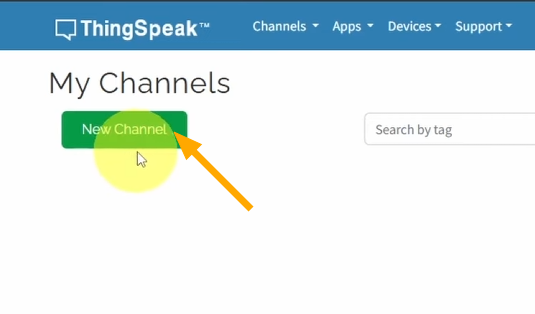
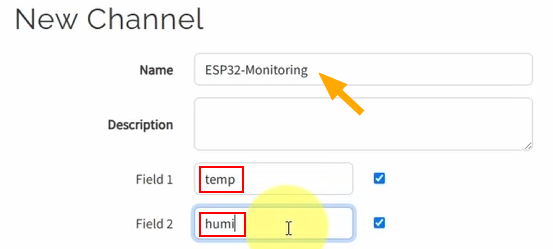
⚙️ Step 1: Create a ThingSpeak Account & Channel
- Go to ThingSpeak.com and sign up (It is FREE)
- Log in, then click Channels → New Channel
- Give your channel a name (e.g: “ESP32-Monitoring“)
- Enable:
- Field 1: Temperature (°C)
- Field 2: Humidity (%)
- Save the channel
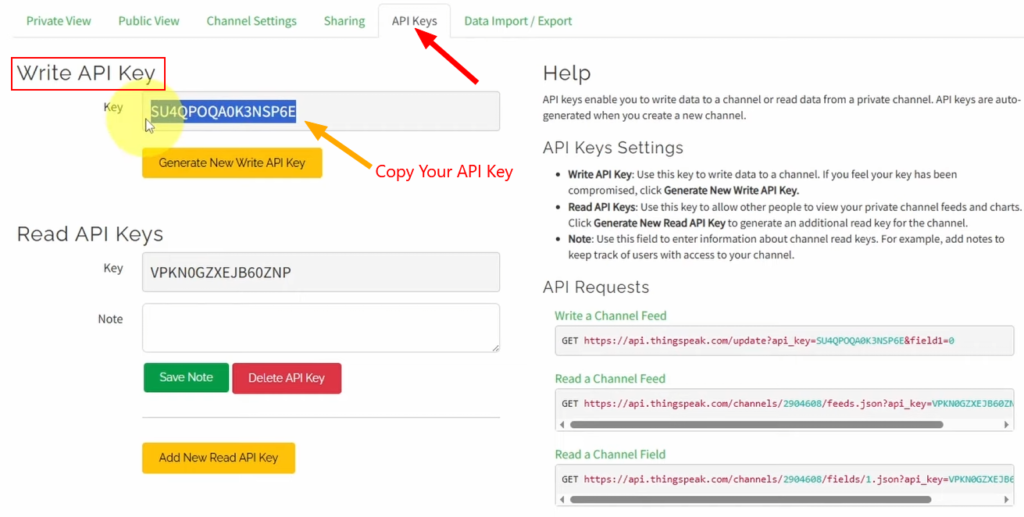
🔑 Go to API Keys and copy your Write API Key – you’ll need it later in the code.
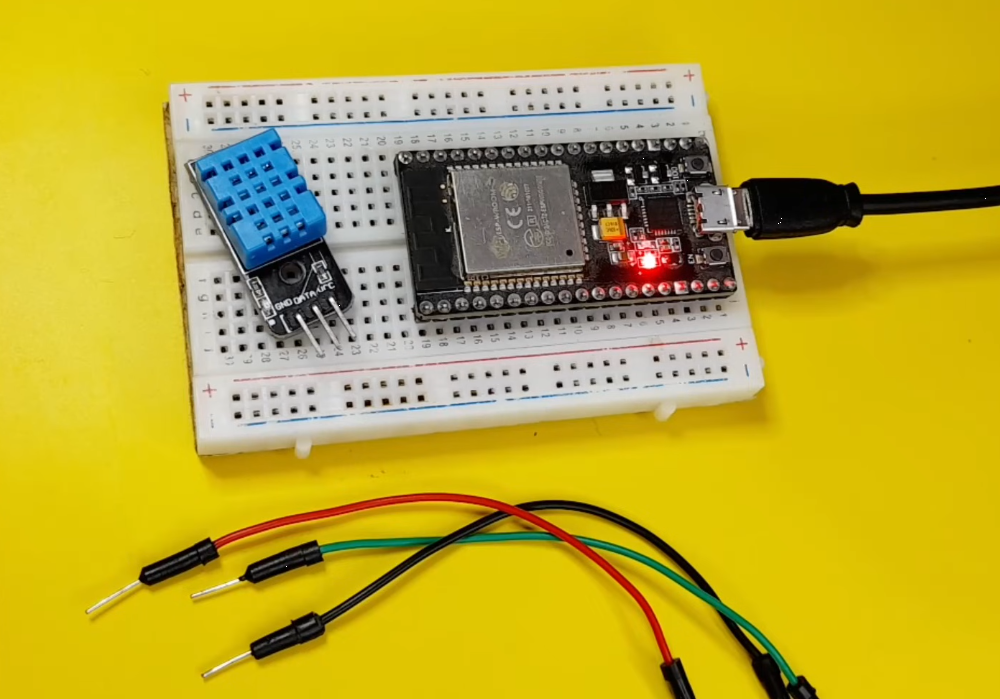
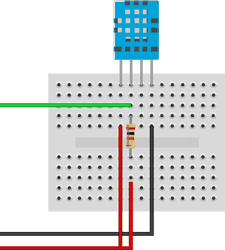
🔌 Step 2: Wiring the DHT Sensor to ESP32
DHT Sensor Pins:
- VCC → ESP32 3.3V or 5V
- GND → ESP32 GND
- DATA → ESP32 GPIO 26 (can be any digital pin)
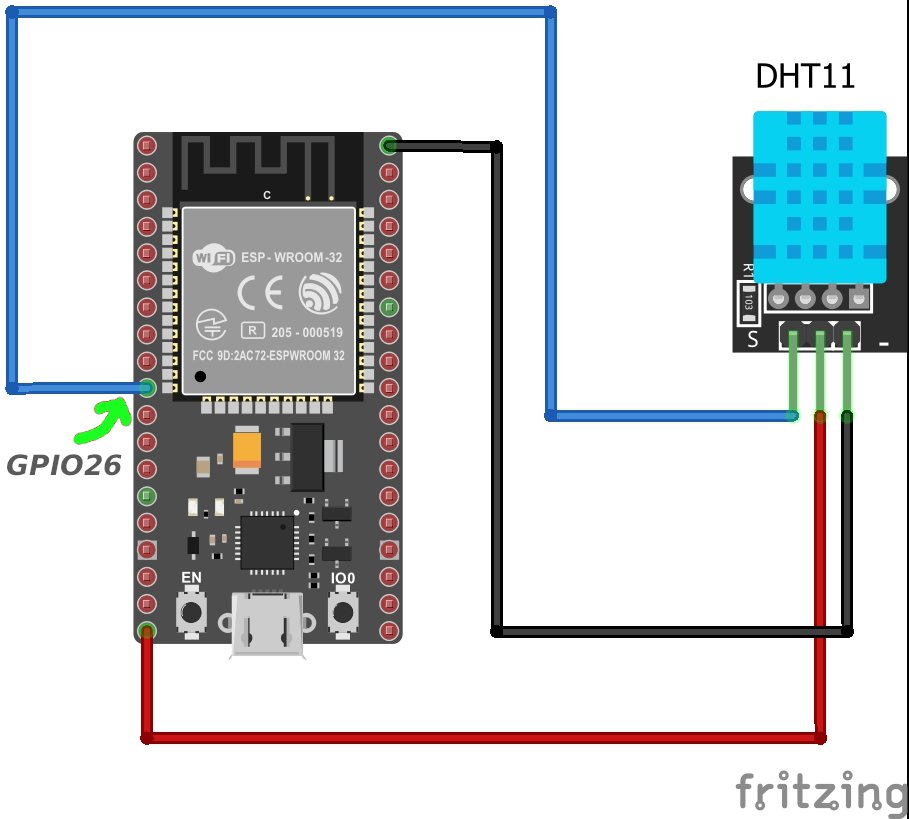
⚠️ Important Note:
If you are using a DHT sensor without an internal pull-up resistor, connect a 10kΩ resistor between VCC and DATA. This ensures reliable communication between the sensor and the ESP32.
🧠 Step 3: Install Required Libraries
Open Arduino IDE → Library Manager and install:
- DHT sensor library by Adafruit
- Adafruit Unified Sensor
💻 Step 4: ESP32 Code
Here’s the complete sketch with detailed explanations. Replace the placeholder values with your actual credentials:
- WiFi name & password
- ThingSpeak API key
#include <WiFi.h>
#include <HTTPClient.h>
#include <DHT.h>

// Replace with your network credentials
const char* ssid = "REPLACE_WITH_YOUR_SSID";
const char* password = "REPLACE_WITH_YOUR_PASSWORD";

// Replace with your ThingSpeak API Key
String serverName = "http://api.thingspeak.com/update?api_key=REPLACE_WITH_YOUR_API_KEY";

// Timer setup
unsigned long lastTime = 0;
const unsigned long timerDelay = 5000; // 5 seconds delay

// DHT Sensor setup
#define DHT_PIN 26           // Pin connected to the DHT sensor (change if necessary)
#define DHT_TYPE DHT11       // DHT11 or DHT22 (change if you're using a DHT11)

DHT dht(DHT_PIN, DHT_TYPE); // Initialize DHT sensor

WiFiClient client;
HTTPClient http;

void setup() {
  Serial.begin(115200);

  // Connect to WiFi
  WiFi.begin(ssid, password);
  Serial.println("Connecting to WiFi...");

  while (WiFi.status() != WL_CONNECTED) {
    delay(500);
    Serial.print(".");
  }

  Serial.println();
  Serial.print("Connected to WiFi, IP Address: ");
  Serial.println(WiFi.localIP());

  // Initialize the DHT sensor
  dht.begin();

  // Initial message for clarity
  Serial.println("Timer set to 5 seconds. It will take 10 seconds before publishing the first reading.");
}

void loop() {
  // Check if it's time to send a new HTTP request
  if (millis() - lastTime >= timerDelay) {
    if (WiFi.status() == WL_CONNECTED) {
      // Read temperature and humidity from DHT sensor
      float temperature = dht.readTemperature();  // Get temperature in Celsius
      float humidity = dht.readHumidity();       // Get humidity percentage

      // Check if reading was successful
      if (isnan(temperature) || isnan(humidity)) {
        Serial.println("Failed to read from DHT sensor!");
        return;
      }
      // Construct the server path with temperature and humidity data
      String serverPath = serverName + "&field1=" + String(temperature) + "&field2=" + String(humidity);

      // Start HTTP request
      http.begin(client, serverPath.c_str());

      // Send HTTP GET request
      int httpResponseCode = http.GET();

      if (httpResponseCode > 0) {
        Serial.print("HTTP Response code: ");
        Serial.println(httpResponseCode);
        String payload = http.getString();
        Serial.println(payload);  // Print the response payload
      } else {
        Serial.print("Error code: ");
        Serial.println(httpResponseCode);  // Error code if request failed
      }
      // End the HTTP request and free resources
      http.end();
    } else {
      Serial.println("WiFi Disconnected");
    }
    // Update lastTime to manage the delay
    lastTime = millis();
  }
}
- Select Board → ESP32 Dev Module
- Select the correct COM Port
- Then Click Upload
- Open Serial Monitor (115200 baud)
If everything is correct, you’ll see: Connected to WiFi, IP Address: 192.168.X.Y
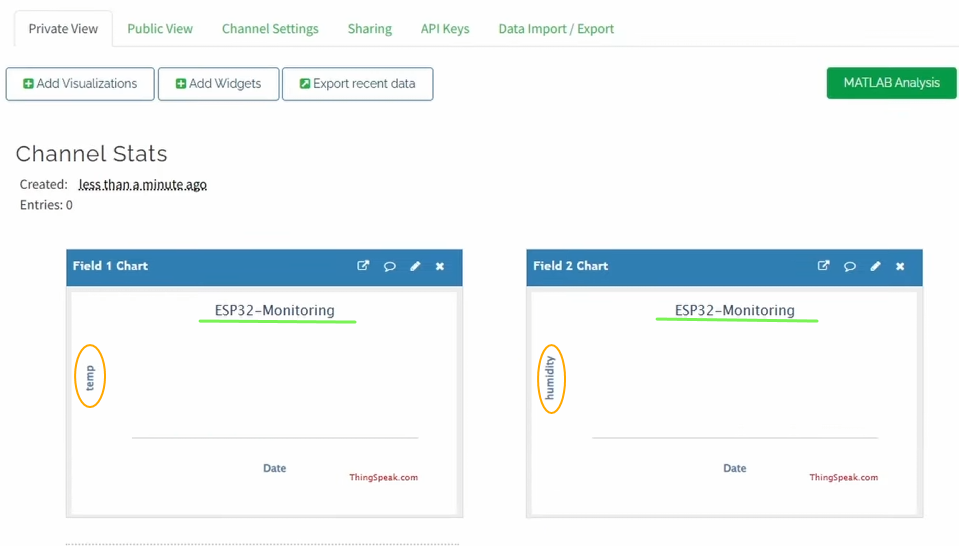
📊 Step 5: View Data on ThingSpeak
- Now open your ThingSpeak channel
- You’ll see live temperature & humidity graphs
- Data updates every 5 seconds
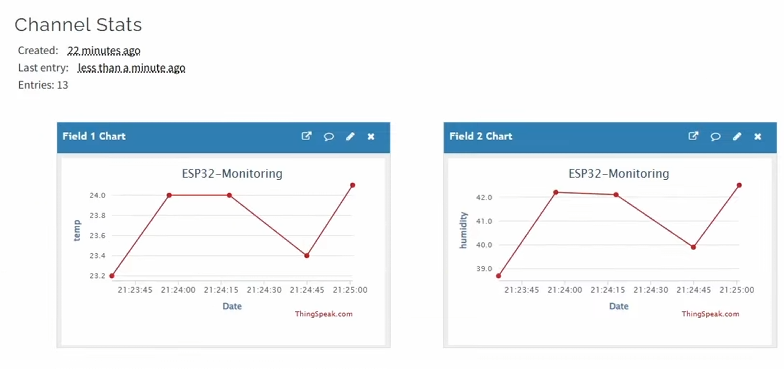
🎉 You can now monitor your home from anywhere in the world using just a browser or phone.
4️⃣ How the Project Works?
📚 1. Including Libraries
#include <WiFi.h>
#include <HTTPClient.h>
#include <DHT.h>WiFi.h: Manages WiFi connections (authentication, IP assignment, network protocols)HTTPClient.h: Handles HTTP/HTTPS communication (GET/POST requests, headers, responses)DHT.h: Controls DHT sensors using one-wire protocol
🌐 2. Set up WiFi Credentials
// Replace with your network credentials
const char* ssid = "REPLACE_WITH_YOUR_SSID";
const char* password = "REPLACE_WITH_YOUR_PASSWORD";- These are your WiFi network details
- The ESP32 uses them to access the internet
☁️ 3. Creating ThingSpeak Server URL
// Replace with your ThingSpeak API Key
String serverName = "http://api.thingspeak.com/update?api_key=REPLACE_WITH_YOUR_API_KEY";- This URL tells the ESP32 where to send the data
- The API key identifies your ThingSpeak channel
- Sensor values will be added later using
field1andfield2
⏱️ 4. Timer Configuration
// Timer setup
unsigned long lastTime = 0;
const unsigned long timerDelay = 5000; // 5 seconds delay- We need to prevent sending data too often
- So this ensures that data is sent every 5 seconds
- by using
millis()instead ofdelay()for better performance
🌡️ 5. DHT Sensor Setup
// DHT Sensor setup
#define DHT_PIN 26           // Pin connected to the DHT sensor (change if necessary)
#define DHT_TYPE DHT11       // DHT11 or DHT22 (change if you're using a DHT11)

DHT dht(DHT_PIN, DHT_TYPE); // Initialize DHT sensor Object
🌍 6. Network & HTTP Objects
WiFiClient client;
HTTPClient http;WiFiClienthandles the client network connectionHTTPClientto send HTTP GET requests to ThingSpeak
⚙️ 7. setup() Function
void setup() {
  Serial.begin(115200);

  // Connect to WiFi
  WiFi.begin(ssid, password);
  Serial.println("Connecting to WiFi...");

  while (WiFi.status() != WL_CONNECTED) {
    delay(500);
    Serial.print(".");
  }

  Serial.println();
  Serial.print("Connected to WiFi, IP Address: ");
  Serial.println(WiFi.localIP());

  // Initialize the DHT sensor
  dht.begin();

  // Initial message for clarity
  Serial.println("Timer set to 5 seconds. It will take 10 seconds before publishing the first reading.");
}
First, we start the “Serial Monitor” to see debug messages. Then our ESP32 connects to the WiFi network and waits until the connection is successful.
Once connected, the DHT sensor is initialized, and the board is ready to start working.
⚙️ 8. Loop() FUNCTION
Under the loop:
🌡️ Our ESP32 reads the temperature and humidity values from the DHT sensor using the DHT library:
      float temperature = dht.readTemperature();  // Get temperature in Celsius
      float humidity = dht.readHumidity();       // Get humidity percentage

      // Check if reading was successful
      if (isnan(temperature) || isnan(humidity)) {
        Serial.println("Failed to read from DHT sensor!");
        return;
      }
✅ If the readings are valid, the ESP32 creates a ThingSpeak update URL by attaching the temperature and humidity values to the API request.
String serverPath = serverName + "&field1=" + String(temperature) + "&field2=" + String(humidity);📞 An HTTP GET request is sent to ThingSpeak using this URL.
      // Start HTTP request
      http.begin(client, serverPath.c_str());

      // Send HTTP GET request
      int httpResponseCode = http.GET();

      if (httpResponseCode > 0) {
        Serial.print("HTTP Response code: ");
        Serial.println(httpResponseCode);
        String payload = http.getString();
        Serial.println(payload);  // Print the response payload
      } else {
        Serial.print("Error code: ");
        Serial.println(httpResponseCode);  // Error code if request failed
      }
ThingSpeak receives the data, stores it in the channel fields, and updates the live graphs automatically.
After sending the data, the HTTP connection is closed to free memory and ensure stable communication.
5️⃣ 🏁 Conclusion
You’ve successfully built an IoT house monitoring system using ESP32, DHT sensor, and ThingSpeak ☁️.
This project is a solid foundation for smart homes, weather stations, and remote monitoring systems. You now have:
✅ Real-time monitoring of your home’s climate
✅ Historical data to track trends over time
✅ Remote access from anywhere in the world
✅ Customizable system you can expand as needed
📌 Resources
- ThingSpeak API Documentation: https://www.mathworks.com/help/thingspeak/
- ESP32 HTTP Client Examples: https://github.com/espressif/arduino-esp32/tree/master/libraries/HTTPClient/examples
- DHT Sensor Library: https://github.com/adafruit/DHT-sensor-library
🔮 Project Improvements & Ideas
- Add email alerts using ThingSpeak MATLAB
- Display data on an LCD or OLED
- Add multiple rooms / sensors
- Use deep sleep for battery projects
- Create a mobile app dashboard