Build Your ESP32 Temperature & Humidity Web Server with a DHT Sensor🌡️
Want to monitor temperature and humidity using your ESP32? Today, we’re going to transform our ESP32 microcontroller into a real-time temperature and humidity monitoring station that serves data through a web interface.
Before We Begin: If you’re completely new to the ESP32, I recommend checking out my previous blog post, an Ultimate ESP32 Beginner’s Guide. We’ve covered the basics of setting up your development environment, installing board support, and uploading your first program.
What You’ll Need?
Hardware Components
- ESP32 Development Board (any variant: ESP32 DevKit, NodeMCU-32S, etc.)
- DHT11 or DHT22 Temperature/Humidity Sensor
- Breadboard (optional but recommended)
- Jumper Wires (male-to-female or male-to-male)
- Micro-USB Cable for programming and power
- 10kΩ Resistor (only if using DHT11 without built-in pull-up)
🚀 I highly recommend getting a complete ESP32 starter kit.
It will save you time, money, and frustration—and help you learn IoT much faster.
Software Requirements
- Arduino IDE
- ESP32 Board Support Package
- DHT Sensor Library by Adafruit
Note: If you haven’t set up your Arduino IDE with ESP32 support yet, please follow my previous ESP32 setup guide before proceeding.
🌡️ DHT11 vs DHT22 (Quick Comparison)
| Feature | DHT11 | DHT22 |
|---|---|---|
| Temperature Range | 0–50°C | -40–80°C |
| Humidity Range | 20–80% | 0–100% |
| Accuracy | Moderate | High |
| Price | Cheaper | Slightly expensive |
Both sensors work similarly in code; just change the DHT type in your sketch.
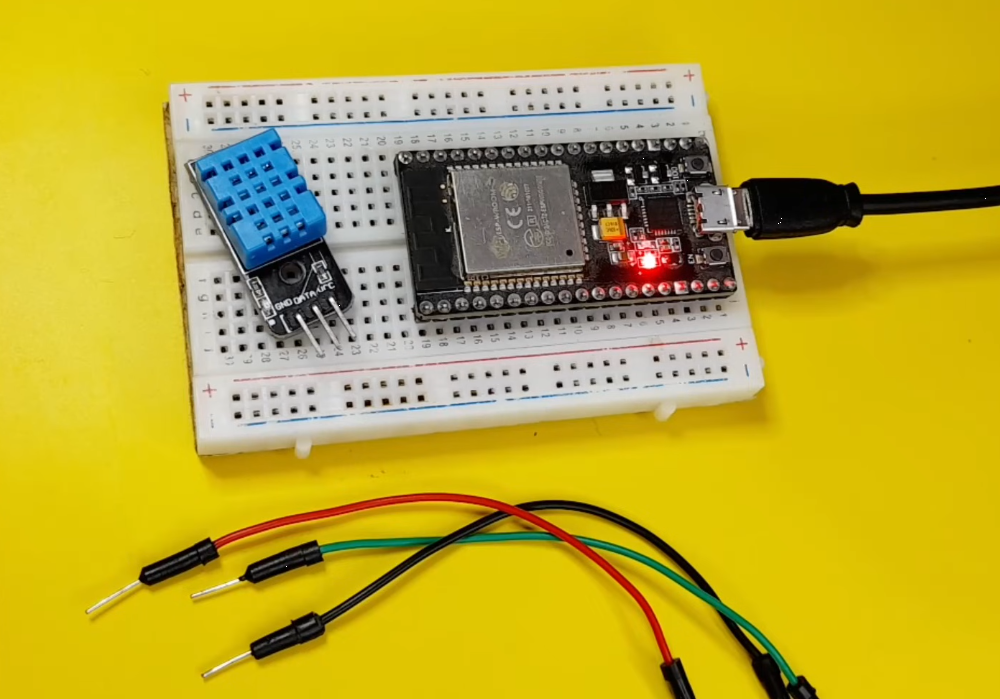
🔌 Circuit Diagram & Connections
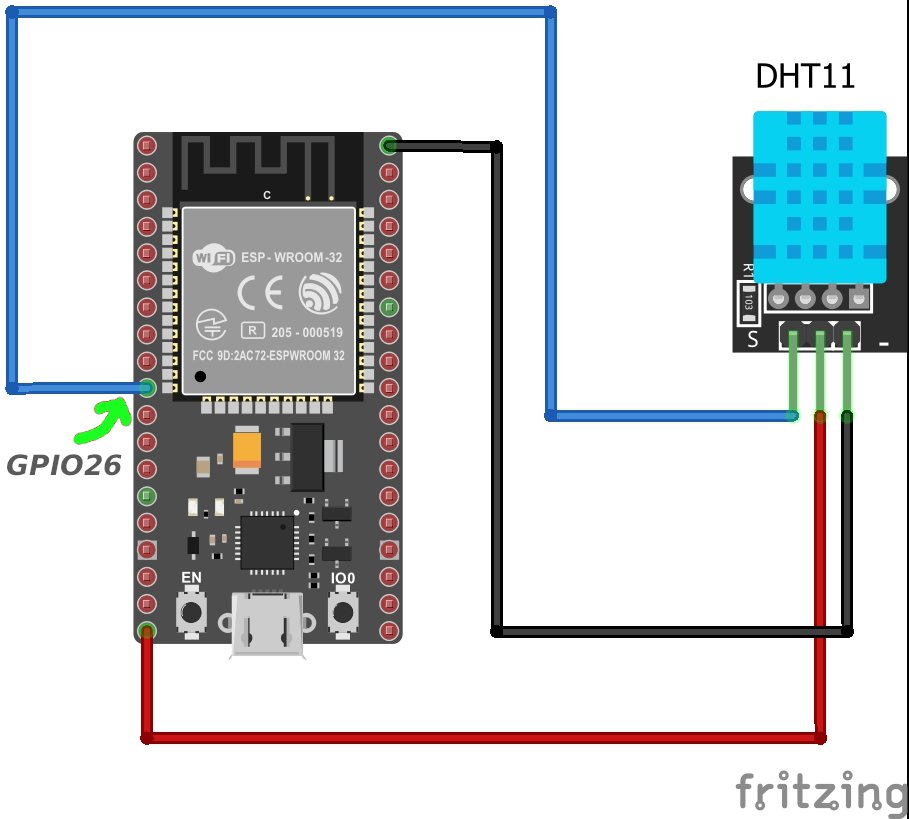
DHT Sensor Pins:
- VCC → ESP32 3.3V or 5V
- GND → ESP32 GND
- DATA → ESP32 GPIO 26 (can be any digital pin)
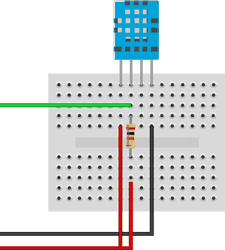
Important Note:
If you are using a DHT sensor without an internal pull-up resistor, connect a 10kΩ resistor between VCC and DATA. This ensures reliable communication between the sensor and the ESP32.
🧠 ESP32 Web Server Code
Library to Install: DHT sensor library by Adafruit
#include <WiFi.h>
#include <WiFiClient.h>
#include <WebServer.h>
#include <ESPmDNS.h>
#include <DHT.h>
const char *ssid = "YOUR-Network";
const char *password = "YOUR-PASSWORD";
WebServer server(80);
DHT dht(26, DHT11);
void handleRoot() {
char msg[1500];
snprintf(msg, 1500,
"<html>\
<head>\
<meta http-equiv='refresh' content='4'/>\
<meta name='viewport' content='width=device-width, initial-scale=1'>\
<link rel='stylesheet' href='https://use.fontawesome.com/releases/v5.7.2/css/all.css' integrity='sha384-fnmOCqbTlWIlj8LyTjo7mOUStjsKC4pOpQbqyi7RrhN7udi9RwhKkMHpvLbHG9Sr' crossorigin='anonymous'>\
<title>ESP32 DHT Server</title>\
<style>\
html { font-family: Arial; display: inline-block; margin: 0px auto; text-align: center;}\
h2 { font-size: 3.0rem; }\
p { font-size: 3.0rem; }\
.units { font-size: 1.2rem; }\
.dht-labels{ font-size: 1.5rem; vertical-align:middle; padding-bottom: 15px;}\
</style>\
</head>\
<body>\
<h2>ESP32 DHT Server!</h2>\
<p>\
<i class='fas fa-thermometer-half' style='color:#ca3517;'></i>\
<span class='dht-labels'>Temperature</span>\
<span>%.2f</span>\
<sup class='units'>°C</sup>\
</p>\
<p>\
<i class='fas fa-tint' style='color:#00add6;'></i>\
<span class='dht-labels'>Humidity</span>\
<span>%.2f</span>\
<sup class='units'>%</sup>\
</p>\
</body>\
</html>",
readDHTTemperature(), readDHTHumidity()
);
server.send(200, "text/html", msg);
}
void setup(void) {
Serial.begin(115200);
dht.begin();
WiFi.mode(WIFI_STA);
WiFi.begin(ssid, password);
Serial.println("");
// Wait for connection
while (WiFi.status() != WL_CONNECTED) {
delay(500);
Serial.print(".");
}
Serial.println("");
Serial.print("Connected to ");
Serial.println(ssid);
Serial.print("IP address: ");
Serial.println(WiFi.localIP());
if (MDNS.begin("esp32")) {
Serial.println("MDNS responder started");
}
server.on("/", handleRoot);
server.begin();
Serial.println("HTTP server started");
}
void loop(void) {
server.handleClient();
delay(2000);//allow the cpu to switch to other tasks
}
float readDHTTemperature() {
// Sensor readings may also be up to 2 seconds
// Read temperature as Celsius (the default)
float t = dht.readTemperature();
if (isnan(t)) {
Serial.println("Failed to read from DHT sensor!");
return -1;
}
else {
Serial.println(t);
return t;
}
}
float readDHTHumidity() {
// Sensor readings may also be up to 2 seconds
float h = dht.readHumidity();
if (isnan(h)) {
Serial.println("Failed to read from DHT sensor!");
return -1;
}
else {
Serial.println(h);
return h;
}
}Configure and Upload Code:
- First, replace
YOUR_WIFI_SSIDandYOUR_WIFI_PASSWORDwith your actual WiFi credentials - Select your ESP32 board: Tools → Board → ESP32 Arduino → (your specific board)
- Select the correct port: Tools → Port
- Click the upload button (right arrow icon)
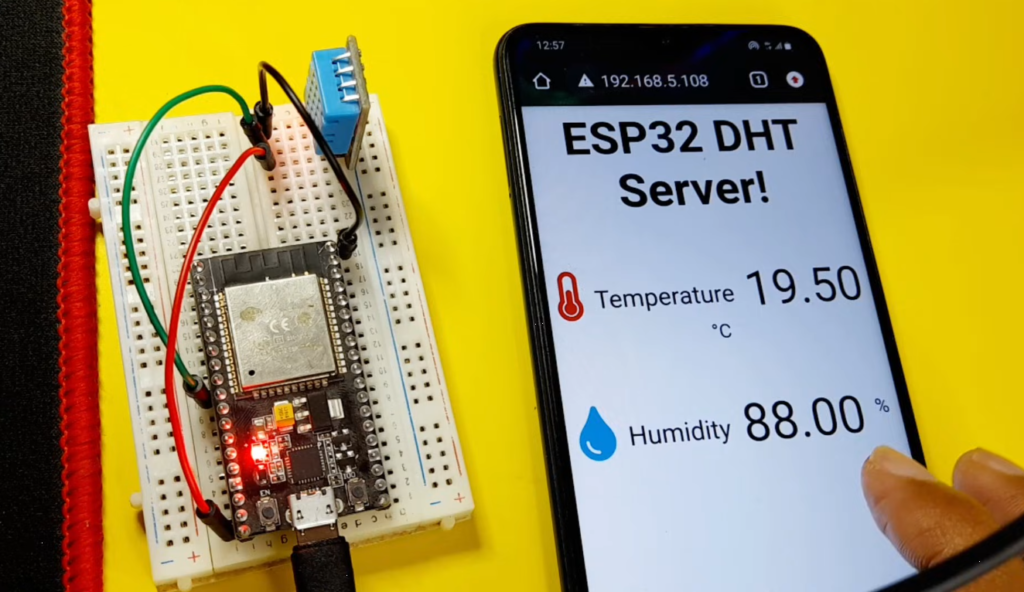
Testing Your Web Server:
- After successful upload, open the Serial Monitor (Tools → Serial Monitor)
- Set the baud rate to 115200
- You should see the ESP32 connecting to WiFi and displaying an IP address
- Copy this IP address and paste it into any web browser on your network
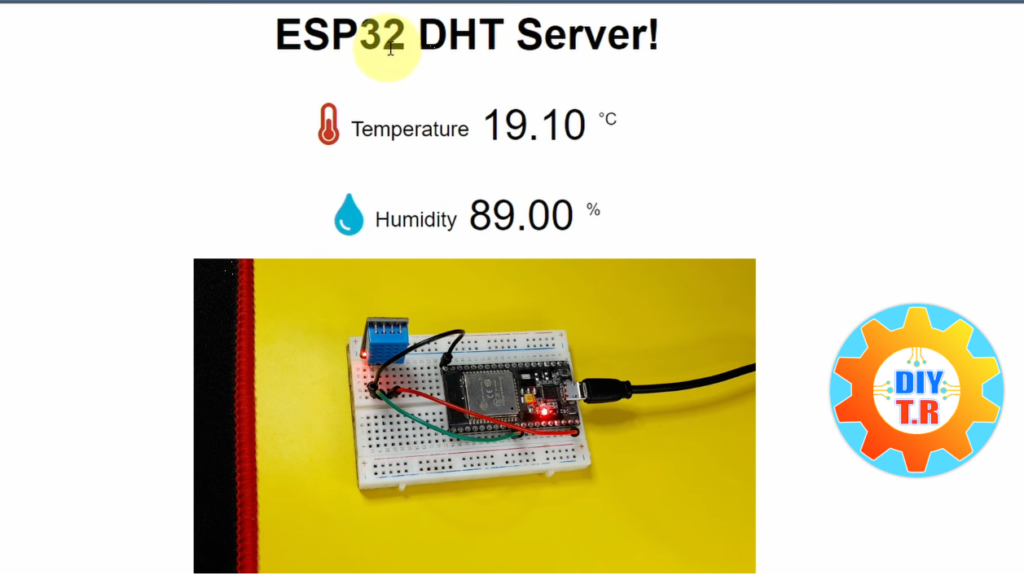
- Voilà! You should see your temperature and humidity display
📡 How the Project Works
This project combines the ESP32, DHT sensor, and a web server to display live temperature and humidity readings. Here’s a step-by-step overview:
- ESP32 connects to your WiFi network – This allows your device to communicate with other devices on the same network.
- The DHT sensor reads temperature & humidity – The sensor collects environmental data in real-time.
- ESP32 hosts a local web server – This web server runs on the ESP32, waiting for requests from a browser.
- Browser requests data from ESP32 – You open a browser and access the ESP32’s IP address to fetch the data.
- Web page displays live sensor readings – The browser shows the current temperature and humidity, updated whenever you refresh the page (or automatically if using JavaScript).
What’s Special About This Project?
Unlike basic ESP32 web servers that require you to remember an IP address (like
192.168.1.100), our system will be accessible athttp://esp32.localfrom any device on your local network. No more searching through router logs or using a serial monitor to find your ESP32’s IP address!Why Use mDNS in IoT Projects?
- No IP Address Hunting: Access your ESP32 by a memorable name
- Dynamic IP Friendly: Works even if your router assigns different IPs
- Professional Feel: Makes your project feel more polished
- Easy Network Integration: Works with most modern operating systems
- Zero Configuration: No router settings to change
💡 Tip: Later, you can enhance the page to display charts for a smoother experience.
🧠 Code Explanation (More Detailed):
This code turns your ESP32 into a web server that displays live temperature and humidity from a DHT sensor.
1️⃣ Include Libraries
#include <WiFi.h>
#include <WiFiClient.h>
#include <WebServer.h>
#include <ESPmDNS.h>
#include <DHT.h>
- WiFi.h / WiFiClient.h → Connects ESP32 to WiFi and handles network communication.
- WebServer.h → Creates a local web server on the ESP32.
- ESPmDNS.h → Allows you to access the ESP32 using
http://esp32.local - DHT.h → Reads data from the DHT sensor (temperature & humidity).
2️⃣ WiFi Credentials
const char *ssid = "Your-Network";
const char *password = "YOUR-PASSWORD";
Replace these with your WiFi name and password. ESP32 uses this to connect to your network.
3️⃣ Server and DHT Initialization
WebServer server(80); // Creates a web server on port 80
DHT dht(26, DHT11);   // DHT sensor connected to GPIO 26, type DHT11
WebServer server(80)→ ESP32 will listen for requests on port 80 (default for HTTP).DHT dht(26, DHT11)→ Connects the DHT11 sensor to pin 26.
4️⃣ Handling the Web Page
void handleRoot() {
  char msg[1500];

  snprintf(msg, 1500,
           "<html> ... </html>",
           readDHTTemperature(), readDHTHumidity()
          );
  server.send(200, "text/html", msg);
}
handleRoot()→ Function called when someone visits the root URL (/) of your ESP32.snprintf()→ Inserts the live temperature and humidity values into an HTML template.server.send(200, "text/html", msg)→ Sends the HTML page to the browser.
HTML Details:
<meta http-equiv='refresh' content='4'/>→ Auto-refresh page every 4 seconds.<i class='fas fa-thermometer-half'>→ Uses Font Awesome icons for a nice visual.- The placeholders
%.2fare replaced by temperature and humidity values from the sensor.
5️⃣ Setup Function
void setup(void) {
  Serial.begin(115200);
  dht.begin();

  WiFi.mode(WIFI_STA);
  WiFi.begin(ssid, password);

  while (WiFi.status() != WL_CONNECTED) {
    delay(500);
    Serial.print(".");
  }

  Serial.println(WiFi.localIP());

  if (MDNS.begin("esp32")) {
    Serial.println("MDNS responder started");
  }
  server.on("/", handleRoot);

  server.begin();
  Serial.println("HTTP server started");
}
Serial.begin(115200)→ Opens the serial monitor for debugging.dht.begin()→ Initializes the DHT sensor.WiFi.mode(WIFI_STA)→ Sets ESP32 as a station to connect to WiFi.WiFi.begin(ssid, password)→ Starts connecting to WiFi.MDNS.begin("esp32")→ Optional: access ESP32 ashttp://esp32.local.server.on("/", handleRoot)→ Assigns the root URL/to the functionhandleRoot().server.begin()→ Starts the web server.
6️⃣ Loop Function
void loop(void) {
  server.handleClient();
  delay(2000);
}
server.handleClient()→ Checks if a browser has requested the page and responds.delay(2000)→ Tiny pause to allow ESP32 to handle other background tasks.
7️⃣ Reading Sensor Data
Temperature:
float readDHTTemperature() {
  float t = dht.readTemperature();
  if (isnan(t)) {
    Serial.println("Failed to read from DHT sensor!");
    return -1;
  }
  else {
    Serial.println(t);
    return t;
  }
}
dht.readTemperature()→ Reads the temperature in Celsius.isnan(t)→ Checks if the reading failed. Returns -1 if it fails.Serial.println(t)→ Prints the temperature to the serial monitor for debugging.
Humidity:
float readDHTHumidity() {
  float h = dht.readHumidity();
  if (isnan(h)) {
    Serial.println("Failed to read from DHT sensor!");
    return -1;
  }
  else {
    Serial.println(h);
    return h;
  }
}
- Works the same way as temperature, but reads humidity.
✅ Conclusion
Congratulations! You’ve successfully built an ESP32 temperature and humidity web server. This project demonstrates the core concepts of IoT: sensor data collection, microcontroller programming, and web server hosting.
The skills you’ve learned here form the foundation for countless other IoT projects. From here, you could expand to monitoring multiple sensors, controlling devices based on conditions, or even creating a complete home automation system.
Remember to experiment with the code, try different sensors, and customize the web interface to match your style. The ESP32 is a remarkably versatile platform, and you’ve just scratched the surface of what it can do!