Voice-Controlled Smart Lamp using ESP32 and Alexa
Have you ever wanted to control your lights with just your voice?
Yes, it’s possible, and I’ll show you how to create a voice-controlled smart lamp using an ESP32 microcontroller and an Amazon Echo Dot.
Introduction
Smart homes are becoming more popular every day, and one of the easiest and most useful projects you can build is a voice-controlled smart lamp. In this Guide, we will use an ESP32 and an Amazon Alexa to turn a lamp ON and OFF using voice commands.
This project is beginner-friendly and perfect if you want to learn:
- How ESP32 connects to Wi‑Fi
- How voice assistants like Alexa work with IoT devices
- How to control real-world hardware using cloud services
By the end of this guide, you’ll have your own smart lamp that responds to commands like:
“Alexa, turn on the lamp.”
What You’ll Need?
Hardware Components
- ESP32 Development Board – The brain of our smart lamp
- Amazon Echo Dot (3rd, 4th or 5th generation)
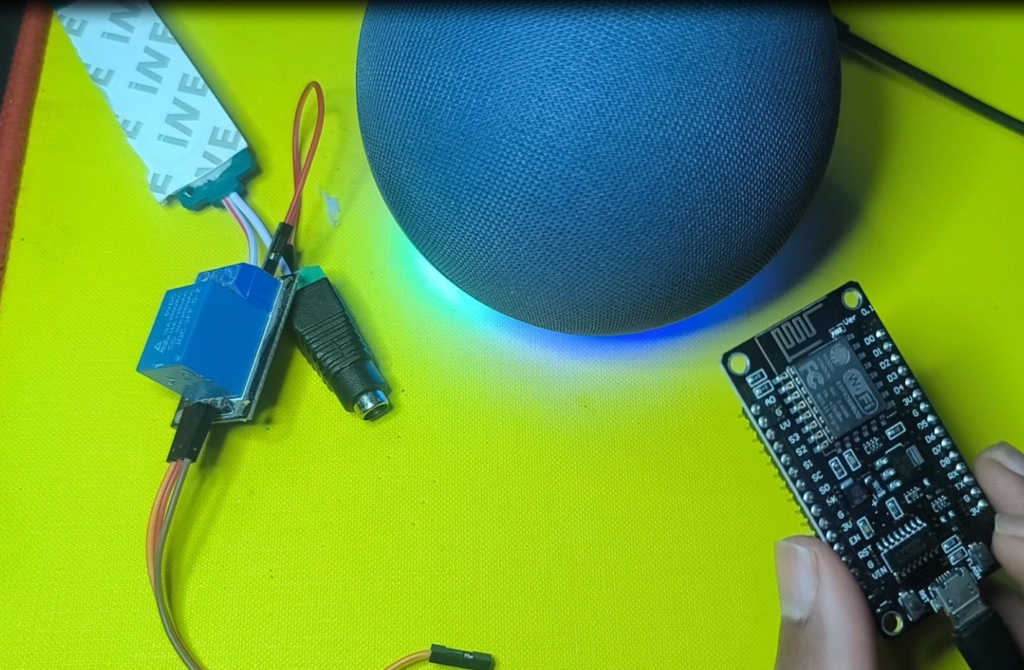
- 5V Relay Module – To safely control the lamp
- Table Lamp – Any standard lamp will work
- Jumper Wires – Male-to-female and male-to-male
- Breadboard – For prototyping
- USB Cable – To program the ESP32
- 5V Power Supply – For the ESP32
🧠 If you’re serious about learning IoT, a complete ESP32 Starter Kit is the fastest and smartest way to get started—perfect for beginners and makers.
⚠️ Warning: Mains voltage is dangerous. If you are not experienced, ask for help or use a low‑voltage lamp module.
Software Requirements
- Arduino IDE with ESP32 support
- ESP Alexa Library
- Alexa App for Setup
Step-by-Step Guide
Step 1: Install Arduino IDE with ESP32 Support
- Download Arduino IDE from arduino.cc
- Add ESP32 board support:
- Go to File → Preferences
- Add this URL to Additional Boards Manager URLs: http://arduino.esp8266.com/stable/package_esp8266com_index.json, https://raw.githubusercontent.com/espressif/arduino-esp32/gh-pages/package_esp32_index.json
- Install the ESP32/ESP8266 board from the Boards Manager
Step 2: Install Required Libraries
Open Arduino IDE and install these libraries via Library Manager:
- ESP Alexa by Christian Schwinne
- ArduinoJson by Benoit Blanchon
Step 3: Circuit Diagrams
Our code works with the ESP32 Board:
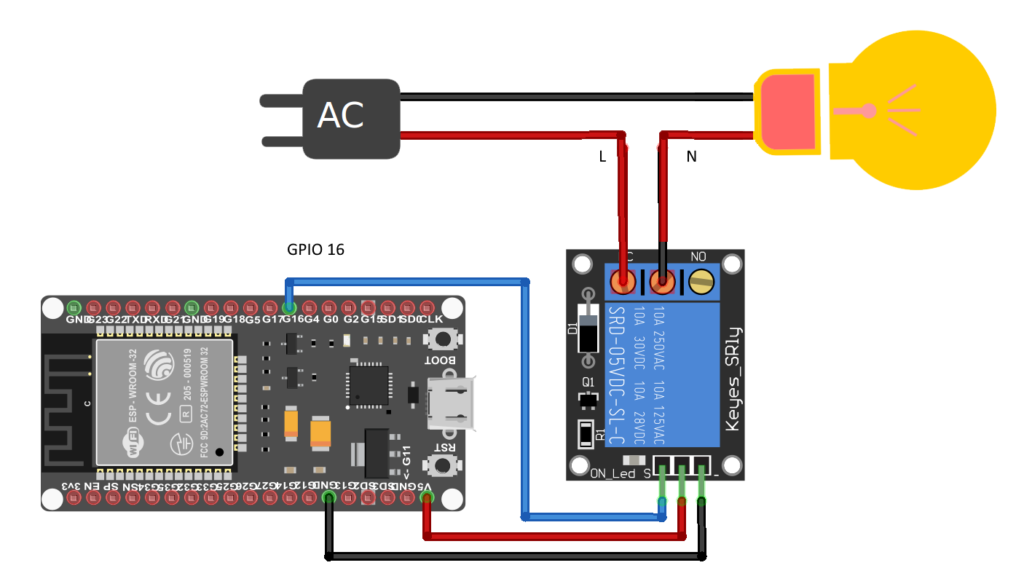
ESP32 to Relay
- Relay IN → ESP32 GPIO 16
- Relay VCC → ESP32 5V (or 3.3V if supported)
- Relay GND → ESP32 GND
Relay to Lamp
- Live wire → COM terminal of relay
- NO terminal → Lamp live input
- Neutral wire → Directly to lamp
When the relay turns ON, the circuit closes and the lamp lights up.
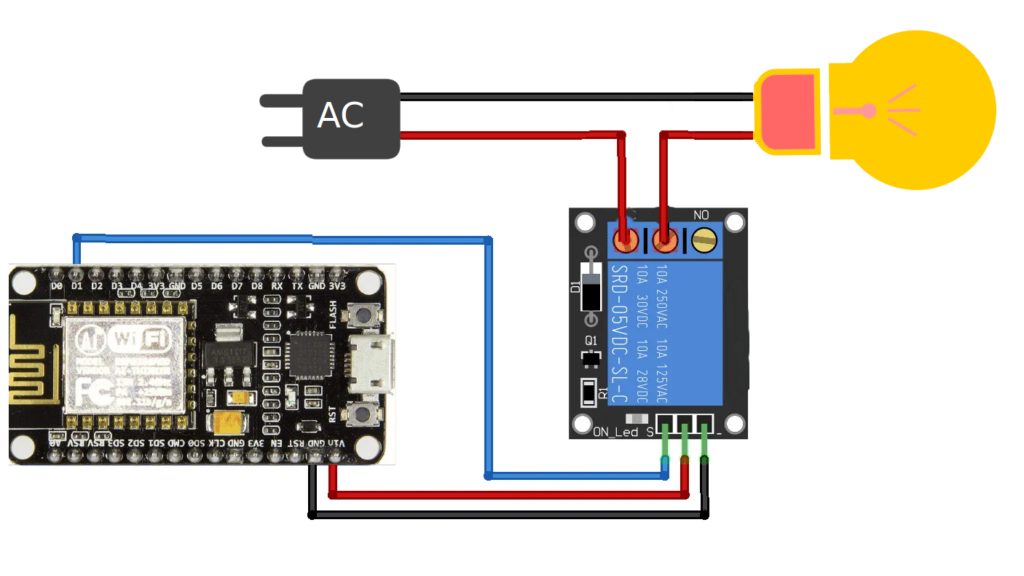
And it works with the ESP8266:
Step 4: Complete Smart Lamp Code
Here’s the complete code for our voice-controlled lamp:
cpp
#ifdef ARDUINO_ARCH_ESP32
#include <WiFi.h>
#else
#include <ESP8266WiFi.h>
#endif
#include <Espalexa.h>

const char* ssid = "YOUR_WIFI_SSID";         // Replace with your Wi-Fi SSID
const char* password = "YOUR_WIFI_PASSWORD"; // Replace with your Wi-Fi password

Espalexa espalexa; // Create an instance of the Espalexa class
bool lampState = false; // Current state of the lamp
const int relayPin = 16; // Replace relay Pin Here !Use D1 for ESP8266

void lampControl(uint8_t brightness) {
  lampState = brightness == 255;
  digitalWrite(relayPin, lampState ? HIGH : LOW); // Control the relay
}

void addDevices(){
  // Define your devices here.
  espalexa.addDevice("lamp", lampControl);
  espalexa.begin();
}

void setup() {
  Serial.begin(9600);

  WiFi.mode(WIFI_STA);
  WiFi.begin(ssid, password);
  while (WiFi.status() != WL_CONNECTED) {
    delay(500);
    Serial.print(".");
  }
  Serial.println("Connected to Wi-Fi");
  Serial.print("IP Address: ");
  Serial.println(WiFi.localIP());
  pinMode(relayPin, OUTPUT);
  digitalWrite(relayPin, LOW); // Ensure the relay is off initially

  addDevices();
}

void loop() {
  espalexa.loop(); // Keep the library running
  delay(2);
}
Step 5: Upload and Configure
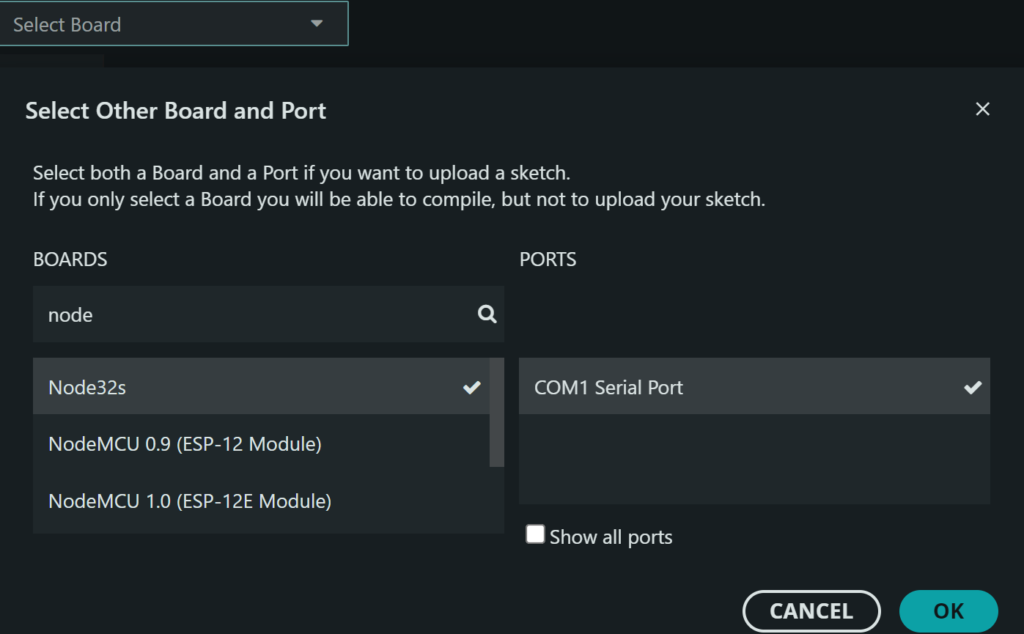
- Select the correct board: ESP32 or ESP8266 Dev Module
- Choose the correct COM port
- Upload the code to your ESP Board
- Open Serial Monitor (115200 baud) to see the IP address
Step 6: Connect with Alexa
- Open the Amazon Alexa app on your phone
- Go to Devices → + → Add Device
- Select Other → Discover Devices
- Wait for Alexa to find your “Smart Lamp”
- The device will appear in your Alexa app
Step 7: Testing Your Smart Lamp
- Ensure the ESP32 is powered on and connected to Wi‑Fi.
- Make sure your lamp is plugged in and the relay is properly wired.
- Open the Alexa app and confirm that your smart lamp is listed as a device.
- Say: “Alexa, turn on the lamp”
- You should hear a click from the relay.
- The lamp should turn ON immediately.
- Check that the Alexa app shows the device status as ON

Say: “Alexa, turn off the lamp”
- The relay should click again.
- The lamp should turn OFF immediately.
- Confirm in the Alexa app that the status updates to OFF.
If the lamp does not respond:
- Check the Wi-Fi connection of ESP32.
- Ensure that the correct Device ID is used in the code.
- Verify the relay connections.
Optionally, try using the Alexa app control button to toggle the lamp and confirm that the relay reacts correctly.
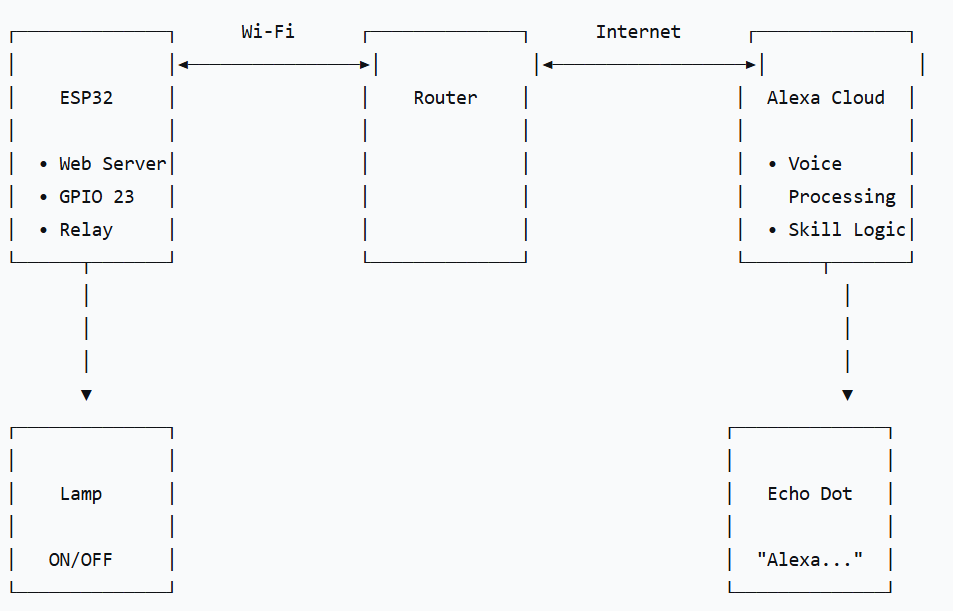
How the System Works?
Alexa itself does not talk directly to the ESP32. Instead, the communication happens like this:
- You give a voice command to Alexa
- Alexa sends the command to the Alexa cloud
- A smart home service (like Sinric Pro) sends the command to your ESP32 over Wi‑Fi
- The ESP32 switches a relay module ON or OFF
- The relay controls the lamp
This approach avoids complex Alexa skill development and makes the project much easier.
Conclusion
Congratulations! You’ve just created your first voice-controlled smart device. This project demonstrates the core principles of IoT home automation that we discussed in my first blog post. Remember how we talked about starting simple?
Well, you’ve now taken those basic concepts and applied them to create something truly useful!
If you missed that first guide, check out Our First Smart Home: A Beginner’s Guide, where I cover the fundamentals of home automation, choosing the right platform, and safety considerations. This lamp project is the perfect next step from those basics.
Share your creation! Tag your projects on social media with #ESPSmartLamp and let me know what improvements you’ve made!
Happy Making! 🛠️💡
Disclaimer: This project involves working with electricity. Always take proper safety precautions and consult a professional if unsure about any steps.
What’s Next?
- Add multiple relays for different appliances
- Implement scheduling with time-based automation
- Add temperature or motion sensors
- Create scenes (like “Movie Mode” that dims the lights)